HP 450c Service Manual - Page 82
Nozzles not printing Nozzles Out, Nozzles misdirected, Nozzles Problem 1, Corrective Action
 |
View all HP 450c manuals
Add to My Manuals
Save this manual to your list of manuals |
Page 82 highlights
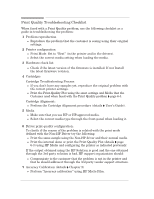
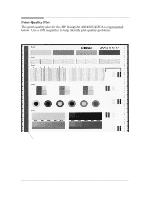
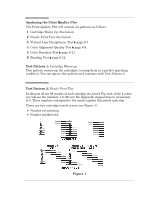
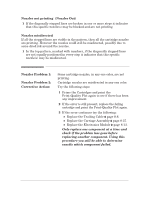
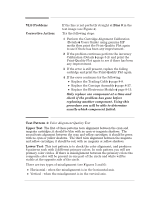
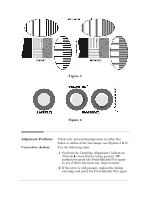
Nozzles not printing (Nozzles Out) 1 If the diagonally stepped lines are broken in one or more steps it indicates that this specific nozzle(s) may be blocked and are not printing. Nozzles misdirected If all the stepped lines are visible in the pattern, then all the cartridge nozzles are printing. However the nozzles could still be misdirected, possibly due to some dried ink around the nozzles. 1 In the top pattern, marked with numbers, if the diagonally stepped lines are not equally positioned in every step it indicates that this specific nozzle(s) may be misdirected. Nozzles Problem 1: Nozzles Problem 2: Corrective Action: Some cartridge nozzles, in any one color, are not printing. Cartridge nozzles are misdirected in any one color. Try the following steps: 1 Prime the Cartridges and print the PrintĆQuality Plot again to see if there has been any improvement. 2 If the error is still present, replace the failing cartridge and print the PrintĆQuality Plot again. 3 If the error continues try the following: D Replace the Trailing Cable ' page 8Ć8. D Replace the Carriage Assembly ' page 8Ć37. D Replace the Electronics Module ' page 8Ć13. Only replace one component at a time and check if the problem has gone before replacing another component. Using this procedure you will be able to determine exactly which component failed. 6-6 HP DesignJet 430, 450C and 455CA Printers Print Quality
-
 1
1 -
2
-
3
-
4
-
5
-
6
-
7
-
8
-
9
-
10
-
11
-
12
-
13
-
14
-
15
-
16
-
17
-
18
-
19
-
20
-
21
-
22
-
23
-
24
-
25
-
26
-
27
-
28
-
29
-
30
-
31
-
32
-
33
-
34
-
35
-
36
-
37
-
38
-
39
-
40
-
41
-
42
-
43
-
44
-
45
-
46
-
47
-
48
-
49
-
50
-
51
-
52
-
53
-
54
-
55
-
56
-
57
-
58
-
59
-
60
-
61
-
62
-
63
-
64
-
65
-
66
-
67
-
68
-
69
-
70
-
71
-
72
-
73
-
74
-
75
-
76
-
 77
77 -
 78
78 -
 79
79 -
 80
80 -
 81
81 -
 82
82 -
 83
83 -
 84
84 -
 85
85 -
 86
86 -
 87
87 -
88
-
89
-
90
-
91
-
92
-
93
-
94
-
95
-
96
-
97
-
98
-
99
-
100
-
101
-
102
-
103
-
104
-
105
-
106
-
107
-
108
-
109
-
110
-
111
-
112
-
113
-
114
-
115
-
116
-
117
-
118
-
119
-
120
-
121
-
122
-
123
-
124
-
125
-
126
-
127
-
128
-
129
-
130
-
131
-
132
-
133
-
134
-
135
-
136
-
137
-
138
-
139
-
140
-
141
-
142
-
143
-
144
-
145
-
146
-
147
-
148
-
149
-
150
-
151
-
152
-
153
-
154
-
155
-
156
-
157
-
158
-
159
-
160
-
161
-
162
-
163
-
164
-
165
-
166
-
167
-
168
-
169
-
170
-
171
-
172
-
173
-
174
-
175
-
176
-
177
-
178
-
179
-
180
-
181
-
182
-
183
-
184
-
185
-
186
-
187
-
188
-
189
-
190
-
191
-
192
-
193
-
194
-
195
-
196
-
197
-
198
-
199
-
200
-
201
-
202
-
203
-
204
-
205
-
206
-
207
-
208
 |
 |