HP 450c Service Manual - Page 172
Removing the Overdrive Assembly including the Overdrive, Roller, Media Separator
 |
View all HP 450c manuals
Add to My Manuals
Save this manual to your list of manuals |
Page 172 highlights
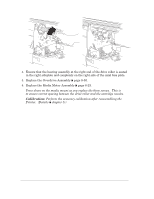
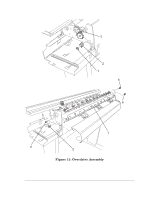
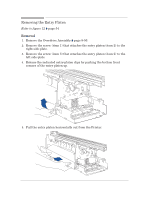
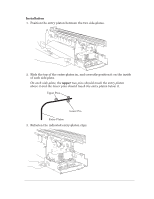
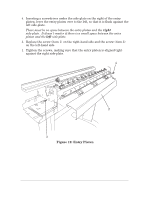
Removing the Overdrive Assembly (including the Overdrive Roller, Media Separator, Media Deflectors and Media Sensor) Refer to figure 11 ' page 51. Removal 1. Remove the Spittoon ' page 8Ć20. 2. Remove the Primer Assembly ' page 8Ć25. 3. Remove the Service Station ' page 8Ć26. 4. Disconnect the mediaĆsensor cable from the main PCA (connector labeled MEDIA). 5. Remove the clutch retaining ring (item 1) that secures the overdrive clutch (item 2) to the overdrive roller (item 3). 6. Slide the overdrive clutch (item 2) to the left and remove it from the overdrive roller (item 3). 7. Remove two screws (item 4) from the right side of the printer and one screw (item 5) from the left side. 8. Loosen one screw (item 6) on the left side, but do not remove it. 9. Lift the complete Overdrive Assembly (item 7) (which includes the overdrive roller, media separator, media deflectors and media sensor) from the printer. 8-50 HP DesignJet 430, 450C and 455CA Printers Removal and Installation
-
 1
1 -
2
-
3
-
4
-
5
-
6
-
7
-
8
-
9
-
10
-
11
-
12
-
13
-
14
-
15
-
16
-
17
-
18
-
19
-
20
-
21
-
22
-
23
-
24
-
25
-
26
-
27
-
28
-
29
-
30
-
31
-
32
-
33
-
34
-
35
-
36
-
37
-
38
-
39
-
40
-
41
-
42
-
43
-
44
-
45
-
46
-
47
-
48
-
49
-
50
-
51
-
52
-
53
-
54
-
55
-
56
-
57
-
58
-
59
-
60
-
61
-
62
-
63
-
64
-
65
-
66
-
67
-
68
-
69
-
70
-
71
-
72
-
73
-
74
-
75
-
76
-
77
-
78
-
79
-
80
-
81
-
82
-
83
-
84
-
85
-
86
-
87
-
88
-
89
-
90
-
91
-
92
-
93
-
94
-
95
-
96
-
97
-
98
-
99
-
100
-
101
-
102
-
103
-
104
-
105
-
106
-
107
-
108
-
109
-
110
-
111
-
112
-
113
-
114
-
115
-
116
-
117
-
118
-
119
-
120
-
121
-
122
-
123
-
124
-
125
-
126
-
127
-
128
-
129
-
130
-
131
-
132
-
133
-
134
-
135
-
136
-
137
-
138
-
139
-
140
-
141
-
142
-
143
-
144
-
145
-
146
-
147
-
148
-
149
-
150
-
151
-
152
-
153
-
154
-
155
-
156
-
157
-
158
-
159
-
160
-
161
-
162
-
163
-
164
-
165
-
166
-
 167
167 -
 168
168 -
 169
169 -
 170
170 -
 171
171 -
 172
172 -
 173
173 -
 174
174 -
 175
175 -
 176
176 -
 177
177 -
178
-
179
-
180
-
181
-
182
-
183
-
184
-
185
-
186
-
187
-
188
-
189
-
190
-
191
-
192
-
193
-
194
-
195
-
196
-
197
-
198
-
199
-
200
-
201
-
202
-
203
-
204
-
205
-
206
-
207
-
208
 |
 |