HP CP6015dn HP Color LaserJet CP6015 Series - User Guide - Page 162
Set the real-time clock, attached to stored print, so you can identify the most recent versions.
 |
UPC - 883585363018
View all HP CP6015dn manuals
Add to My Manuals
Save this manual to your list of manuals |
Page 162 highlights
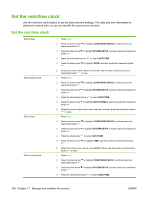
Set the real-time clock Use the real-time clock feature to set the date and time settings. The date and time information is attached to stored print, so you can identify the most recent versions. Set the real-time clock Set the date Set the date format Set the time Set the time format 1. Press Menu. 2. Press the down arrow to highlight CONFIGURE DEVICE, and then press the checkmark button . 3. Press the down arrow to highlight SYSTEM SETUP, and then press the checkmark button . 4. Press the checkmark button to select DATE/TIME. 5. Press the down arrow to highlight DATE, and then press the checkmark button . 6. Select the correct month, date of the month, and the year, and then press the checkmark button to save. 1. Press Menu. 2. Press the down arrow to highlight CONFIGURE DEVICE, and then press the checkmark button . 3. Press the down arrow to highlight SYSTEM SETUP, and then press the checkmark button . 4. Press the checkmark button to select DATE/TIME. 5. Press the down arrow to highlight DATE FORMAT, and then press the checkmark button . 6. Select the month, date of the month, and year, and then press the checkmark button to save. 1. Press Menu. 2. Press the down arrow to highlight CONFIGURE DEVICE, and then press the checkmark button . 3. Press the down arrow to highlight SYSTEM SETUP, and then press the checkmark button . 4. Press the checkmark to select DATE/TIME. 5. Press the down arrow to highlight TIME, and then press the checkmark button . 6. Select the correct hour, minute, and AM/PM setting, and then press the checkmark button to save. 1. Press Menu. 2. Press the down arrow to highlight CONFIGURE DEVICE, and then press the checkmark button . 3. Press the down arrow to highlight SYSTEM SETUP, and then press the checkmark button . 4. Press the checkmark button to select DATE/TIME. 148 Chapter 11 Manage and maintain the product ENWW
-
 1
1 -
2
-
3
-
4
-
5
-
6
-
7
-
8
-
9
-
10
-
11
-
12
-
13
-
14
-
15
-
16
-
17
-
18
-
19
-
20
-
21
-
22
-
23
-
24
-
25
-
26
-
27
-
28
-
29
-
30
-
31
-
32
-
33
-
34
-
35
-
36
-
37
-
38
-
39
-
40
-
41
-
42
-
43
-
44
-
45
-
46
-
47
-
48
-
49
-
50
-
51
-
52
-
53
-
54
-
55
-
56
-
57
-
58
-
59
-
60
-
61
-
62
-
63
-
64
-
65
-
66
-
67
-
68
-
69
-
70
-
71
-
72
-
73
-
74
-
75
-
76
-
77
-
78
-
79
-
80
-
81
-
82
-
83
-
84
-
85
-
86
-
87
-
88
-
89
-
90
-
91
-
92
-
93
-
94
-
95
-
96
-
97
-
98
-
99
-
100
-
101
-
102
-
103
-
104
-
105
-
106
-
107
-
108
-
109
-
110
-
111
-
112
-
113
-
114
-
115
-
116
-
117
-
118
-
119
-
120
-
121
-
122
-
123
-
124
-
125
-
126
-
127
-
128
-
129
-
130
-
131
-
132
-
133
-
134
-
135
-
136
-
137
-
138
-
139
-
140
-
141
-
142
-
143
-
144
-
145
-
146
-
147
-
148
-
149
-
150
-
151
-
152
-
153
-
154
-
155
-
156
-
 157
157 -
 158
158 -
 159
159 -
 160
160 -
 161
161 -
 162
162 -
 163
163 -
 164
164 -
 165
165 -
 166
166 -
 167
167 -
168
-
169
-
170
-
171
-
172
-
173
-
174
-
175
-
176
-
177
-
178
-
179
-
180
-
181
-
182
-
183
-
184
-
185
-
186
-
187
-
188
-
189
-
190
-
191
-
192
-
193
-
194
-
195
-
196
-
197
-
198
-
199
-
200
-
201
-
202
-
203
-
204
-
205
-
206
-
207
-
208
-
209
-
210
-
211
-
212
-
213
-
214
-
215
-
216
-
217
-
218
-
219
-
220
-
221
-
222
-
223
-
224
-
225
-
226
-
227
-
228
-
229
-
230
-
231
-
232
-
233
-
234
-
235
-
236
-
237
-
238
-
239
-
240
-
241
-
242
-
243
-
244
-
245
-
246
-
247
-
248
-
249
-
250
-
251
-
252
-
253
-
254
-
255
-
256
-
257
-
258
-
259
-
260
-
261
-
262
-
263
-
264
-
265
-
266
-
267
-
268
-
269
-
270
-
271
-
272
-
273
-
274
-
275
-
276
-
277
-
278
-
279
-
280
-
281
-
282
-
283
-
284
-
285
-
286
-
287
-
288
-
289
-
290
-
291
-
292
-
293
-
294
-
295
-
296
-
297
-
298
-
299
-
300
-
301
-
302
-
303
-
304
-
305
-
306
-
307
-
308
 |
 |
