HP CP6015dn HP Color LaserJet CP6015 Series - User Guide - Page 36
Print Quality menu, To display, CON DEVICE
 |
UPC - 883585363018
View all HP CP6015dn manuals
Add to My Manuals
Save this manual to your list of manuals |
Page 36 highlights
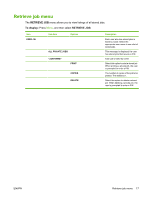
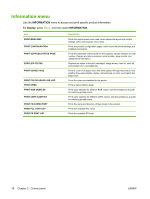
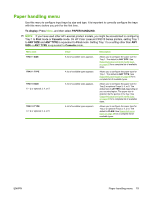
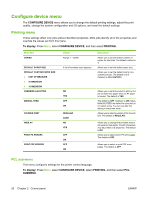
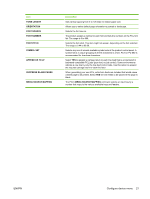
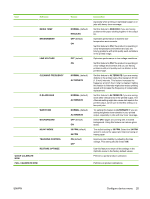
Print Quality menu To display: Press Menu, select CONFIGURE DEVICE, and then select PRINT QUALITY. Item ADJUST COLOR SET REGISTRATION Sub-item HIGHLIGHTS ● CYAN DENSITY ● MAGNETA DENSITY ● YELLOW DENSITY ● BLACK DENSITY MIDTONES ● CYAN DENSITY ● MAGNETA DENSITY ● YELLOW DENSITY ● BLACK DENSITY SHADOWS ● CYAN DENSITY ● MAGNETA DENSITY ● YELLOW DENSITY ● BLACK DENSITY RESTORE COLOR VALUES PRINT TEST PAGE SOURCE ADJUST TRAY ● X1 SHIFT ● X2 SHIFT ● Y SHIFT Values Description Range from +5 to -5. Default is 0. Adjust the darkness or lightness of highlights on a printed page. Lower values represent lighter highlights on a printed page, and higher values represent darker highlights on a printed page. Range from +5 to -5. Default is 0. Adjust the darkness or lightness of midtones on a printed page. Lower values represent lighter midtones on a printed page, and higher values represent darker midtones on a printed page. Range from +5 to -5. Default is 0. Adjust the darkness or lightness of shadows on a printed page. Lower values represent lighter shadows on a printed page, and higher values represent darker shadows on a printed page. Restore the color settings by resetting the density values of each color. Setting the registration shifts the margin alignment to center the image on the page from top to bottom and from left to right. You can also align the image on the front with the image printed on the back. Print a test page for setting the registration. ALL TRAYS TRAY 1 Select the source input tray for printing the SET REGISTRATION test page. TRAY 2 TRAY (X = 3, 4, or 5) Shift from -20 to 20 along the X or Y axes. 0 is the default. Perform the alignment procedure for each tray. When it creates an image, the product scans across the page from side to side as the sheet feeds from top to bottom into the product. The scan direction is referred to as X. X1 is the scan direction for the first side of a 2-sided page. X2 is the scan direction for the second side of a 2sided page. The feed direction is referred to as Y. 22 Chapter 2 Control panel ENWW
-
 1
1 -
2
-
3
-
4
-
5
-
6
-
7
-
8
-
9
-
10
-
11
-
12
-
13
-
14
-
15
-
16
-
17
-
18
-
19
-
20
-
21
-
22
-
23
-
24
-
25
-
26
-
27
-
28
-
29
-
30
-
 31
31 -
 32
32 -
 33
33 -
 34
34 -
 35
35 -
 36
36 -
 37
37 -
 38
38 -
 39
39 -
 40
40 -
 41
41 -
42
-
43
-
44
-
45
-
46
-
47
-
48
-
49
-
50
-
51
-
52
-
53
-
54
-
55
-
56
-
57
-
58
-
59
-
60
-
61
-
62
-
63
-
64
-
65
-
66
-
67
-
68
-
69
-
70
-
71
-
72
-
73
-
74
-
75
-
76
-
77
-
78
-
79
-
80
-
81
-
82
-
83
-
84
-
85
-
86
-
87
-
88
-
89
-
90
-
91
-
92
-
93
-
94
-
95
-
96
-
97
-
98
-
99
-
100
-
101
-
102
-
103
-
104
-
105
-
106
-
107
-
108
-
109
-
110
-
111
-
112
-
113
-
114
-
115
-
116
-
117
-
118
-
119
-
120
-
121
-
122
-
123
-
124
-
125
-
126
-
127
-
128
-
129
-
130
-
131
-
132
-
133
-
134
-
135
-
136
-
137
-
138
-
139
-
140
-
141
-
142
-
143
-
144
-
145
-
146
-
147
-
148
-
149
-
150
-
151
-
152
-
153
-
154
-
155
-
156
-
157
-
158
-
159
-
160
-
161
-
162
-
163
-
164
-
165
-
166
-
167
-
168
-
169
-
170
-
171
-
172
-
173
-
174
-
175
-
176
-
177
-
178
-
179
-
180
-
181
-
182
-
183
-
184
-
185
-
186
-
187
-
188
-
189
-
190
-
191
-
192
-
193
-
194
-
195
-
196
-
197
-
198
-
199
-
200
-
201
-
202
-
203
-
204
-
205
-
206
-
207
-
208
-
209
-
210
-
211
-
212
-
213
-
214
-
215
-
216
-
217
-
218
-
219
-
220
-
221
-
222
-
223
-
224
-
225
-
226
-
227
-
228
-
229
-
230
-
231
-
232
-
233
-
234
-
235
-
236
-
237
-
238
-
239
-
240
-
241
-
242
-
243
-
244
-
245
-
246
-
247
-
248
-
249
-
250
-
251
-
252
-
253
-
254
-
255
-
256
-
257
-
258
-
259
-
260
-
261
-
262
-
263
-
264
-
265
-
266
-
267
-
268
-
269
-
270
-
271
-
272
-
273
-
274
-
275
-
276
-
277
-
278
-
279
-
280
-
281
-
282
-
283
-
284
-
285
-
286
-
287
-
288
-
289
-
290
-
291
-
292
-
293
-
294
-
295
-
296
-
297
-
298
-
299
-
300
-
301
-
302
-
303
-
304
-
305
-
306
-
307
-
308
 |
 |