Kyocera KM-C3232E C2525E/C3225E/C3232E/C4035E Operation Guide (Basic)
Kyocera KM-C3232E Manual
 |
View all Kyocera KM-C3232E manuals
Add to My Manuals
Save this manual to your list of manuals |
Kyocera KM-C3232E manual content summary:
- Kyocera KM-C3232E | C2525E/C3225E/C3232E/C4035E Operation Guide (Basic) - Page 1
C2525E C3225E C3232E C4035E Operation Guide Please read the Operation Guide before using this machine. Keep it close to the machine for easy reference. - Kyocera KM-C3232E | C2525E/C3225E/C3232E/C4035E Operation Guide (Basic) - Page 2
model, C3225E to the 32/25 ppm model, C3232E to the 32/32 ppm model and C4035E to the 40/35 ppm model. NOTE: This Operation Guide contains information . The inch versions of these machines are shown in the screens in this guide. If you are using the metric version, use the messages provided for the - Kyocera KM-C3232E | C2525E/C3225E/C3232E/C4035E Operation Guide (Basic) - Page 3
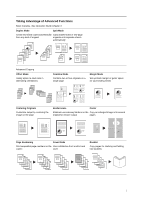
Advantage of Advanced Functions Basic Copying...See Operation Guide Chapter 3 Duplex Mode Split Mode Create two 3 2 3 1 2 3 2 1 1 3 2 1 Centering Originals Customize output by centering the image on the page Border Erase Poster Eliminate unnecessary borders on the Copy an enlarged - Kyocera KM-C3232E | C2525E/C3225E/C3232E/C4035E Operation Guide (Basic) - Page 4
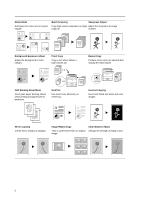
transparencies for projectors EcoPrint Use toner more efficiently as necessary Inverted Copying Invert both black and white and color images Mirror Copying Create mirror images of originals Image Repeat Copy Tiles a copied sheet with an original image Color Balance Adjust Change the strength - Kyocera KM-C3232E | C2525E/C3225E/C3232E/C4035E Operation Guide (Basic) - Page 5
Hue Adjust Adjust the color (hue) of images One Touch Image Adjust Adjust image quality to match the image Color/B&W Selection Make color and B&W copies in one operation Vivid Dull Sharp Single Color Copy Make copies in 1 other than black Programmed Copying Remember commonly used settings Job - Kyocera KM-C3232E | C2525E/C3225E/C3232E/C4035E Operation Guide (Basic) - Page 6
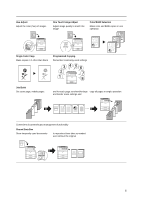
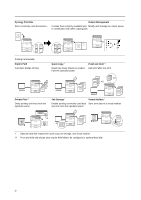
Synergy Print Box Store commonly used documents... Output Management to make them instantly available later Modify and manage the output queue in combination with other copying jobs 1 1 2 4 3 3 4 2 Printing Functionality Duplex Path Automatic duplex printing Quick Copy † Reprint as many - Kyocera KM-C3232E | C2525E/C3225E/C3232E/C4035E Operation Guide (Basic) - Page 7
Functionality Full-color Scan Scan to PC Send E-mail Make high quality scans of even color Send scanned images to a computer Send scanned images as e-mail documents as PDF or JPEG files Scan to FTP Upload scanned images to FTP server directly TWAIN Import images using a TWAIN-compliant - Kyocera KM-C3232E | C2525E/C3225E/C3232E/C4035E Operation Guide (Basic) - Page 8
Sheet Document Finisher (When equipped with a mailbox and folding unit) Job Separator Key Counter Fax Kit Memory Card (CompactFlash) Hard Disk Additional Memory Security Kit Network Interface Card Serial Interface Document Table vi - Kyocera KM-C3232E | C2525E/C3225E/C3232E/C4035E Operation Guide (Basic) - Page 9
viii • Regarding Tradenames...ix • Energy Saving Control Function...x • Automatic 2-Sided Copy Function...x • Paper Recycling...x • Energy Star (ENERGY STAR®) Program...x • Safety Conventions in This Guide...xi • Caution Labels...xii • Installation Precautions...xiii • Precautions for Use...xiv vii - Kyocera KM-C3232E | C2525E/C3225E/C3232E/C4035E Operation Guide (Basic) - Page 10
present edition. No responsibility is assumed if accidents occur while the user is following the instructions in this guide. No responsibility is assumed for defects in the printer's firmware (contents of its read-only memory). This guide, any copyrightable subject matter sold or provided with or in - Kyocera KM-C3232E | C2525E/C3225E/C3232E/C4035E Operation Guide (Basic) - Page 11
are registered trademarks of Kyocera Corporation. • KPDL is trademark of Kyocera Corporation. • Windows and Windows Server are registered trademarks of Microsoft Corporation. • Windows NT is a trademark of respective companies. The designations ™ and ® will not be used in this Operation Guide. ix - Kyocera KM-C3232E | C2525E/C3225E/C3232E/C4035E Operation Guide (Basic) - Page 12
elapses since the device was last used, as well as a Sleep Mode where printer and fax functions remain in a waiting state but power consumption is still reduced on the environment and this device supports recycled paper. Your sales or service representative can provide information about recommended - Kyocera KM-C3232E | C2525E/C3225E/C3232E/C4035E Operation Guide (Basic) - Page 13
guide and parts of the machine marked with symbols are safety warnings meant to protect the user, actions which must be performed. Specifics of the required action are indicated service representative to order a replacement if the safety warnings in this Operation Guide are illegible or if the guide - Kyocera KM-C3232E | C2525E/C3225E/C3232E/C4035E Operation Guide (Basic) - Page 14
at the following locations for safety purposes. Be sufficiently careful to avoid fire or electric shock when removing a paper jam or when replacing toner. Label 1, 2 High temperature inside. Do not touch parts in this area, because there is a danger of getting burned. NOTE: Do not remove these - Kyocera KM-C3232E | C2525E/C3225E/C3232E/C4035E Operation Guide (Basic) - Page 15
level environmental conditions may affect the image quality. It is recommended to use window or with exposure to direct sunlight. • Avoid locations with vibrations. • Avoid locations with drastic temperature fluctuations. • Avoid locations with direct exposure to hot or cold air. • Avoid poorly - Kyocera KM-C3232E | C2525E/C3225E/C3232E/C4035E Operation Guide (Basic) - Page 16
however, the machine is used over a long period of time in a poorly ventilated room or when making an extremely large number of copies, the smell short. If an earth connection is not possible, contact your service representative. Other precautions Connect the power plug to the closest outlet - Kyocera KM-C3232E | C2525E/C3225E/C3232E/C4035E Operation Guide (Basic) - Page 17
other trouble. It is therefore recommended that you consult with your service representative Do not look directly at the light from the scanning lamp as it may cause your eyes to feel attempting to move the machine. Other precautions (for users in California, the United States) This product - Kyocera KM-C3232E | C2525E/C3225E/C3232E/C4035E Operation Guide (Basic) - Page 18
to a place with fresh air and gargle thoroughly with a large amount of water. If coughing develops, contact a physician. • If you do happen to ingest toner, rinse your mouth out with water and drink 1 or 2 cups of water to dilute the contents of your stomach. If necessary, contact a physician. • If - Kyocera KM-C3232E | C2525E/C3225E/C3232E/C4035E Operation Guide (Basic) - Page 19
under IEC 60825. Caution: Performance of procedures other than those specified in this manual may result in hazardous radiation exposure. These labels are attached to the laser scanner unit inside the machine and are not in a user access area. The label shown below is attached on the right side of - Kyocera KM-C3232E | C2525E/C3225E/C3232E/C4035E Operation Guide (Basic) - Page 20
Safety Instructions Regarding the declaration relates is in conformity with the following specifications. EN55024 EN55022 Class B EN61000-3-2 EN61000-3-3 EN60950 technology used in this equipment to identify the toner container may be subject to authorization and the use of this - Kyocera KM-C3232E | C2525E/C3225E/C3232E/C4035E Operation Guide (Basic) - Page 21
the sale of laser checking the optical unit, avoid direct exposure to the laser beam, which is invisible. Shown at below is the label located on the cover of the optical unit. 4. Maintenance For safety of the service personnel, follow the maintenance instructions in the other section of this manual - Kyocera KM-C3232E | C2525E/C3225E/C3232E/C4035E Operation Guide (Basic) - Page 22
and used in accordance with the instructions, may cause harmful interference to radio the party responsible for compliance could void the user's authority to operate the equipment. This device technology used in this equipment to identify the toner container may be subject to authorization and the - Kyocera KM-C3232E | C2525E/C3225E/C3232E/C4035E Operation Guide (Basic) - Page 23
Dealer from whom the MFP was purchased. If the Kyocera Dealer is not able to provide service, write to Kyocera at the address below for the name and address of the Authorized Kyocera Dealer in your area or check Kyocera's website at www.kyoceramita.com. 4. This warranty does not cover MFPs which - Kyocera KM-C3232E | C2525E/C3225E/C3232E/C4035E Operation Guide (Basic) - Page 24
xxii - Kyocera KM-C3232E | C2525E/C3225E/C3232E/C4035E Operation Guide (Basic) - Page 25
and scanning. 4 Optional Equipment Introduces the convenient optional equipment available for this machine. 5 Maintenance Describes cleaning and toner replacement. 6 Troubleshooting Explains how to handle error messages, paper jams, and other problems. Appendix Lists the machine specifications - Kyocera KM-C3232E | C2525E/C3225E/C3232E/C4035E Operation Guide (Basic) - Page 26
, and troubleshooting. Advanced Operation Guide Explains copying, printing and scanning features in depth, as well as default settings. This guide is contained on the CD-ROM as a PDF file. Kyocera Extended Driver User Guide Explains how to install and setup the printer driver. This guide is - Kyocera KM-C3232E | C2525E/C3225E/C3232E/C4035E Operation Guide (Basic) - Page 27
Conventions in This Guide The following conventions are used depending on the nature of the description. Convention Description Example Bold Indicates a or operations for reference. NOTE: - Important Indicates items that are required or prohibited so as to avoid problems. IMPORTANT: - xxv - Kyocera KM-C3232E | C2525E/C3225E/C3232E/C4035E Operation Guide (Basic) - Page 28
Originals and Paper Sizes This section explains the notation used in this guide when referring to sizes of originals or paper sizes. As in A4 and B5, which may be used either in the horizontal or vertical direction, - Kyocera KM-C3232E | C2525E/C3225E/C3232E/C4035E Operation Guide (Basic) - Page 29
Operation Guide ... Printer ...2-22 Preparing the Scanner ...2-31 3 Basic Operation 3-1 Basic Copying Procedures ...3-2 Selecting Image Quality Network Interface Card ...4-8 Serial Interface ...4-8 Document Table ...4-8 5 Maintenance 5-1 Cleaning ...5-2 Toner Container and Waste Toner - Kyocera KM-C3232E | C2525E/C3225E/C3232E/C4035E Operation Guide (Basic) - Page 30
6 Troubleshooting 6-1 Solving Malfunctions ...6-2 Responding to Error Messages 6-4 Clearing Paper Jams ...6-15 Appendix ...Appendix-1 Specifications ...Appendix-2 Index ...Index-1 xxviii - Kyocera KM-C3232E | C2525E/C3225E/C3232E/C4035E Operation Guide (Basic) - Page 31
1 Part Names This chapter identifies machine parts and operation panel keys. • Body...1-2 • Operation Panel...1-4 • Touch Panel...1-5 1-1 - Kyocera KM-C3232E | C2525E/C3225E/C3232E/C4035E Operation Guide (Basic) - Page 32
2 10 Paper Length Guide 11 Paper Width Guide 12 Paper Width Adjusting Tab 13 Interface Cover 14 Network Interface Connector (Printer) 15 USB Interface Connector 16 Parallel Port Interface Connector 17 Memory Card (CompactFlash) Slot 18 Network Interface Connector (Scanner) 19 Main Power Switch - Kyocera KM-C3232E | C2525E/C3225E/C3232E/C4035E Operation Guide (Basic) - Page 33
22 23 31 21 Output Tray 22 Left Cover 1 23 Left Cover 2 24 Front Cover 25 Toner Container (Black) 26 Toner Container (Yellow) 27 Toner Container (Cyan) 28 Toner Container (Magenta) 29 Toner Container Lock Lever 30 Waste Toner Box 31 Carrying Handles Part Names 21 25 26 27 28 30 29 24 1-3 - Kyocera KM-C3232E | C2525E/C3225E/C3232E/C4035E Operation Guide (Basic) - Page 34
Erase 11×8½" Plain Reduce /Enlarge Exposure Mode Staple 5 Basic User choice Function Color func. Program 22 23 24 987 20 21 1 Brightness Adjustment Dial 2 Copier Key (Indicator/Lamp) 3 Printer Key (Indicator/Lamp) 4 Scanner Key (Indicator/Lamp) 5 Fax Key (Indicator/Lamp) 6 System Menu - Kyocera KM-C3232E | C2525E/C3225E/C3232E/C4035E Operation Guide (Basic) - Page 35
to copy. Select Paper Exposure Mode Orig.Image Quality Sort/ Offset Basic 2 sided/ Separation Reduce /Enlarge Margin/ Centering Border Erase User choice ( Full-Color ) Select Orig.Size Auto Selection Page # Cover Mode Function Combine Batch Scanning Poster Booklet Color func. Paper Size Set 11 - Kyocera KM-C3232E | C2525E/C3225E/C3232E/C4035E Operation Guide (Basic) - Page 36
d User choice file 1 file 2 Function Color func. Paper Size Set 11×8½" 100% Reg./Delete Combine Register Delete Margin/ Centering Sheet Erase Change Name Program Ready to print. Scanner Screen Displayed by pressing the Scanner key. Printer Menu Select scanner function. Send E-mail Scan - Kyocera KM-C3232E | C2525E/C3225E/C3232E/C4035E Operation Guide (Basic) - Page 37
the machine. • Loading Paper...2-2 • Setting Paper Type and Size for the Cassettes and MP Tray...2-7 • Placing Originals...2-16 • Language...2-20 • Connecting Cables...2-21 • Preparing the Printer...2-22 • Preparing the Scanner...2-31 2-1 - Kyocera KM-C3232E | C2525E/C3225E/C3232E/C4035E Operation Guide (Basic) - Page 38
poor image quality. If output paper curls or does not line up properly, try flipping over the paper loaded into the cassette. Avoid exposing opened paper to high temperatures and high humidity as dampness may cause copying problems 1 and 2 support standard, recycled, and colored paper. 500 sheets - Kyocera KM-C3232E | C2525E/C3225E/C3232E/C4035E Operation Guide (Basic) - Page 39
. 3 Holding the paper width adjusting tab both ends, move the paper width guide to fit the paper. NOTE: Paper sizes are marked on the cassette. When loading paper smaller than 11 × 8 1/2" or A4 into Cassette 1, raise the support lever as shown in the illustration. 4 Align the paper flush against the - Kyocera KM-C3232E | C2525E/C3225E/C3232E/C4035E Operation Guide (Basic) - Page 40
guide or length guide. Overloading may cause paper jams. Before loading the paper, be sure that it is not curled or folded. Overloading may cause paper jams. Ensure that the loaded paper does not exceed the level color copies, use special color paper for best results. Do not use inkjet printer - Kyocera KM-C3232E | C2525E/C3225E/C3232E/C4035E Operation Guide (Basic) - Page 41
jams. Ensure that the loaded paper does not exceed the level indicated. Preparation for Usage 3 Gently push the cassette back 50 sheets 10 sheets IMPORTANT: When making color copies, use special color paper for best results. Do not use inkjet printer paper or paper with special surface coatings - Kyocera KM-C3232E | C2525E/C3225E/C3232E/C4035E Operation Guide (Basic) - Page 42
out the paper. The paper may not be fed depending on the paper quality. To print on both the front and back side of the post card, paper in the MP tray. Ensure that the loaded paper does not exceed the level indicated. Overloading may cause paper jams. When loading envelopes, place with the envelope - Kyocera KM-C3232E | C2525E/C3225E/C3232E/C4035E Operation Guide (Basic) - Page 43
, Folio, 8K, 16K, 16KR 1 Press the System Menu/Counter key. 2 Press the [Machine Default] key. System Menu / Counter System Menu Copy Default Scanner Default Machine Default Printer Default Document Management Language MP tray Setting Register Orig. Size Job Accounting BOX Management Print - Kyocera KM-C3232E | C2525E/C3225E/C3232E/C4035E Operation Guide (Basic) - Page 44
(4th cassette) and press [Change #]. System Menu / Counter Machine Default Default menu Auto cassette switching Paper size (1st cassette) Paper size (2nd Plain, Rough, Vellum, Recycled, Preprinted, Bond, Color (Colour), Prepunched, Letterhead, High Quality, Custom 1 - 8 1 Press the System Menu/Counter - Kyocera KM-C3232E | C2525E/C3225E/C3232E/C4035E Operation Guide (Basic) - Page 45
Menu / Counter System Menu Copy Default Scanner Default Machine Default Printer Default Document Management Language MP tray Setting type. Plain Rough Vellum Recycled Preprinted Bond Color Prepunched Letterhead High Quality System Menu - Machine Default 6 Press [Close]. 7 Press [End]. - Kyocera KM-C3232E | C2525E/C3225E/C3232E/C4035E Operation Guide (Basic) - Page 46
units. 1 Press the System Menu/Counter key. 2 Press [MP tray Setting]. System Menu / Counter System Menu Copy Default Scanner Default Machine Default Printer Default Document Management Language MP tray Setting Register Orig. Size Job Accounting BOX Management Print Report A 2-10 - Kyocera KM-C3232E | C2525E/C3225E/C3232E/C4035E Operation Guide (Basic) - Page 47
] and press [Select size]. 4 Select the paper size. 5 Press [Close]. System Menu / Counter System Menu Copy Default Scanner Default Machine Default Printer Default Document Management Language MP tray Setting Register Orig. Size Job Accounting BOX Management Print Report A System Menu - Kyocera KM-C3232E | C2525E/C3225E/C3232E/C4035E Operation Guide (Basic) - Page 48
size. 1 Press the System Menu/Counter key. 2 Press [MP tray Setting]. System Menu / Counter System Menu Copy Default Scanner Default Machine Default Printer Default Document Management Language MP tray Setting Register Orig. Size Job Accounting BOX Management Print Report A 3 Press [Input - Kyocera KM-C3232E | C2525E/C3225E/C3232E/C4035E Operation Guide (Basic) - Page 49
for each custom size. Assignment Method 1 Press the System Menu/Counter key. 2 Press [Machine Default]. System Menu / Counter System Menu Copy Default Scanner Default Machine Default Printer Default Document Management Language MP tray Setting Register Orig. Size Job Accounting BOX Management - Kyocera KM-C3232E | C2525E/C3225E/C3232E/C4035E Operation Guide (Basic) - Page 50
using the numeric keys by pressing [#-Keys]. Paper size (User reg. 1) Stores Paper Size for MP Tray Color/B&W selection (37/8~115/8) Y 1111/16 " Off (57 Menu / Counter System Menu Copy Default Scanner Default Machine Default Printer Default Document Management Language MP tray Setting - Kyocera KM-C3232E | C2525E/C3225E/C3232E/C4035E Operation Guide (Basic) - Page 51
Recycled, Preprinted, Bond, Cardstock, Color (Colour), Prepunched, Letterhead, Thick paper, Envelope, Coated, High Quality, Custom 1 - 8 NOTE: Paper System Menu / Counter System Menu Copy Default Scanner Default Machine Default Printer Default Document Management Language MP tray Setting Register - Kyocera KM-C3232E | C2525E/C3225E/C3232E/C4035E Operation Guide (Basic) - Page 52
Preparation for Usage Placing Originals This section explains how to place an original for copying or scanning. Loading Originals on the Platen Open the original platen and place the original on the platen. You may also place non-sheet originals such as - Kyocera KM-C3232E | C2525E/C3225E/C3232E/C4035E Operation Guide (Basic) - Page 53
(Metric models) Preparation for Usage 3 Close the original platen. IMPORTANT: Do not push the original platen or document processor forcefully when you close it. Excessive pressure may crack the platen glass. Shadows may appear around the edges and in the middle of copies of open-faced originals - Kyocera KM-C3232E | C2525E/C3225E/C3232E/C4035E Operation Guide (Basic) - Page 54
document processor supports the following types of originals. Item Weight Size Capacity Specifications 1-sided original Standard paper (80 g/m2, 8 1/2 × 14"/B4 or larger), color paper (8 1/2 × 14"/B4 or larger), recycled paper (8 1/2 Original table 2 Original width guides 3 Original eject table 4 - Kyocera KM-C3232E | C2525E/C3225E/C3232E/C4035E Operation Guide (Basic) - Page 55
eject table may cause the new originals to jam. 1 Adjust the original width guides to fit the originals. 2 Place the originals. Place the side to be read : Confirm that the original width guides exactly fits the originals. If there is a gap, readjust the original width guides. Failure to do so may - Kyocera KM-C3232E | C2525E/C3225E/C3232E/C4035E Operation Guide (Basic) - Page 56
Italian (Italiano) 1 Press the System Menu/Counter key. 2 Press [Language]. System Menu / Counter System Menu Copy Default Scanner Default Machine Default Printer Default Document Management Language MP tray Setting Register Orig. Size Job Accounting BOX Management Print Report 3 Select the - Kyocera KM-C3232E | C2525E/C3225E/C3232E/C4035E Operation Guide (Basic) - Page 57
. 2 Open the interface cover on the right side of the unit and connect the cable to the interface. A: Network interface (printer) B: USB interface (printer) C: Parallel port interface (printer) D: Network interface (scanner) AB C D 3 Connect the other end of the cable to the computer or a hub - Kyocera KM-C3232E | C2525E/C3225E/C3232E/C4035E Operation Guide (Basic) - Page 58
setting is enabled by default. 1 Press the Printer key. 2 Press [Printer Menu]. 3 Press [Interface]. 4 Press [Network]. Ready to print. Printer Menu Select item. Printer menu Print Status Page Interface Emulation Font Page Set Print Quality Paper Handling Color Mode RAM DISK Mode Interface - Kyocera KM-C3232E | C2525E/C3225E/C3232E/C4035E Operation Guide (Basic) - Page 59
Setting Item DHCP BOOTP IP Address Subnet Mask Gateway Value On On 0. 0. 0. 0 0. 0. 0. 0 0. 0. 0. 0 DHCP Setting Change # Back Off On Printer menu - Interface - Network - TCP/IP 9 Press [S] or [T] to select BOOTP and press [Change #]. 10 Press [Off] and press [Close]. BOOTP Setting Back - Kyocera KM-C3232E | C2525E/C3225E/C3232E/C4035E Operation Guide (Basic) - Page 60
Printer menu- Interface - Network - Printer mode. Included Printer Utilities This product includes the following printer utilities Install them as necessary. For details, refer to the manual included with each utility. • KM-NET for Clients • KM-NET for Direct Printing • IC-Link • KM-NET VIEWER • KM - Kyocera KM-C3232E | C2525E/C3225E/C3232E/C4035E Operation Guide (Basic) - Page 61
Installing the Printer Driver Install the printer driver to connect this device to a computer. Install from the included Software Library CD-ROM for connections via the parallel port interface, network interface or the USB interface. The following procedures are based on a Windows XP installation - Kyocera KM-C3232E | C2525E/C3225E/C3232E/C4035E Operation Guide (Basic) - Page 62
to upgrade the driver. 5 Select Local connection and press the Next button. For Network connection, refer to the IB-21E/IB-22 Operation Guide on the included CD-ROM. 6 Select the device and press the Next button. At this point the Plug and Play window may reappear. Cancel any Printer Found screens - Kyocera KM-C3232E | C2525E/C3225E/C3232E/C4035E Operation Guide (Basic) - Page 63
Installation screen appears. Press the Continue Anyway button. Preparation for Usage If the Network Printer Port Monitor screen is displayed, select Yes and click the Next button. 7 The Select the Printer Port screen is displayed. Follow the procedure below for parallel port or USB connection - Kyocera KM-C3232E | C2525E/C3225E/C3232E/C4035E Operation Guide (Basic) - Page 64
you don't know the IP address or host name for this device, click Search and go to the next step. 12 A list of printers available on the network is displayed. Select this device and click the OK button. 13 The IP address or host name selected in Step 12 is displayed in - Kyocera KM-C3232E | C2525E/C3225E/C3232E/C4035E Operation Guide (Basic) - Page 65
Preparation for Usage 17 Click on Create a new port. Set the type to KM USB Port and click the Next button. 18 Confirm the Port name. The to complete the installation. 20 After completing the printer driver installation, install the optional printer components. Select Yes to install the components - Kyocera KM-C3232E | C2525E/C3225E/C3232E/C4035E Operation Guide (Basic) - Page 66
. 23 To end the installation, select No and click the Finish button. To continue installing another printer driver, select Yes and click the Next button. This concludes the printer driver installation. Depending on the operating system, the computer may prompt you to be restarted. If so, follow - Kyocera KM-C3232E | C2525E/C3225E/C3232E/C4035E Operation Guide (Basic) - Page 67
Settings Scanner Settings User/Destination Registration SMTP Server Send E-mail Send scanned images as e-mail attachments. Printer Parallel USB Send E-mail Scan to PC Scan to PC Send scanned image files to a computer. Network Scan to FTP FTP Server Scan to FTP Send scanned image files to - Kyocera KM-C3232E | C2525E/C3225E/C3232E/C4035E Operation Guide (Basic) - Page 68
Scanner Basic Settings The network settings for this device must be configured before using the scanner feature. The setting items are as follows. Configuration Item Host name IP address Subnet Mask Default To use WINS (Windows Internet Name Service) to resolve address. Scanner status log files and - Kyocera KM-C3232E | C2525E/C3225E/C3232E/C4035E Operation Guide (Basic) - Page 69
Menu / Counter System Menu Copy Default Scanner Default Machine Default Printer Default Document Management Language MP tray Setting press [System Basic] again. System Menu / Counter Scanner setting menu System Basic Func. Def. setting. User registr. System Menu 5 Press [S] or [T] to - Kyocera KM-C3232E | C2525E/C3225E/C3232E/C4035E Operation Guide (Basic) - Page 70
less than 8 characters long (numerals only) to be input during user selection. (Password entry is optional) Folder number to specify as destination when Save to User PC is selected. Use Scanner File Utility to set the folder corresponding to this number. Input a 3 digit number (from 001-100). Only - Kyocera KM-C3232E | C2525E/C3225E/C3232E/C4035E Operation Guide (Basic) - Page 71
image data to the computer at this address. Configure the destination name to be displayed in the Address Book. For Scan to PC, the folder number set as the destination. Set the folder corresponding to this number with the Scanner File Utility input. Input the user name and password used to logon to - Kyocera KM-C3232E | C2525E/C3225E/C3232E/C4035E Operation Guide (Basic) - Page 72
for Usage 1 Press the Scanner key. 2 Press [Edit Addr. Book]. scanner function. Scan to PC TWAIN Scan to FTP 3 Input the sending user's user number de. and press [Enter]. Recall Program 08/08/'05 14:00 Edit Addr. Book Change User Info. History of Sending Stop User number Clear (with #key - Kyocera KM-C3232E | C2525E/C3225E/C3232E/C4035E Operation Guide (Basic) - Page 73
[S] or [T] to Registra.list:Scan to PC address book select the item to be configured and Setting item Setting value press [Change #]. The settings configuration screen is displayed. Follow Name to display Password (Not specified) (Not specified) the screen instructions to make the changes - Kyocera KM-C3232E | C2525E/C3225E/C3232E/C4035E Operation Guide (Basic) - Page 74
Preparation for Usage 2 Press [Machine Default]. System Menu / Counter System Menu Copy Default Scanner Default Machine Default Printer Default Document Management Language MP tray Setting Register Orig. Size Job Accounting BOX Management Print Report A 3 Use the numeric keys to enter the - Kyocera KM-C3232E | C2525E/C3225E/C3232E/C4035E Operation Guide (Basic) - Page 75
The CD-ROM contains the following utilities for this scanner system. • Scanner File Utility • Address Book for Scanner • Address Editor (Administrator Tool) • DB Assistant (Administrator Tool) • TWAIN Source The following procedures are based on a Windows XP installation, but the same procedure - Kyocera KM-C3232E | C2525E/C3225E/C3232E/C4035E Operation Guide (Basic) - Page 76
Scanner File Utility to use the Scan to PC functionality. Installing Scanner File Utility This section explains how to install the Scanner File Utility. 1 Display the Scanner Utilities screen, referring to Steps 1-3 of Installing the Scanner Utilities on page 2-39. 2 Click on Scanner File Utility - Kyocera KM-C3232E | C2525E/C3225E/C3232E/C4035E Operation Guide (Basic) - Page 77
Scanner File Utility which folders to use to save scanned documents. NOTE: The following explanation is based on a Desktop Mode installation of Scanner File Utility. 1 Launch the Scanner File Utility by clicking on the start Menu and clicking Programs J Scanner User Software J Scanner File Utility - Kyocera KM-C3232E | C2525E/C3225E/C3232E/C4035E Operation Guide (Basic) - Page 78
2 Double-click the Scanner File Utility icon shown in the taskbar to show the start dialog box. 3 Click the Setup button. 4 Click the New button. 5 Input the file save folder number in the No. column and click the ... button. NOTE: Input a number (from 1-100) for the file save folder No. column - Kyocera KM-C3232E | C2525E/C3225E/C3232E/C4035E Operation Guide (Basic) - Page 79
6 Choose a folder and click the OK button. 7 Click the OK button. Preparation for Usage 8 The save folder is registered. Click the OK button. 9 Click the OK button. 2-43 - Kyocera KM-C3232E | C2525E/C3225E/C3232E/C4035E Operation Guide (Basic) - Page 80
from a Web Browser Register users into this device using a web browser. NOTE: The network configuration for this device must be done before performing this setting. Contact your system administrator. This function is not available during scanning. Verify that the scanner function is not in use - Kyocera KM-C3232E | C2525E/C3225E/C3232E/C4035E Operation Guide (Basic) - Page 81
File Save Folders on page 2-41. 6 Click the Registration button. NOTE: Be sure to click the Registration button. Settings are not saved if you change screens or close the browser window without pressing Registration. After the above settings have been completed, scanned images can be sent to user - Kyocera KM-C3232E | C2525E/C3225E/C3232E/C4035E Operation Guide (Basic) - Page 82
Preparation for Usage 2-46 - Kyocera KM-C3232E | C2525E/C3225E/C3232E/C4035E Operation Guide (Basic) - Page 83
Basic Copying Procedures...3-2 • Selecting Image Quality...3-5 • Adjusting Exposure...3-6 • Reducing/Enlarging...3-7 • Duplex Mode...3-11 • Split Mode...3-14 • Sort Mode...3-16 • Interrupt Copy...3-17 • Job Reservation...3-18 • Canceling a Print Job...3-19 • Scanner Operation...3-20 • Low-Power Mode - Kyocera KM-C3232E | C2525E/C3225E/C3232E/C4035E Operation Guide (Basic) - Page 84
indicator will glow green. 2 Press the Copier key. 3 Place the original. NOTE: Refer to Placing Originals on page 2-16 for original placement instructions. 4 Press the Auto Color, Full Color or Black&White key to select a color mode. Color Mode Auto color mode Full Color mode Black and White mode - Kyocera KM-C3232E | C2525E/C3225E/C3232E/C4035E Operation Guide (Basic) - Page 85
paper size to select the paper source. Ready to copy. ( Full-Color ) 11×8½" Plain 11×17" Color 11×8½" Plain 11×8½" Plain Basic APS MP tray Plain User choice Auto % 100% Reduce /Enlarge Function Auto Exposure Exposure Mode Color func. 6 Use the numeric keys to enter the copy quantity. You - Kyocera KM-C3232E | C2525E/C3225E/C3232E/C4035E Operation Guide (Basic) - Page 86
Basic Operation Turning off the main power switch Press the Power key on the operation panel, and after verifying the Power indicator has gone off, switch off the main power switch. Switching off the main power switch before pressing the Power key may cause damage to the internal hard disk. If the - Kyocera KM-C3232E | C2525E/C3225E/C3232E/C4035E Operation Guide (Basic) - Page 87
/ Centering Border Erase User choice ( Full-Color ) Select Orig.Size Auto Selection Page # Cover Mode Function Combine Batch Scanning Poster Booklet Color func. Paper Size 11×8½ 100% Up Down Program 4 Select the image quality. Ready to copy. Orig.Image Quality ( Full-Color ) Shortcut Paper - Kyocera KM-C3232E | C2525E/C3225E/C3232E/C4035E Operation Guide (Basic) - Page 88
. The machine determines a suitable exposure level for copying. To change the exposure mode from [Auto] to [Manual], press the exposure adjustment key ( / ). Ready to copy. ( Full-Color ) 11×8½" Plain 11×17" Color 11×8½" Plain 11×8½" Plain Basic APS MP tray Plain User choice Auto % 100% Reduce - Kyocera KM-C3232E | C2525E/C3225E/C3232E/C4035E Operation Guide (Basic) - Page 89
will be displayed. Ready to copy. ( Full-Color ) 11×8½" Plain 11×17" Color 11×8½" Plain 11×8½" Plain Basic APS MP tray Plain User choice Auto % 100% Reduce /Enlarge Function Auto Exposure Exposure Mode Color func. 3 Press the Start key. The image will be automatically reduced or enlarged for - Kyocera KM-C3232E | C2525E/C3225E/C3232E/C4035E Operation Guide (Basic) - Page 90
or enlarges the original image in 1 % increments between 25 - 400 %. Follow the steps as below to use manual zoom. 25 % 1 Color ) 11×8½" Plain 11×17" Color 11×8½" Plain 11×8½" Plain Basic APS MP tray Plain User choice Auto % 100% Reduce /Enlarge Function Auto Exposure Exposure Mode Color - Kyocera KM-C3232E | C2525E/C3225E/C3232E/C4035E Operation Guide (Basic) - Page 91
. Model Type Inch models Metric models Metric models (Asia Pacific) Zoom Level 200 % (5 1/2 × 8 1/2"J11 × 17"), 154 % (5 Color ) 11×8½" Plain 11×17" Color 11×8½" Plain 11×8½" Plain Basic APS MP tray Plain User choice Auto % 100% Reduce /Enlarge Function Auto Exposure Exposure Mode Color - Kyocera KM-C3232E | C2525E/C3225E/C3232E/C4035E Operation Guide (Basic) - Page 92
keys] ([#-Keys]) to enter with numeric keys. Ready to copy. ( Full-Color ) 11×8½" Plain 11×17" Color 11×8½" Plain 11×8½" Plain Basic APS MP tray Plain User choice Auto % 100% Reduce /Enlarge Function Auto Exposure Exposure Mode Color func. Paper Size 11×8 100% Staple Off Staple Left Top Staple - Kyocera KM-C3232E | C2525E/C3225E/C3232E/C4035E Operation Guide (Basic) - Page 93
. ...A • Original Left/Right Bind to Finish Top Bind: Images are copied onto the back side rotated 180°. Pages of the 4 5 3 1 4 2 2 Original Copy NOTE: This operation requires the optional document processor. Supported paper sizes for Two-sided to Two-sided operation are: 11 × 17", 8 1/2 × 14 - Kyocera KM-C3232E | C2525E/C3225E/C3232E/C4035E Operation Guide (Basic) - Page 94
3 4 2 Original Copy NOTE: Supported paper sizes for Book to Two- Image Quality Sort/ Offset Basic 2 sided/ Separation Reduce /Enlarge Margin/ Centering Border Erase User choice ( Full-Color ) Select Orig.Size Auto Selection Page # Cover Mode Function Combine Batch Scanning Poster Booklet Color - Kyocera KM-C3232E | C2525E/C3225E/C3232E/C4035E Operation Guide (Basic) - Page 95
top corner]) from Select Original Image Direction. 1 sided J2 sided J2 2sidsiedded Book J2 sided ( Full-Color ) Original Shortcut Finished Open Scan next original(s) is displayed. Place the next original page and press the Start key. If all original pages have been scanned, press [Scanning - Kyocera KM-C3232E | C2525E/C3225E/C3232E/C4035E Operation Guide (Basic) - Page 96
to use Split mode. 1 Press [Function]. Ready to copy. ( Full-Color ) 11×8½" Plain 11×17" Color 11×8½" Plain 11×8½" Plain Basic APS MP tray Plain User choice Auto % 100% Reduce /Enlarge Function Auto Exposure Exposure Mode Color func. Paper Size 11×8 100% Staple Off Staple Left Top Staple - Kyocera KM-C3232E | C2525E/C3225E/C3232E/C4035E Operation Guide (Basic) - Page 97
copy. Select Paper Exposure Mode Orig.Image Quality Sort/ Offset Basic 2 sided/ Separation Reduce /Enlarge Margin/ Centering Border Erase User choice ( Full-Color ) Select Orig.Size Auto Selection Page # Cover Mode Function Combine Batch Scanning Poster Booklet Color func. Paper Size 11×8½ 100 - Kyocera KM-C3232E | C2525E/C3225E/C3232E/C4035E Operation Guide (Basic) - Page 98
copy. Select Paper Exposure Mode Orig.Image Quality Sort/ Offset Basic 2 sided/ Separation Reduce /Enlarge Margin/ Centering Border Erase User choice ( Full-Color ) Select Orig.Size Auto Selection Page # Cover Mode Function Combine Batch Scanning Poster Booklet Color func. Paper Size 11×8½ 100 - Kyocera KM-C3232E | C2525E/C3225E/C3232E/C4035E Operation Guide (Basic) - Page 99
Interrupt Copy Interrupt copying is useful to pause one copy job and copy other originals with different copy settings. After completing the urgent job, you can resume the interrupted jobs according to their original settings. You can also pause copy or print jobs to make emergency copies. Follow - Kyocera KM-C3232E | C2525E/C3225E/C3232E/C4035E Operation Guide (Basic) - Page 100
Plain 11×8½" Plain Basic APS MP tray Color User choice Auto % 100% Reduce /Enlarge Function Auto Exposure Exposure Mode Color func. Staple Off Staple Left Top Staple Program 4 Press the Start key. Scanning of the original begins. After scanning all the originals, the touch panel will return - Kyocera KM-C3232E | C2525E/C3225E/C3232E/C4035E Operation Guide (Basic) - Page 101
to cancel a print job that is currently spooling. 1 Press the Printer key. Basic Operation 2 Press [Cancel]. 3 Select the interface to cancel. 4 Printing is canceled. Processing. Orig. Page 11×8½" Network I/F User name: NO USER NAME Select interface to cancel the job. Current Job Parallel - Kyocera KM-C3232E | C2525E/C3225E/C3232E/C4035E Operation Guide (Basic) - Page 102
to add to the Common Address Book from the operation panel. Scan an image for Send E-mail 1 Press the Scanner key. 2 Press [Send E-mail]. Select scanner function. Send E-mail Scan to PC TWAIN Database Connection 3 Select a destination (user name). Either name. press the number key or use the - Kyocera KM-C3232E | C2525E/C3225E/C3232E/C4035E Operation Guide (Basic) - Page 103
NOTE: If the scanner default setting for Selec. of senders (users) is set to [On], user number 001 will automatically be selected. If a password was entered when the user was registered, the password input screen is displayed. Input the password and press [Enter]. If the password is correct, the - Kyocera KM-C3232E | C2525E/C3225E/C3232E/C4035E Operation Guide (Basic) - Page 104
User A To: User B Select Orig.Size Auto size Orig. Set Direction 200dpi Delete Select Send Size Scanning Resolution Enter dest. Address Book Basic Quality Scanner Setup 11 Press the Auto Color, Full Color or Black&White key to select a color mode. 12 The scanner 10. "Check direction of - Kyocera KM-C3232E | C2525E/C3225E/C3232E/C4035E Operation Guide (Basic) - Page 105
Direction 200dpi Scanning Resolution Quality To end the operation, press [Cancel] ([Job cancel]). Scan an Image for Scan to PC Use Scan to PC to save scanned original images as files to a folder on a computer. Access to this feature is provided by installing the Scanner File Utility on the target - Kyocera KM-C3232E | C2525E/C3225E/C3232E/C4035E Operation Guide (Basic) - Page 106
If the password is correct, the scanner settings screen is displayed. 4 To save a copy for the sender (user), press [Save at User PC]. The sender (user) is displayed in the destination column. Ready to scan. Place the original and select destination. Scan to PC-Sending ( Full-Color ) Original 11 - Kyocera KM-C3232E | C2525E/C3225E/C3232E/C4035E Operation Guide (Basic) - Page 107
Group A Save at User PC Address Book Delete Auto Select Orig.Size Auto size Select Send Size Basic Top Edge Orig. Set Direction 200dpi Scanning Resolution Quality Scanner Setup 9 Press the Auto Color, Full Color or Black&White key to select a color mode. 10 The scanner setup screen is - Kyocera KM-C3232E | C2525E/C3225E/C3232E/C4035E Operation Guide (Basic) - Page 108
to scan. ( Full-Color User PC Address Book Delete Auto Select Orig.Size Auto size Select Send Size Basic Top Edge Orig. Set Direction 200dpi Scanning Resolution Quality To end the operation, press [Cancel] ([Job cancel]). NOTE: If Permit File Overwrite is checked in Scanner File Utility, files - Kyocera KM-C3232E | C2525E/C3225E/C3232E/C4035E Operation Guide (Basic) - Page 109
Basic Operation Scan an Image Using TWAIN TWAIN provides method to connect to the scanner from within TWAIN-compatible applications. Install the TWAIN driver together with the application you plan to use. This section only explains the settings to be made to the machine to enable TWAIN usage. - Kyocera KM-C3232E | C2525E/C3225E/C3232E/C4035E Operation Guide (Basic) - Page 110
The computer to which DB Assistant was installed and the computer to which Scanner File Utility was installed must be pre-registered using from a web browser or the operation panel. This section focuses on how to setup KM-DB Assist (functionality to add keywords as text data to scanned images). 3-28 - Kyocera KM-C3232E | C2525E/C3225E/C3232E/C4035E Operation Guide (Basic) - Page 111
password and press [Enter]. 4 Select the input data source. Press [S] ection or [T], select the desired input data source, and press [Enter]. This section explains how to select KM-DB Assist (functionality to add 0-9 GHI PQR YZ Dest. of input data File A keywords as text data to scanned images - Kyocera KM-C3232E | C2525E/C3225E/C3232E/C4035E Operation Guide (Basic) - Page 112
next higher [A]. folder level, select [up] and press [B]. [Enter]. Folders higher than the folder [C]. specified in Scanner File Utility cannot [D]. be set can be set for PDF only. NOTE: Use File Name to change the filename for the scanned image. Keyword, Subject, Creator, and Comment may - Kyocera KM-C3232E | C2525E/C3225E/C3232E/C4035E Operation Guide (Basic) - Page 113
[Input data complete]. The KM-DB Assist function adds text the previously registered text information (keywords) to the scanned image and saves to the specified folder. Dest. of input data: File A The Database Assist function adds text information from the scanned image as User name: 001. a CSV - Kyocera KM-C3232E | C2525E/C3225E/C3232E/C4035E Operation Guide (Basic) - Page 114
to servers outside the local area network (LAN) may fail due to network configuration. Before using Scan to FTP Before using Scan to FTP, confirm with your administrator the credentials to access the FTP server and save these to the machine. • User name • Password • FTP Server hostname or IP address - Kyocera KM-C3232E | C2525E/C3225E/C3232E/C4035E Operation Guide (Basic) - Page 115
scanner default setting for Selec. of senders (users) is set to [On], user number 001 will automatically be selected. If a password was entered when the user was registered, the password input screen is displayed. Input the password and press [Enter]. 4 Press [Address Book]. Ready to scan. Place - Kyocera KM-C3232E | C2525E/C3225E/C3232E/C4035E Operation Guide (Basic) - Page 116
. nding ( Full-Color ) Original Send 11×8½" 8½×11" 08/08/'05 14:00 Register Prgrm Cont. TX to Cancel Address Book Delete Auto Select Orig.Size Auto size Select Send Size Basic Top Edge Orig. Set Direction 200dpi Scanning Resolution Quality Auto File Name Input JPEG File Type Edit - Kyocera KM-C3232E | C2525E/C3225E/C3232E/C4035E Operation Guide (Basic) - Page 117
seconds. Auto Low-Power Mode In Auto Low-Power mode, the machine automatically switches to Low-Power mode if left idle for a preset period. The default period for Auto Low-Power mode is 7 minutes. 3-35 - Kyocera KM-C3232E | C2525E/C3225E/C3232E/C4035E Operation Guide (Basic) - Page 118
functionality in 45 seconds. Auto Sleep Mode In Auto Sleep mode, the machine automatically switches to Sleep mode if left idle for a preset period. The default period for Auto Sleep mode is 29 minutes for the 25/25 ppm model and 44 minutes for the 32/25, 32/32 and 40 - Kyocera KM-C3232E | C2525E/C3225E/C3232E/C4035E Operation Guide (Basic) - Page 119
Finisher...4-5 • 3000 Sheet Document Finisher...4-5 • Job Separator...4-5 • Key Counter...4-6 • Fax Kit...4-6 • Memory Card (CompactFlash)...4-6 • Hard Disk...4-7 • Additional Memory...4-7 • Security Kit...4-7 • Network Interface Card...4-8 • Serial Interface...4-8 • Document Table...4-8 4-1 - Kyocera KM-C3232E | C2525E/C3225E/C3232E/C4035E Operation Guide (Basic) - Page 120
Optional Equipment Overview of Optional Equipment The following optional equipment is available for the machine. Document Processor Key Counter Mailbox Document Finisher 3000 Sheet Document Finisher Document Table Job Separator Folding Unit Paper Feeder 3000 Sheet Paper Feeder 4-2 - Kyocera KM-C3232E | C2525E/C3225E/C3232E/C4035E Operation Guide (Basic) - Page 121
Serial Interface Additional Memory Network Interface Card Memory Card (CompactFlash) Optional Equipment Fax Kit Hard Disk Security Kit 4-3 - Kyocera KM-C3232E | C2525E/C3225E/C3232E/C4035E Operation Guide (Basic) - Page 122
Optional Equipment Document Processor Automatically scans each page of single sided originals. Also automatically flips over 2-sided originals for duplex copying and split copying. For document processor usage operation, see Loading - Kyocera KM-C3232E | C2525E/C3225E/C3232E/C4035E Operation Guide (Basic) - Page 123
document finisher Operation Guide. Other options include the mailbox and folding unit. (See images below.) Job Separator Separates paper according to output destination for easier sorting. Specify an output destination for copy or print jobs. Or, specify the default - Kyocera KM-C3232E | C2525E/C3225E/C3232E/C4035E Operation Guide (Basic) - Page 124
the fax kit, fax send/receive is enabled. Also, it is possible to use it as a network fax, by using it with a computer. For further details, refer to the Fax kit Operation Guide. Memory Card (CompactFlash) A microchip card for storing optional fonts, macros or forms. Insert into the memory - Kyocera KM-C3232E | C2525E/C3225E/C3232E/C4035E Operation Guide (Basic) - Page 125
Optional Equipment Additional Memory Increase the memory available to the printer. Additional memory enables printing more complex data. An additional MB may be added. Security Kit This machine functions by temporarily storing scanned data on an internal hard disk. After being used for copying, - Kyocera KM-C3232E | C2525E/C3225E/C3232E/C4035E Operation Guide (Basic) - Page 126
TCP/IP, IPX/SPX, NetBEUI and EtherTalk protocols to enable network printing for Windows, Macintosh, UNIX, Netware and other environments. Serial Interface Install for connecting to printers with serial port interfaces. Supports the RS-232C serial interface. Document Table Place original or other - Kyocera KM-C3232E | C2525E/C3225E/C3232E/C4035E Operation Guide (Basic) - Page 127
5 Maintenance This chapter describes cleaning and toner replacement. • Cleaning...5-2 • Toner Container and Waste Toner Box Replacement...5-5 5-1 - Kyocera KM-C3232E | C2525E/C3225E/C3232E/C4035E Operation Guide (Basic) - Page 128
Maintenance Cleaning Clean the machine regularly to ensure optimum copy quality. Caution: For safety, always unplug the power cord before cleaning the machine. Original Platen and Platen Open the document processor. Wipe the platen and the - Kyocera KM-C3232E | C2525E/C3225E/C3232E/C4035E Operation Guide (Basic) - Page 129
Slit Glass Maintenance When black streaks or dirt appears in copies when using the optional document processor, clean the slit glass with the included cleaning cloth. The message: Clean the slit glass for original fed from DP (Clean the slit glass for original fed) may be displayed if the slit - Kyocera KM-C3232E | C2525E/C3225E/C3232E/C4035E Operation Guide (Basic) - Page 130
Maintenance 3 Open left cover 1. 4 Open duplex unit A1. 5 As shown in the figure, clean dirt from the separator by moving the brush from side to side along the separator. 6 Set duplex unit A1 securely to the original position and close left cover 1. IMPORTANT: Push the indicated position to close - Kyocera KM-C3232E | C2525E/C3225E/C3232E/C4035E Operation Guide (Basic) - Page 131
and replace the toner container See the toner container box or operation manual for replacement procedures NOTE: Press [Adding toner] to display the replacement instructions on the touch panel. If you close the front cover without installing toner containers, a screen asking to check whether the - Kyocera KM-C3232E | C2525E/C3225E/C3232E/C4035E Operation Guide (Basic) - Page 132
to the vertical position. 3 Push up the toner container top clip A and pull the toner container down towards you. A 4 Lift the toner container up and out. 5 Close the pickup opening, with the cap attached to the back side, on the old toner container. Caution: Do not attempt to incinerate the - Kyocera KM-C3232E | C2525E/C3225E/C3232E/C4035E Operation Guide (Basic) - Page 133
container before shaking it sufficiently. This may cause errors due to insufficient toner replenishment. 10 Insert the new toner container into the machine. Maintenance 11 Press in the toner container upper portion. There will be an audible 'click' when the container is inserted in the correct - Kyocera KM-C3232E | C2525E/C3225E/C3232E/C4035E Operation Guide (Basic) - Page 134
container lock lever to its original position. Replace the other toner colors in the same fashion. 13 Hold down waste toner box release lever B, and slowly pull out the waste toner box. NOTE: Do not turn the removed old waste toner box B upside down. 14 As shown in the illustration, seal the - Kyocera KM-C3232E | C2525E/C3225E/C3232E/C4035E Operation Guide (Basic) - Page 135
17 Install the new waste toner box. Maintenance 18 Close the front cover. After use, always dispose of the toner container and the waste toner box in accordance with Federal, State and Local rules and regulations. 5-9 - Kyocera KM-C3232E | C2525E/C3225E/C3232E/C4035E Operation Guide (Basic) - Page 136
Maintenance 5-10 - Kyocera KM-C3232E | C2525E/C3225E/C3232E/C4035E Operation Guide (Basic) - Page 137
6 Troubleshooting This chapter explains how to solve problems with the machine. • Solving Malfunctions...6-2 • Responding to Error Messages...6-4 • Clearing Paper Jams...6-15 6-1 - Kyocera KM-C3232E | C2525E/C3225E/C3232E/C4035E Operation Guide (Basic) - Page 138
dark. Is the machine set to Manual Exposure Use the exposure adjustment key to set page 3-6 mode? the correct exposure level. Copies have a moire pattern (dots grouped together in patterns and not aligned uniformly). Is the original a printed photograph? Set the image quality to [Print]. page - Kyocera KM-C3232E | C2525E/C3225E/C3232E/C4035E Operation Guide (Basic) - Page 139
securely before placing the originals. Is the paper loaded correctly? Check the position of the paper width page 2-2 guides. Paper jams frequently occur. Is the paper loaded correctly? Load the paper correctly. Is the paper of the supported type? Is it Remove the paper from the cassette, in - Kyocera KM-C3232E | C2525E/C3225E/C3232E/C4035E Operation Guide (Basic) - Page 140
Troubleshooting Responding to Error Messages If the touch panel displays any of machine. - Completely pull out the indicated - cassette and remove any paper inside. (Open cassette #, check and remove paper from inside of machine.) Reset feeding unit for paper cassette. Is the paper feeder - Kyocera KM-C3232E | C2525E/C3225E/C3232E/C4035E Operation Guide (Basic) - Page 141
Troubleshooting Error Messages Checkpoints Corrective Actions Reference Page Check original? paper cassette.) Is the copier installed beneath Do not install this staple sheet count. finisher or 3000 sheet document finisher Operation Guide. The top tray is full of paper. During copying, - Kyocera KM-C3232E | C2525E/C3225E/C3232E/C4035E Operation Guide (Basic) - Page 142
Ready to copy. - Add toner. [C], [M], [Y], [K] Add toner. [C], [M], [Y], [K] - Image cycle. - (Now adding toner.) Please wait. - Now in the fusing temperature adjustment process. Check waste toner box. Is the waste toner box securely fastened? Replace the waste toner box. - Clean the - Kyocera KM-C3232E | C2525E/C3225E/C3232E/C4035E Operation Guide (Basic) - Page 143
Troubleshooting Error Messages Checkpoints Corrective Actions Reference Page Check the waste punch box. Is the optional 3000 sheet document Refer to the optional 3000 sheet - (Check Punch Hole box.) finisher waste punch box securely document finisher Operation Guide fastened? to securely - Kyocera KM-C3232E | C2525E/C3225E/C3232E/C4035E Operation Guide (Basic) - Page 144
or Authorized Service Center. - No matching ID-code found. Verify - the registered ID-code using the driver. - Shown when a printer error has - occurred when other modes are currently being displayed. Press the Printer key to switch to the printer screen and display the specific error - Kyocera KM-C3232E | C2525E/C3225E/C3232E/C4035E Operation Guide (Basic) - Page 145
Troubleshooting Error Messages File not found Press GO. Warning image adapt. Print overrun Press GO. Memory overflow Press GO. Interface is occupied. Opt. ROM error Press GO. Check the waste punch box. (Check Punch Hole box.) Checkpoints Corrective Actions Reference Page - A file error has - Kyocera KM-C3232E | C2525E/C3225E/C3232E/C4035E Operation Guide (Basic) - Page 146
- Contact Administrator. and password for SMTP or support personnel. authentication been set? Unable to find PC for personal Is Address Book for Scanner Launch Address Book for Scanner. - address list. running on the computer? Check the PC. Is the network properly connected Confirm the - Kyocera KM-C3232E | C2525E/C3225E/C3232E/C4035E Operation Guide (Basic) - Page 147
the maximum hard disk usage Increase available space and try - Check the destination PC. set by Scanner File Utility at the again. sending PC been exceeded? Are you trying to send from multiple Try again later or change the - scanners using the same filename? filename. Destination PC is in - Kyocera KM-C3232E | C2525E/C3225E/C3232E/C4035E Operation Guide (Basic) - Page 148
network cable is properly connected. page 2-21 Contact your server administrator or - support personnel. FTP server login failed. Make sure page 2-35 username and password verify that the logged in user account has write permissions. Confirm the network cable is properly connected. page 2-21 - Kyocera KM-C3232E | C2525E/C3225E/C3232E/C4035E Operation Guide (Basic) - Page 149
PC password. - password do not match when preparing for image transmission. During Scan to PC, destination PC hard Try again after increasing available space - disk usage limit exceeded. on the destination PC hard disk. Version of the Scanner File Utility is Check the Scanner File Utility - Kyocera KM-C3232E | C2525E/C3225E/C3232E/C4035E Operation Guide (Basic) - Page 150
Page Invalid command received from computer • Check that the Scanner File Utility on - during Scan to PC. An unexpected the destination PC is running properly. condition has occurred on the destination PC. • Confirm that no other programs to receive network data are running on the computer - Kyocera KM-C3232E | C2525E/C3225E/C3232E/C4035E Operation Guide (Basic) - Page 151
panel will display Paper misfeed and the copying will stop. Refer to these procedures to remove the jammed paper. Paper misfeed. JAM 00 Troubleshooting 1.Remove paper. 2.Open duplex unit A1 and remove any paper that is inside. 3.Open cassette 1. 4.Remove paper. 5.Reset the cassette and close the - Kyocera KM-C3232E | C2525E/C3225E/C3232E/C4035E Operation Guide (Basic) - Page 152
Troubleshooting Paper Jam Precautions • Do not reuse paper cleared from a jam. • If the paper was torn during removal, be sure to remove any loose scraps of - Kyocera KM-C3232E | C2525E/C3225E/C3232E/C4035E Operation Guide (Basic) - Page 153
4 Remove any jammed paper. If the paper tears, remove any loose scraps from the machine. 5 Pull out Cassette 1. Troubleshooting 6 Remove any jammed paper. If the paper tears, remove any loose scraps from the machine. 7 Gently push Cassette 1 back in all the way. 8 Set duplex - Kyocera KM-C3232E | C2525E/C3225E/C3232E/C4035E Operation Guide (Basic) - Page 154
Troubleshooting Cassette 2 Follow the steps below to clear Cassette 2 jams. Paper misfeed. JAM 00 1 Open left cover 2. 1.Open left cover 2 of the machine and remove any - Kyocera KM-C3232E | C2525E/C3225E/C3232E/C4035E Operation Guide (Basic) - Page 155
when using the optional paper feeder or 3000 sheet paper feeder and a jam occurs in Cassettes 3 or 4. Paper misfeed. JAM 00 1 Open left cover 3. Troubleshooting 1.Open the left cover 3 of the machine and remove any paper. 2.Open cassette 3. 3.Remove paper. 4.Reset the cassette and close the cover - Kyocera KM-C3232E | C2525E/C3225E/C3232E/C4035E Operation Guide (Basic) - Page 156
Troubleshooting MP Tray Follow the steps below to clear paper jams in the MP tray. Paper misfeed. JAM 00 1 Open left cover 1. 1.Remove paper. 2.Open duplex unit A1 and paper feed guide B1 to remove any paper. 3.Remove any paper from the multi purpose tray. 4.Open cassette 1. Follow the - Kyocera KM-C3232E | C2525E/C3225E/C3232E/C4035E Operation Guide (Basic) - Page 157
5 Open feed guide B1. Troubleshooting B1 Caution: The fixing unit of this product is extremely hot. Take sufficient care when working in this area, as there is a danger of getting - Kyocera KM-C3232E | C2525E/C3225E/C3232E/C4035E Operation Guide (Basic) - Page 158
Troubleshooting 10 Remove any jammed paper. Follow the steps below if unable to remove jammed paper. 11 Pull out paper feed unit B3. 12 Open the - Kyocera KM-C3232E | C2525E/C3225E/C3232E/C4035E Operation Guide (Basic) - Page 159
15 Remove any jammed paper. Troubleshooting 16 Return Cassette 1 and paper feed unit B3 to their original positions. 17 Set feed guide B1 and duplex unit A1 securely to each original position and close left cover 1. IMPORTANT: Push the indicated position to close left cover 1 securely. 18 - Kyocera KM-C3232E | C2525E/C3225E/C3232E/C4035E Operation Guide (Basic) - Page 160
Troubleshooting 3 Open duplex unit A1. 4 Remove any jammed paper. If the paper tears, remove any loose scraps from the machine. 5 Set duplex unit A1 securely to - Kyocera KM-C3232E | C2525E/C3225E/C3232E/C4035E Operation Guide (Basic) - Page 161
the paper tears, remove any loose scraps from the machine. Troubleshooting 3 Close left cover 2. Fixing Unit Follow the steps 1.Remove paper. 2.Open duplex unit A1 and remove any 3.Open fixing cover A2 to check paper inside. 4.Close the cover. 2 Remove any jammed paper. If the paper tears - Kyocera KM-C3232E | C2525E/C3225E/C3232E/C4035E Operation Guide (Basic) - Page 162
Troubleshooting 4 Remove any jammed paper. If the paper tears, remove any loose scraps from the machine. 5 Open fixing unit cover A2. Caution: The fixing unit of - Kyocera KM-C3232E | C2525E/C3225E/C3232E/C4035E Operation Guide (Basic) - Page 163
Follow the steps below to clear paper jams in the document processor. Paper misfeed. JAM 00 1 Remove any originals on the original table. Troubleshooting 1.Open the document processor top cove 2.Hold up the reverse unit. 3.Turn the left dial. 4.Remove the original. 5.Close the document processor - Kyocera KM-C3232E | C2525E/C3225E/C3232E/C4035E Operation Guide (Basic) - Page 164
Troubleshooting 4 Lift up the reverse unit. 5 Remove the jammed paper. If the original tears, remove any loose scraps from inside the machine. 6 ) If a paper jam occurs in the optional document finisher or 3000 sheet document finisher, clear jams according to the corresponding Operation Guide. 6-28 - Kyocera KM-C3232E | C2525E/C3225E/C3232E/C4035E Operation Guide (Basic) - Page 165
Appendix This section explains the specifications of this device. • Body...Appendix-2 • Copying Performance...Appendix-3 • Printing Performance...Appendix-4 • Scanning Performance...Appendix-4 • Document Processor (option)...Appendix-5 • Paper Feeder (option)...Appendix-5 • 3000 Sheet Paper Feeder ( - Kyocera KM-C3232E | C2525E/C3225E/C3232E/C4035E Operation Guide (Basic) - Page 166
specifications are subject to change without notice. Body Copying System Supported Original Types Copy Sizes Cassette 1, 2 MP Tray During Duplex Usage Non-Copying Margin Paper Supply Capacity Cassette 1 Cassette 2 MP Tray Output Tray Capacity Warm-up Time Memory For Copying/ For Scanner MB Printer: - Kyocera KM-C3232E | C2525E/C3225E/C3232E/C4035E Operation Guide (Basic) - Page 167
40/35 ppm model Resolution Continuous Copying Zoom Level B/W: 5.3 seconds or less (1:1, 11 × 8 1/2"/A4) Full color - Single color: 7.5 seconds or less (1:1, 11 × 8 1/2"/A4) Scanning: 600 × 600 dpi Printing: 600 × 600 dpi 1 - 999 sheets Any level of zoom from 25 - 400 % (in 1 % increments) includes - Kyocera KM-C3232E | C2525E/C3225E/C3232E/C4035E Operation Guide (Basic) - Page 168
Scanning Performance Hardware IBM PC/AT Compatible Supported Operating Systems Windows 95 OSR2, Windows 98 Second Edition, Windows NT 4.0 Service Pack 5 or later, Windows 2000 Service Pack 2 or later, Windows Me, Windows XP, Windows Server 2003, Mac OS 9.1-9.2.2, Mac OS 10.1.5-10.4 (TWAIN: Mac - Kyocera KM-C3232E | C2525E/C3225E/C3232E/C4035E Operation Guide (Basic) - Page 169
Folio, 8K, 16K, 16KR Paper weight: 60 - 105 g/m2 Paper types: standard, recycled, color 23 5/16 × 23 1/4 × 12 3/8" 585 × 590 × 315 mm Approx. 57.2 26 kg 3000 Sheet Paper Feeder (option) Paper Supply Method Paper Size Supported Paper Dimensions (W) × (D) × (H) Weight Friction retard method (No. - Kyocera KM-C3232E | C2525E/C3225E/C3232E/C4035E Operation Guide (Basic) - Page 170
1/2", A4, B5, A5, A5R, B6R, A6R, 16K: 50 sheets Postcard: 10 sheets Supported Paper Weight Stapling: 90 g/m2 or less Punchingoption: 45 - 200 g/m2 Maximum Sheets for † When using color copy paper, stapling up to the number of allowed sheets may not be possible due to paper quality. NOTE: When - Kyocera KM-C3232E | C2525E/C3225E/C3232E/C4035E Operation Guide (Basic) - Page 171
weight: 60 - 105 g/m2 Paper type: standard, recycled, color, thin, letterhead 22 7/16 × 22 7/16 × 9 1/2" 570 × 570 × 240 mm 5.06 lbs. or less /2.3 kg or less Environmental Specifications Recovery time from Low-Power mode Time to Low-Power mode (factory default setting) Time to Sleep mode (factory - Kyocera KM-C3232E | C2525E/C3225E/C3232E/C4035E Operation Guide (Basic) - Page 172
Appendix Appendix-8 - Kyocera KM-C3232E | C2525E/C3225E/C3232E/C4035E Operation Guide (Basic) - Page 173
Color/B&W selection iii Combine mode i Conventions in this guide xxv Copy Adjusting exposure 3-6 Basic copying procedures 3-2 Index Duplex mode 3-11 Error message 6-4 Interrupt copy 3-17 Job reservation 3-18 Reducing/Enlarging 3-7 Selecting image quality 3-5 Sort mode 3-16 Specifications Appendix - Kyocera KM-C3232E | C2525E/C3225E/C3232E/C4035E Operation Guide (Basic) - Page 174
Index Hue adjust iii I Image repeat copy ii Included guides xxiv Installation precautions xiii Interface cover 1-2, 2-21 Interrupt copy 3-17 Inverted copying ii J Job accounting v Job build iii Job reservation 3-18 Job separator 4-5 Specifications Appendix-7 Job storage iv K Key counter 4-6 How to - Kyocera KM-C3232E | C2525E/C3225E/C3232E/C4035E Operation Guide (Basic) - Page 175
user information 2-34 Scan to FTP 3-32 Scan to PC 3-23 Scanner File Utility 2-40 Send E-mail 3-20 Specifications Appendix-4 TWAIN 3-27 Scanner File Utility Installing 2-40 Registering file save folders 2-41 Setting from a web browser 2-44 Scanner screen 1-6 Security kit 4-7 Selecting image quality - Kyocera KM-C3232E | C2525E/C3225E/C3232E/C4035E Operation Guide (Basic) - Page 176
-2 Copying performance Appendix-3 Document finisher Appendix-6 Document processor Appendix-5 Environmental specifications Appendix-7 Job separator Appendix-7 Paper feeder Appendix-5 Printing performance Appendix-4 Scanning performance Appendix-4 Split mode i, 3-14 Symbols xi Synergy print box - Kyocera KM-C3232E | C2525E/C3225E/C3232E/C4035E Operation Guide (Basic) - Page 177
For best results and machine performance, we recommend that you use only our original supplies for your products. A1 - Kyocera KM-C3232E | C2525E/C3225E/C3232E/C4035E Operation Guide (Basic) - Page 178
- Kyocera KM-C3232E | C2525E/C3225E/C3232E/C4035E Operation Guide (Basic) - Page 179
©2007 is a trademark of Kyocera Corporation - Kyocera KM-C3232E | C2525E/C3225E/C3232E/C4035E Operation Guide (Basic) - Page 180
Rev.1.0 2007.2 302JD56030
-
 1
1 -
 2
2 -
 3
3 -
 4
4 -
 5
5 -
 6
6 -
 7
7 -
8
-
9
-
10
-
11
-
12
-
13
-
14
-
15
-
16
-
17
-
18
-
19
-
20
-
21
-
22
-
23
-
24
-
25
-
26
-
27
-
28
-
29
-
30
-
31
-
32
-
33
-
34
-
35
-
36
-
37
-
38
-
39
-
40
-
41
-
42
-
43
-
44
-
45
-
46
-
47
-
48
-
49
-
50
-
51
-
52
-
53
-
54
-
55
-
56
-
57
-
58
-
59
-
60
-
61
-
62
-
63
-
64
-
65
-
66
-
67
-
68
-
69
-
70
-
71
-
72
-
73
-
74
-
75
-
76
-
77
-
78
-
79
-
80
-
81
-
82
-
83
-
84
-
85
-
86
-
87
-
88
-
89
-
90
-
91
-
92
-
93
-
94
-
95
-
96
-
97
-
98
-
99
-
100
-
101
-
102
-
103
-
104
-
105
-
106
-
107
-
108
-
109
-
110
-
111
-
112
-
113
-
114
-
115
-
116
-
117
-
118
-
119
-
120
-
121
-
122
-
123
-
124
-
125
-
126
-
127
-
128
-
129
-
130
-
131
-
132
-
133
-
134
-
135
-
136
-
137
-
138
-
139
-
140
-
141
-
142
-
143
-
144
-
145
-
146
-
147
-
148
-
149
-
150
-
151
-
152
-
153
-
154
-
155
-
156
-
157
-
158
-
159
-
160
-
161
-
162
-
163
-
164
-
165
-
166
-
167
-
168
-
169
-
170
-
171
-
172
-
173
-
174
-
175
-
176
-
177
-
178
-
179
-
180
 |
 |
Operation Guide
C2525E
C3225E
C3232E
C4035E
Please read the Operation Guide before using this machine. Keep it close to the machine for easy reference.