Kyocera KM-C3232E C2525E/C3225E/C3232E/C4035E Operation Guide (Basic) - Page 51
Specifying the Paper Type to the MP Tray
 |
View all Kyocera KM-C3232E manuals
Add to My Manuals
Save this manual to your list of manuals |
Page 51 highlights
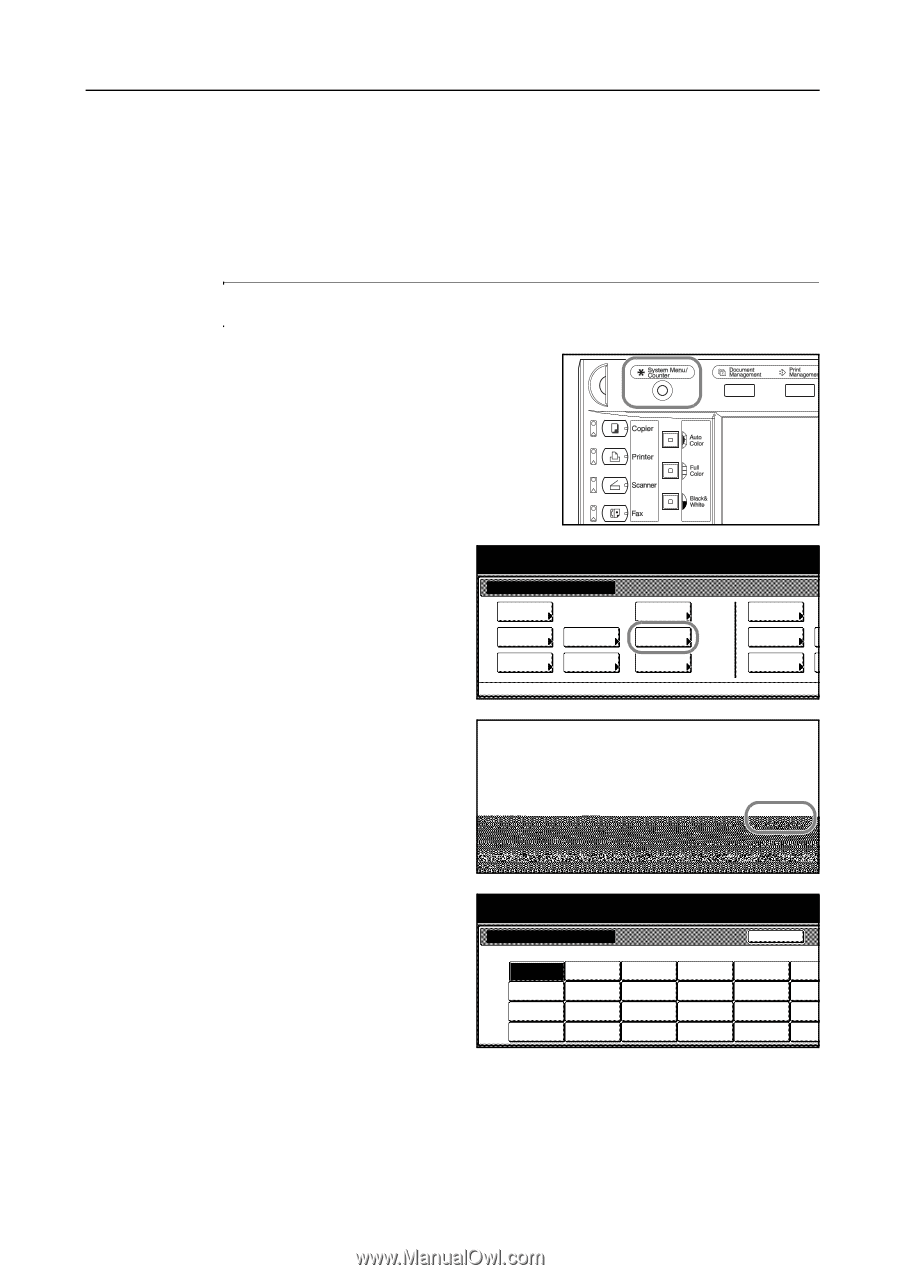
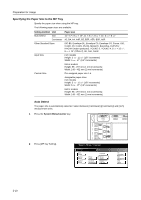
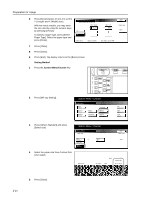
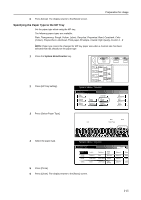
Preparation for Usage 6 Press [Close]. The display returns to the [Basic] screen. Specifying the Paper Type to the MP Tray Set the paper type when using the MP tray. The following paper types are available. Plain, Transparency, Rough, Vellum, Labels, Recycled, Preprinted, Bond, Cardstock, Color (Colour), Prepunched, Letterhead, Thick paper, Envelope, Coated, High Quality, Custom 1 - 8 NOTE: Paper type cannot be changed for MP tray paper size when a Custom size has been selected that has already set the paper type. 1 Press the System Menu/Counter key. 2 Press [MP tray Setting]. 3 Press [Select Paper Type]. System Menu / Counter System Menu Copy Default Scanner Default Machine Default Printer Default Document Management Language MP tray Setting Register Orig. Size Job Accounting BOX Management Print Report A m Menu / Counter g Unit Centimeter Inch Back Paper Type Close Plain Select Paper Type 4 Select the paper type. System Menu / Counter Select Paper Type Back Plain Transparency Rough Vellum Labels Recycled Preprinted Bond Cardstock Color Thick paper Envelope Prepunched Letterhead Coated High Quality Custom 1 Custom 2 Custom 3 Custom 4 Custom Custom Custom Custom 5 Press [Close]. 6 Press [Close]. The display returns to the [Basic] screen. 2-15
-
 1
1 -
2
-
3
-
4
-
5
-
6
-
7
-
8
-
9
-
10
-
11
-
12
-
13
-
14
-
15
-
16
-
17
-
18
-
19
-
20
-
21
-
22
-
23
-
24
-
25
-
26
-
27
-
28
-
29
-
30
-
31
-
32
-
33
-
34
-
35
-
36
-
37
-
38
-
39
-
40
-
41
-
42
-
43
-
44
-
45
-
 46
46 -
 47
47 -
 48
48 -
 49
49 -
 50
50 -
 51
51 -
 52
52 -
 53
53 -
 54
54 -
 55
55 -
 56
56 -
57
-
58
-
59
-
60
-
61
-
62
-
63
-
64
-
65
-
66
-
67
-
68
-
69
-
70
-
71
-
72
-
73
-
74
-
75
-
76
-
77
-
78
-
79
-
80
-
81
-
82
-
83
-
84
-
85
-
86
-
87
-
88
-
89
-
90
-
91
-
92
-
93
-
94
-
95
-
96
-
97
-
98
-
99
-
100
-
101
-
102
-
103
-
104
-
105
-
106
-
107
-
108
-
109
-
110
-
111
-
112
-
113
-
114
-
115
-
116
-
117
-
118
-
119
-
120
-
121
-
122
-
123
-
124
-
125
-
126
-
127
-
128
-
129
-
130
-
131
-
132
-
133
-
134
-
135
-
136
-
137
-
138
-
139
-
140
-
141
-
142
-
143
-
144
-
145
-
146
-
147
-
148
-
149
-
150
-
151
-
152
-
153
-
154
-
155
-
156
-
157
-
158
-
159
-
160
-
161
-
162
-
163
-
164
-
165
-
166
-
167
-
168
-
169
-
170
-
171
-
172
-
173
-
174
-
175
-
176
-
177
-
178
-
179
-
180
 |
 |