Kyocera KM-C3232E C2525E/C3225E/C3232E/C4035E Operation Guide (Basic) - Page 113
to scan., Full-Color, saves to the specified folder.
 |
View all Kyocera KM-C3232E manuals
Add to My Manuals
Save this manual to your list of manuals |
Page 113 highlights
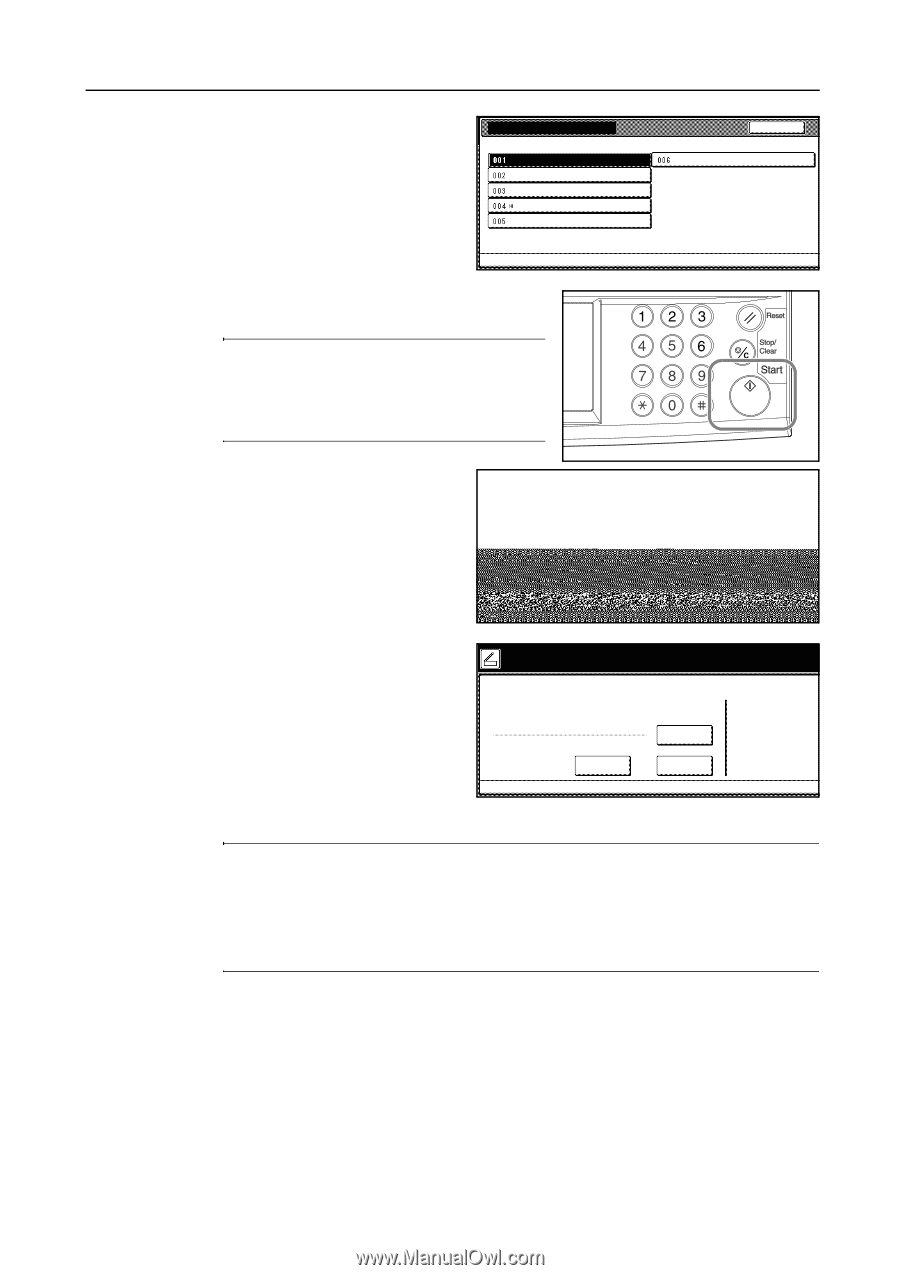
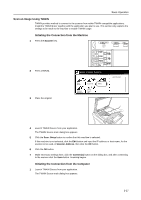
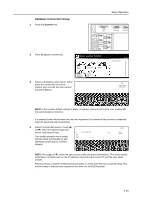
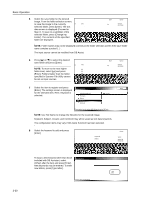
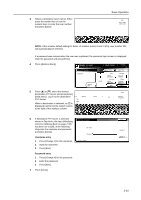
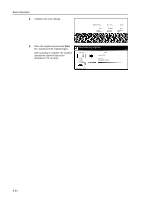
Basic Operation 9 Changed items are identified with a * mark. When satisfied with changes, select Indexing complete and press [Enter]. File Information Indexing completed File Name Subject Keyword Comment Creator Back Please select item for setting. 003-006 can be set for PDF only. 10 At the machine, place the original, and press the Start key to begin scanning. NOTE: Configure various settings from the operation panel. Change settings as necessary. If a setting is changed from both the computer and from the operation panel, the settings from the operation panel take priority. To reconfigure text data input, press [Try to scan. again input data]. als then press Start key. To end the operation, press [Cancel] ection ([Job cancel]). ata Try again input data ( Full-Color ) Original Send 11×8½" 8½×11" 08/08/'05 14:00 Cancel Auto Select Orig.Size Auto size Select Send Size Basic Top Edge Orig. Set Direction 200dpi Scanning Resolution Quality PDF File Type Edit 11 The following screen is displayed when Press 'Input data complete'key. scanning is complete. To finish scanning Select the method to continue 08/08 originals, press [Input data complete]. The KM-DB Assist function adds text the previously registered text information (keywords) to the scanned image and saves to the specified folder. Dest. of input data: File A The Database Assist function adds text information from the scanned image as User name: 001. a CSV file and save to the specified folder. Sel.folder input data How-continue Same mode input data Input of new data NOTE: To re-use the database connection, press [Sel. folder input data]. Follow Step 4 from page 3-29. To re-use the database connection with the same settings, press [Same mode input data]. Follow Step 6 from page 3-30. To re-use the database connection with the same Assist function selection, press [Input of new data]. Follow Step 5 from page 3-30. 3-31
-
 1
1 -
2
-
3
-
4
-
5
-
6
-
7
-
8
-
9
-
10
-
11
-
12
-
13
-
14
-
15
-
16
-
17
-
18
-
19
-
20
-
21
-
22
-
23
-
24
-
25
-
26
-
27
-
28
-
29
-
30
-
31
-
32
-
33
-
34
-
35
-
36
-
37
-
38
-
39
-
40
-
41
-
42
-
43
-
44
-
45
-
46
-
47
-
48
-
49
-
50
-
51
-
52
-
53
-
54
-
55
-
56
-
57
-
58
-
59
-
60
-
61
-
62
-
63
-
64
-
65
-
66
-
67
-
68
-
69
-
70
-
71
-
72
-
73
-
74
-
75
-
76
-
77
-
78
-
79
-
80
-
81
-
82
-
83
-
84
-
85
-
86
-
87
-
88
-
89
-
90
-
91
-
92
-
93
-
94
-
95
-
96
-
97
-
98
-
99
-
100
-
101
-
102
-
103
-
104
-
105
-
106
-
107
-
 108
108 -
 109
109 -
 110
110 -
 111
111 -
 112
112 -
 113
113 -
 114
114 -
 115
115 -
 116
116 -
 117
117 -
 118
118 -
119
-
120
-
121
-
122
-
123
-
124
-
125
-
126
-
127
-
128
-
129
-
130
-
131
-
132
-
133
-
134
-
135
-
136
-
137
-
138
-
139
-
140
-
141
-
142
-
143
-
144
-
145
-
146
-
147
-
148
-
149
-
150
-
151
-
152
-
153
-
154
-
155
-
156
-
157
-
158
-
159
-
160
-
161
-
162
-
163
-
164
-
165
-
166
-
167
-
168
-
169
-
170
-
171
-
172
-
173
-
174
-
175
-
176
-
177
-
178
-
179
-
180
 |
 |