Kyocera KM-C3232E C2525E/C3225E/C3232E/C4035E Operation Guide (Basic) - Page 112
Keyword, File Name, Subject, Creator, Comment, Other, Enter]. The settings screen is displayed
 |
View all Kyocera KM-C3232E manuals
Add to My Manuals
Save this manual to your list of manuals |
Page 112 highlights
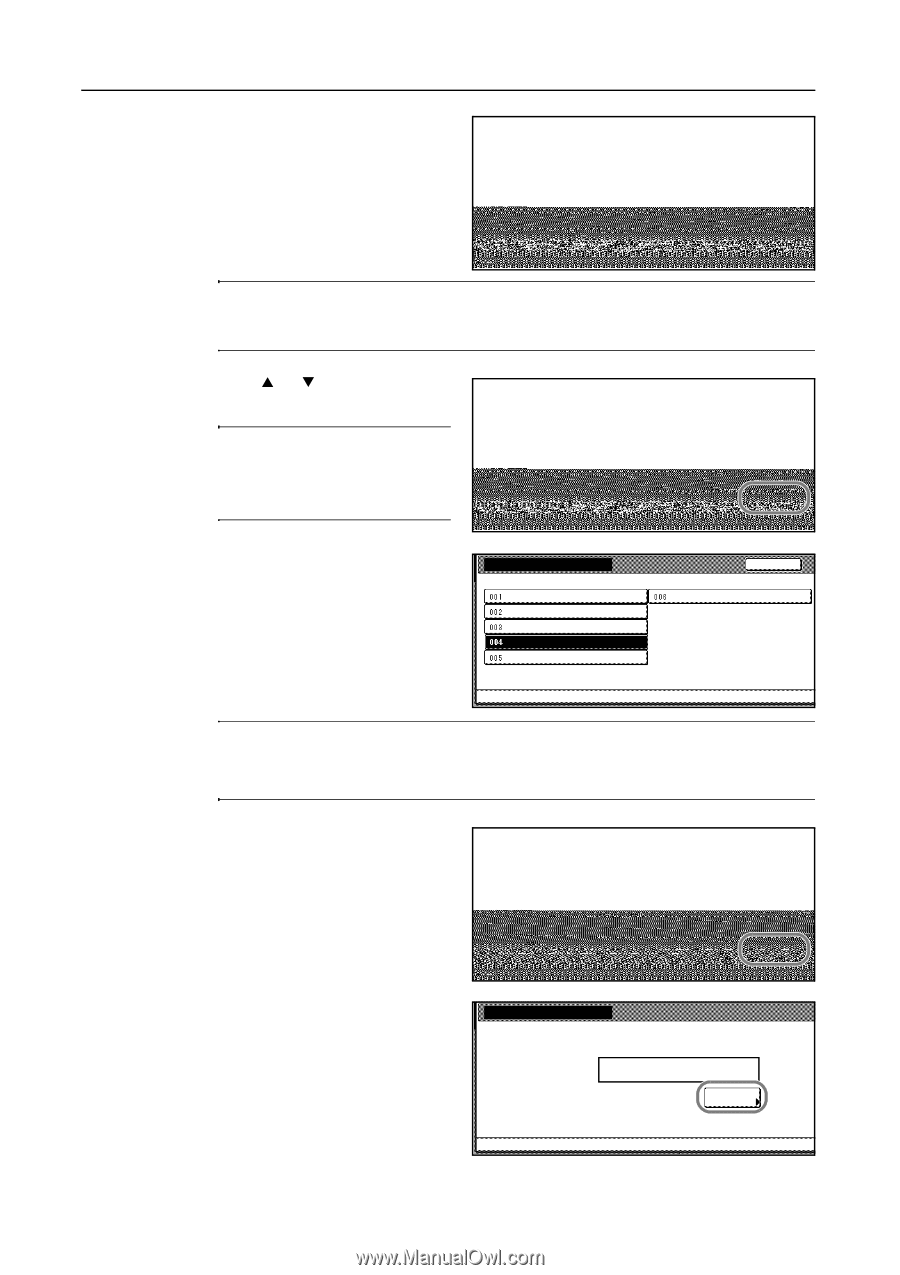
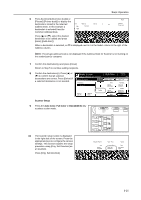
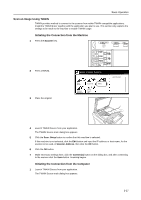
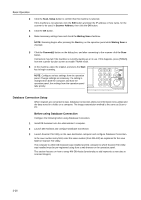
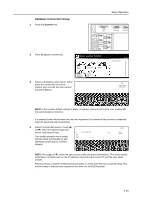
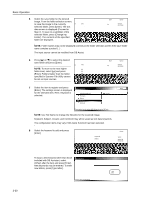
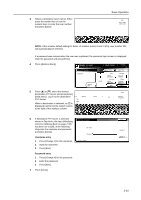
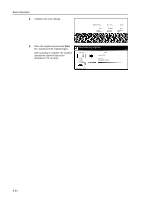
Basic Operation 5 Select the save folder for the desired image. From the folder selection screen, to save the image to the currently 0-9 \100. selected folder, press [Enter]. The text [100]. data screen is displayed (Proceed to Step 7). To save to a subfolder of the selected folder, press [Change inp. Folder]. The contents of the specified folder are displayed. nation folder. Back Up Cancel Change inp.Folder Down Enter NOTE: Folder names may not be displayed correctly in the folder selection screen if the save folder name contains a period ( . ) . The input source cannot be modified from DB Assist. 6 Press [S] or [T] to select the desired save folder and press [Enter]. 0-9 \100. [up] NOTE: To move to the next higher [A]. folder level, select [up] and press [B]. [Enter]. Folders higher than the folder [C]. specified in Scanner File Utility cannot [D]. be set as input sources. nation folder. 7 Select the item to register and press File Information [Enter]. The settings screen is displayed for the selected item. Here, Keyword is selected. Indexing completed File Name Subject Keyword Comment Back Up Cancel Change inp.Folder Down Enter Back Creator Please select item for setting. 003-006 can be set for PDF only. NOTE: Use File Name to change the filename for the scanned image. Keyword, Subject, Creator, and Comment may all be saved as text data keywords. The configuration items may vary if DB Assist Function has been selected. 8 Select the keyword to add and press [Enter]. 1 2 3 4 5 word. To input a new keyword other than those included with DB Assistant, select (Other) after the item and press [Enter]. New keywords may be entered. To enter new letters, press [Type letter]. New Keyword Keyword6 (Other) Cancel Select: Cancel all keywords Enter Type letter Please enter new keyword. 3-30
-
 1
1 -
2
-
3
-
4
-
5
-
6
-
7
-
8
-
9
-
10
-
11
-
12
-
13
-
14
-
15
-
16
-
17
-
18
-
19
-
20
-
21
-
22
-
23
-
24
-
25
-
26
-
27
-
28
-
29
-
30
-
31
-
32
-
33
-
34
-
35
-
36
-
37
-
38
-
39
-
40
-
41
-
42
-
43
-
44
-
45
-
46
-
47
-
48
-
49
-
50
-
51
-
52
-
53
-
54
-
55
-
56
-
57
-
58
-
59
-
60
-
61
-
62
-
63
-
64
-
65
-
66
-
67
-
68
-
69
-
70
-
71
-
72
-
73
-
74
-
75
-
76
-
77
-
78
-
79
-
80
-
81
-
82
-
83
-
84
-
85
-
86
-
87
-
88
-
89
-
90
-
91
-
92
-
93
-
94
-
95
-
96
-
97
-
98
-
99
-
100
-
101
-
102
-
103
-
104
-
105
-
106
-
 107
107 -
 108
108 -
 109
109 -
 110
110 -
 111
111 -
 112
112 -
 113
113 -
 114
114 -
 115
115 -
 116
116 -
 117
117 -
118
-
119
-
120
-
121
-
122
-
123
-
124
-
125
-
126
-
127
-
128
-
129
-
130
-
131
-
132
-
133
-
134
-
135
-
136
-
137
-
138
-
139
-
140
-
141
-
142
-
143
-
144
-
145
-
146
-
147
-
148
-
149
-
150
-
151
-
152
-
153
-
154
-
155
-
156
-
157
-
158
-
159
-
160
-
161
-
162
-
163
-
164
-
165
-
166
-
167
-
168
-
169
-
170
-
171
-
172
-
173
-
174
-
175
-
176
-
177
-
178
-
179
-
180
 |
 |