Kyocera KM-C3232E C2525E/C3225E/C3232E/C4035E Operation Guide (Basic) - Page 68
Scanner Basic Settings, IMPORTANT, System Menu/Counter, Configuration Item, Description
 |
View all Kyocera KM-C3232E manuals
Add to My Manuals
Save this manual to your list of manuals |
Page 68 highlights
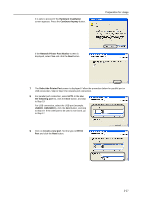
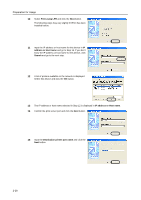
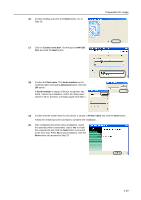
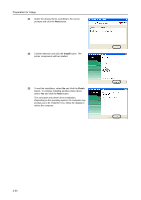
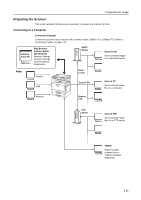
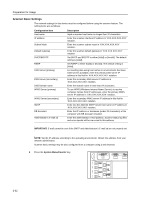
Preparation for Usage Scanner Basic Settings The network settings for this device must be configured before using the scanner feature. The setting items are as follows. Configuration Item Host name IP address Subnet Mask Default Gateway DHCP/BOOTP RARP DNS Server (primary) DNS Server (secondary) DNS Domain name WINS Server (primary) WINS Server (secondary) SMTP DB Assistant Administrator's E-mail ad Description Input a scanner host name no longer than 32 characters. Enter the scanner interface IP address in 'XXX.XXX.XXX.XXX' notation. Enter the scanner subnet mask in 'XXX.XXX.XXX.XXX' notation. Enter the scanner default gateway in 'XXX.XXX.XXX.XXX' notation. Set DHCP and BOOTP to either [Valid] or [Invalid]. The default setting is [Valid]. Set RARP to either [Valid] or [Invalid]. The default setting is [Valid]. For sending data using host names in environments that have DNS servers available, enter the primary DNS server IP address in this field in 'XXX.XXX.XXX.XXX' notation. Enter the secondary DNS server IP address in 'XXX.XXX.XXX.XXX' notation. Enter the domain name in less than 64 characters. To use WINS (Windows Internet Name Service) to resolve computer names from IP addresses, enter the primary WINS server IP address in 'XXX.XXX.XXX.XXX' notation. Enter the secondary WINS server IP address in this field in 'XXX.XXX.XXX.XXX' notation. Enter into this field the SMTP server host name or IP address in 'XXX.XXX.XXX.XXX' notation. Enter the IP address or hostname (under 32 characters) of the computer with DB Assistant installed. Enter the administrator e-mail address. Scanner status log files and error reports will be via e-mail to this address. IMPORTANT: E-mail cannot be sent if the SMTP and Administrator's E-mail ad are not properly set. NOTE: Set the IP address according to the operating environment. Obtain this address from your network administrator. Scanner basic settings may be also configured from a computer using a web browser. 1 Press the System Menu/Counter key. 2-32
-
 1
1 -
2
-
3
-
4
-
5
-
6
-
7
-
8
-
9
-
10
-
11
-
12
-
13
-
14
-
15
-
16
-
17
-
18
-
19
-
20
-
21
-
22
-
23
-
24
-
25
-
26
-
27
-
28
-
29
-
30
-
31
-
32
-
33
-
34
-
35
-
36
-
37
-
38
-
39
-
40
-
41
-
42
-
43
-
44
-
45
-
46
-
47
-
48
-
49
-
50
-
51
-
52
-
53
-
54
-
55
-
56
-
57
-
58
-
59
-
60
-
61
-
62
-
 63
63 -
 64
64 -
 65
65 -
 66
66 -
 67
67 -
 68
68 -
 69
69 -
 70
70 -
 71
71 -
 72
72 -
 73
73 -
74
-
75
-
76
-
77
-
78
-
79
-
80
-
81
-
82
-
83
-
84
-
85
-
86
-
87
-
88
-
89
-
90
-
91
-
92
-
93
-
94
-
95
-
96
-
97
-
98
-
99
-
100
-
101
-
102
-
103
-
104
-
105
-
106
-
107
-
108
-
109
-
110
-
111
-
112
-
113
-
114
-
115
-
116
-
117
-
118
-
119
-
120
-
121
-
122
-
123
-
124
-
125
-
126
-
127
-
128
-
129
-
130
-
131
-
132
-
133
-
134
-
135
-
136
-
137
-
138
-
139
-
140
-
141
-
142
-
143
-
144
-
145
-
146
-
147
-
148
-
149
-
150
-
151
-
152
-
153
-
154
-
155
-
156
-
157
-
158
-
159
-
160
-
161
-
162
-
163
-
164
-
165
-
166
-
167
-
168
-
169
-
170
-
171
-
172
-
173
-
174
-
175
-
176
-
177
-
178
-
179
-
180
 |
 |