Kyocera KM-C3232E C2525E/C3225E/C3232E/C4035E Operation Guide (Basic) - Page 72
Select the Common Address Book you, Properties] [Correct Dest. Info] - address book edit
 |
View all Kyocera KM-C3232E manuals
Add to My Manuals
Save this manual to your list of manuals |
Page 72 highlights
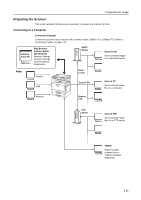
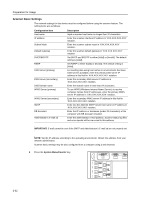
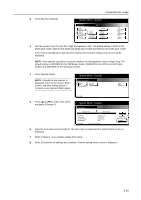
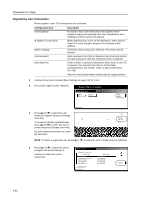
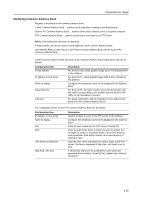
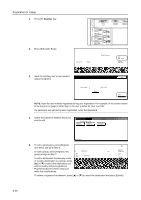
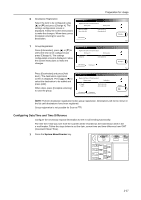
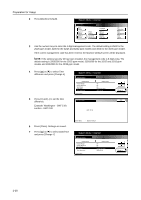
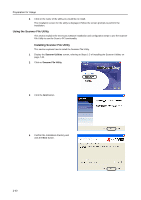
Preparation for Usage 1 Press the Scanner key. 2 Press [Edit Addr. Book]. scanner function. Scan to PC TWAIN Scan to FTP 3 Input the sending user's user number de. and press [Enter]. Recall Program 08/08/'05 14:00 Edit Addr. Book Change User Info. History of Sending Stop User number Clear (with #key) Enter NOTE: Input the user number registered during user registration. For example, in the screen shown in the process on page 2-34 for Step 3, the user number for User A is '001'. If a password was set during user registration, enter that password. 4 Select the Common Address Book you wish to edit. Edit Address Book Select the list to edit. Common Send Email Common Scan to PC FTP Common Add. Book Select the list 5 To add a destination, press [Register to PC new dest.] and go to Step 6. To add a group, press [Register new 0-9 group] and go to Step 7. GHI O PQR To edit a destination that already exists X YZ or to add a destination to a group, press [S] or [T] to select the destination you wish to modify and press [Address t. Properties] ([Correct Dest. Info]) and make the modifications. Destination User B UserGroup Up Down End Address Properties Delete Register new dest. Register new group # of register. 2/100 To delete a registered destination, press [S] or [T] to select the destination and press [Delete]. 2-36
-
 1
1 -
2
-
3
-
4
-
5
-
6
-
7
-
8
-
9
-
10
-
11
-
12
-
13
-
14
-
15
-
16
-
17
-
18
-
19
-
20
-
21
-
22
-
23
-
24
-
25
-
26
-
27
-
28
-
29
-
30
-
31
-
32
-
33
-
34
-
35
-
36
-
37
-
38
-
39
-
40
-
41
-
42
-
43
-
44
-
45
-
46
-
47
-
48
-
49
-
50
-
51
-
52
-
53
-
54
-
55
-
56
-
57
-
58
-
59
-
60
-
61
-
62
-
63
-
64
-
65
-
66
-
 67
67 -
 68
68 -
 69
69 -
 70
70 -
 71
71 -
 72
72 -
 73
73 -
 74
74 -
 75
75 -
 76
76 -
 77
77 -
78
-
79
-
80
-
81
-
82
-
83
-
84
-
85
-
86
-
87
-
88
-
89
-
90
-
91
-
92
-
93
-
94
-
95
-
96
-
97
-
98
-
99
-
100
-
101
-
102
-
103
-
104
-
105
-
106
-
107
-
108
-
109
-
110
-
111
-
112
-
113
-
114
-
115
-
116
-
117
-
118
-
119
-
120
-
121
-
122
-
123
-
124
-
125
-
126
-
127
-
128
-
129
-
130
-
131
-
132
-
133
-
134
-
135
-
136
-
137
-
138
-
139
-
140
-
141
-
142
-
143
-
144
-
145
-
146
-
147
-
148
-
149
-
150
-
151
-
152
-
153
-
154
-
155
-
156
-
157
-
158
-
159
-
160
-
161
-
162
-
163
-
164
-
165
-
166
-
167
-
168
-
169
-
170
-
171
-
172
-
173
-
174
-
175
-
176
-
177
-
178
-
179
-
180
 |
 |
