Ricoh Aficio SP 4310N Software Guide - Page 141
Access in the Administrator Mode, Displaying Web Image Monitor Help
 |
View all Ricoh Aficio SP 4310N manuals
Add to My Manuals
Save this manual to your list of manuals |
Page 141 highlights
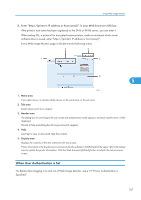
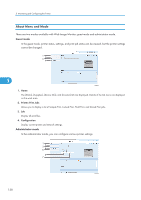
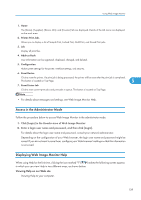
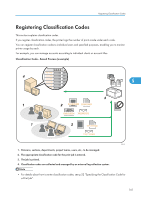
Using Web Image Monitor 1. Home The [Status], [Supplies], [Device Info], and [Counter] tab are displayed. Details of the tab menu are displayed on the work area. 2. Printer: Print Jobs Allows you to display a list of Sample Print, Locked Print, Hold Print, and Stored Print jobs. 3. Job Display all print files. 4. Address Book User information can be registered, displayed, changed, and deleted. 5. Configuration Make system settings for the printer, interface settings, and security. 6. Reset Device Click to reset the printer. If a print job is being processed, the printer will be reset after the print job is completed. This button is located on Top Page. 5 7. Reset Printer Job Click to reset current print jobs and print jobs in queue. This button is located on Top Page. • For details about messages and settings, see Web Image Monitor Help. Access in the Administrator Mode Follow the procedure below to access Web Image Monitor in the administrator mode. 1. Click [Login] in the Header area of Web Image Monitor. 2. Enter a login user name and password, and then click [Login]. For details about the login user name and password, consult your network administrator. Depending on the configuration of your Web browser, the login user name and password might be saved. If you do not want to save them, configure your Web browser's settings so that this information is not saved. Displaying Web Image Monitor Help When using Help for the first time, clicking the icon marked "?" ( ) makes the following screen appear, in which you can view Help in two different ways, as shown below: Viewing Help on our Web site Viewing Help to your computer. 139
-
 1
1 -
2
-
3
-
4
-
5
-
6
-
7
-
8
-
9
-
10
-
11
-
12
-
13
-
14
-
15
-
16
-
17
-
18
-
19
-
20
-
21
-
22
-
23
-
24
-
25
-
26
-
27
-
28
-
29
-
30
-
31
-
32
-
33
-
34
-
35
-
36
-
37
-
38
-
39
-
40
-
41
-
42
-
43
-
44
-
45
-
46
-
47
-
48
-
49
-
50
-
51
-
52
-
53
-
54
-
55
-
56
-
57
-
58
-
59
-
60
-
61
-
62
-
63
-
64
-
65
-
66
-
67
-
68
-
69
-
70
-
71
-
72
-
73
-
74
-
75
-
76
-
77
-
78
-
79
-
80
-
81
-
82
-
83
-
84
-
85
-
86
-
87
-
88
-
89
-
90
-
91
-
92
-
93
-
94
-
95
-
96
-
97
-
98
-
99
-
100
-
101
-
102
-
103
-
104
-
105
-
106
-
107
-
108
-
109
-
110
-
111
-
112
-
113
-
114
-
115
-
116
-
117
-
118
-
119
-
120
-
121
-
122
-
123
-
124
-
125
-
126
-
127
-
128
-
129
-
130
-
131
-
132
-
133
-
134
-
135
-
 136
136 -
 137
137 -
 138
138 -
 139
139 -
 140
140 -
 141
141 -
 142
142 -
 143
143 -
 144
144 -
 145
145 -
 146
146 -
147
-
148
-
149
-
150
-
151
-
152
-
153
-
154
-
155
-
156
-
157
-
158
-
159
-
160
-
161
-
162
-
163
-
164
-
165
-
166
-
167
-
168
-
169
-
170
-
171
-
172
-
173
-
174
-
175
-
176
-
177
-
178
-
179
-
180
-
181
-
182
-
183
-
184
-
185
-
186
-
187
-
188
-
189
-
190
-
191
-
192
-
193
-
194
-
195
-
196
-
197
-
198
-
199
-
200
-
201
-
202
-
203
-
204
-
205
-
206
-
207
-
208
-
209
-
210
-
211
-
212
-
213
-
214
-
215
-
216
-
217
-
218
-
219
-
220
-
221
-
222
-
223
-
224
 |
 |