Ricoh Aficio SP 4310N Software Guide - Page 38
Advanced Printing, Menu Names and Brief Overview of Each Function - pcl6
 |
View all Ricoh Aficio SP 4310N manuals
Add to My Manuals
Save this manual to your list of manuals |
Page 38 highlights
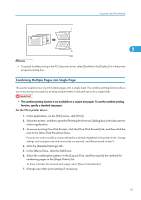
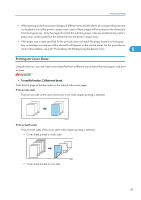
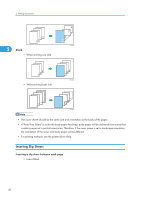
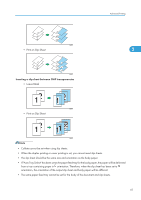
2. Printing Documents Advanced Printing This section explains the printer's advanced printing functions. Other than the functions that can be configured in the [One Click Presets] tab, various print functions can be setup from each [Menu:] icon in the [Detailed Settings] tab. The settings for each function described in 2 this section can be changed by using the following menus. Using the PCL6 printer driver as an example, the following procedure explains how to configure the printer's advanced printing functions. Menu Names and Brief Overview of Each Function The following is an overview of the settings that are available on the [Basic], [Paper], and [Effects] menus. [Basic] menu You can specify the type of the paper you want to print on. • Document Size: If the printer's trays do not contain paper matching the settings of the print job, you can proceed with printing by using the bypass tray. For details about this function, see p.37 "Specifying Printer Driver or Print Command Priority". [Paper] menu You can enable/disable the cover and slip sheets function. • Paper Type: You can specify the type of the paper you want to print on. If the printer's trays do not contain paper matching the settings of the print job, you can proceed with printing by using the bypass tray. For details about this function, see p.37 "Specifying Printer Driver or Print Command Priority". • Front Cover Using this function, you can insert cover sheets fed from a different tray to that of the main paper, and print on them. For details, see p.39 "Printing on Cover Sheet". • Slip Sheet Using this function, you can insert slip sheets fed from a different tray to that of the main paper, and print on them. For details, see p.40 "Inserting Slip Sheets". [Effects] menu You can enable/disable the Watermark function. 36
-
 1
1 -
2
-
3
-
4
-
5
-
6
-
7
-
8
-
9
-
10
-
11
-
12
-
13
-
14
-
15
-
16
-
17
-
18
-
19
-
20
-
21
-
22
-
23
-
24
-
25
-
26
-
27
-
28
-
29
-
30
-
31
-
32
-
 33
33 -
 34
34 -
 35
35 -
 36
36 -
 37
37 -
 38
38 -
 39
39 -
 40
40 -
 41
41 -
 42
42 -
 43
43 -
44
-
45
-
46
-
47
-
48
-
49
-
50
-
51
-
52
-
53
-
54
-
55
-
56
-
57
-
58
-
59
-
60
-
61
-
62
-
63
-
64
-
65
-
66
-
67
-
68
-
69
-
70
-
71
-
72
-
73
-
74
-
75
-
76
-
77
-
78
-
79
-
80
-
81
-
82
-
83
-
84
-
85
-
86
-
87
-
88
-
89
-
90
-
91
-
92
-
93
-
94
-
95
-
96
-
97
-
98
-
99
-
100
-
101
-
102
-
103
-
104
-
105
-
106
-
107
-
108
-
109
-
110
-
111
-
112
-
113
-
114
-
115
-
116
-
117
-
118
-
119
-
120
-
121
-
122
-
123
-
124
-
125
-
126
-
127
-
128
-
129
-
130
-
131
-
132
-
133
-
134
-
135
-
136
-
137
-
138
-
139
-
140
-
141
-
142
-
143
-
144
-
145
-
146
-
147
-
148
-
149
-
150
-
151
-
152
-
153
-
154
-
155
-
156
-
157
-
158
-
159
-
160
-
161
-
162
-
163
-
164
-
165
-
166
-
167
-
168
-
169
-
170
-
171
-
172
-
173
-
174
-
175
-
176
-
177
-
178
-
179
-
180
-
181
-
182
-
183
-
184
-
185
-
186
-
187
-
188
-
189
-
190
-
191
-
192
-
193
-
194
-
195
-
196
-
197
-
198
-
199
-
200
-
201
-
202
-
203
-
204
-
205
-
206
-
207
-
208
-
209
-
210
-
211
-
212
-
213
-
214
-
215
-
216
-
217
-
218
-
219
-
220
-
221
-
222
-
223
-
224
 |
 |
