Ricoh Aficio SP 4310N Software Guide - Page 28
Frequently Used Print Methods, Standard Printing - duplex printing
 |
View all Ricoh Aficio SP 4310N manuals
Add to My Manuals
Save this manual to your list of manuals |
Page 28 highlights
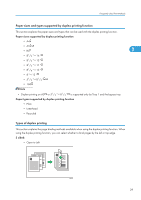
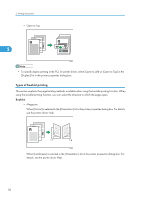
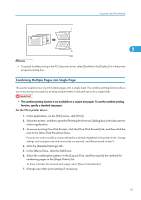
2. Printing Documents Frequently Used Print Methods This section explains how to use the various printing functions including normal printing, duplex printing, and combine printing. Each function described in this section is configured and registered under "One Click Presets". You can 2 also change the parameters for each function by modifying "One Click Presets". For details about custom settings, see p.24 "Making Printer Settings - One Click Presets". Standard Printing Use the following procedure to print documents using the normal printing function with the printer driver. • If you are using a printer with ELP-NX installed, all print jobs for which "Normal Print" or "Locked Print" is specified are stored in ELP-NX when user authentication is set. After issuing the print command from the printer driver, log in to ELP-NX and print the job. • If you are using a printer with ELP-NX installed, all print jobs for which "Locked Print" is specified are stored in ELP-NX when user authentication is not set. Also note that any jobs for which "Locked Print" is not specified will be deleted according to the default setting of ELP-NX. • For details about how to print using ELP-NX, see the manuals provided with the application. • For details about the option settings of ELP-NX, consult your administrator. • Before printing, make sure that the settings for the installed options and loaded paper are correctly configured. For the PCL 6 printer driver: 1. In the application, on the [File] menu, click [Print]. 2. Select the printer, and then open the [Printing Preferences] dialog box in the document's native application. 3. Click the [One Click Presets] tab, if it is not already selected. 4. In the [Job Type:] list, select [Normal Print]. If you want to print multiple copies, specify a number of sets in the [Copies:] box. 5. In the [Document Size:] list, select the size of the original to be printed. 6. In the [Orientation:] list, select [Portrait] or [Landscape] as the orientation of the original. 7. In the [Input Tray] list, select the paper tray that contains the paper you want to print onto. If you select [Auto Tray Select] in the [Input Tray] list, the source tray is automatically selected according to the paper size and type specified. 26
-
 1
1 -
2
-
3
-
4
-
5
-
6
-
7
-
8
-
9
-
10
-
11
-
12
-
13
-
14
-
15
-
16
-
17
-
18
-
19
-
20
-
21
-
22
-
 23
23 -
 24
24 -
 25
25 -
 26
26 -
 27
27 -
 28
28 -
 29
29 -
 30
30 -
 31
31 -
 32
32 -
 33
33 -
34
-
35
-
36
-
37
-
38
-
39
-
40
-
41
-
42
-
43
-
44
-
45
-
46
-
47
-
48
-
49
-
50
-
51
-
52
-
53
-
54
-
55
-
56
-
57
-
58
-
59
-
60
-
61
-
62
-
63
-
64
-
65
-
66
-
67
-
68
-
69
-
70
-
71
-
72
-
73
-
74
-
75
-
76
-
77
-
78
-
79
-
80
-
81
-
82
-
83
-
84
-
85
-
86
-
87
-
88
-
89
-
90
-
91
-
92
-
93
-
94
-
95
-
96
-
97
-
98
-
99
-
100
-
101
-
102
-
103
-
104
-
105
-
106
-
107
-
108
-
109
-
110
-
111
-
112
-
113
-
114
-
115
-
116
-
117
-
118
-
119
-
120
-
121
-
122
-
123
-
124
-
125
-
126
-
127
-
128
-
129
-
130
-
131
-
132
-
133
-
134
-
135
-
136
-
137
-
138
-
139
-
140
-
141
-
142
-
143
-
144
-
145
-
146
-
147
-
148
-
149
-
150
-
151
-
152
-
153
-
154
-
155
-
156
-
157
-
158
-
159
-
160
-
161
-
162
-
163
-
164
-
165
-
166
-
167
-
168
-
169
-
170
-
171
-
172
-
173
-
174
-
175
-
176
-
177
-
178
-
179
-
180
-
181
-
182
-
183
-
184
-
185
-
186
-
187
-
188
-
189
-
190
-
191
-
192
-
193
-
194
-
195
-
196
-
197
-
198
-
199
-
200
-
201
-
202
-
203
-
204
-
205
-
206
-
207
-
208
-
209
-
210
-
211
-
212
-
213
-
214
-
215
-
216
-
217
-
218
-
219
-
220
-
221
-
222
-
223
-
224
 |
 |