Samsung SGH-A817 User Manual (user Manual) (ver.f7) (English) - Page 60
Editing an Existing Contact
 |
View all Samsung SGH-A817 manuals
Add to My Manuals
Save this manual to your list of manuals |
Page 60 highlights
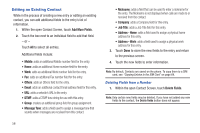
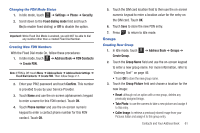
Editing an Existing Contact While in the process of creating a new entry or editing an existing contact, you can add additional fields to the entry's list of information. 1. Within the open Contact Screen, touch Add More Fields. 2. Touch the box next to an individual field to add that field. - or - Touch All to select all entries. Additional fields include: • Mobile: adds an additional Mobile number field for the entry. • Home: adds an additional Home number field for the entry. • Work: adds an additional Work number field for the entry. • Fax: adds an additional Fax number field for the entry. • Others: adds an Others field for the entry. • Email: adds an additional contact Email address field for this entry. • URL: adds a website's URL to the entry. • DTMF: adds a DTMF tone string for use with this entry. • Group: creates an additional group field for group assignment. • Message Tone: adds a field used to assign a message tone that sounds when messages are received from this contact. • Nickname: adds a field that can be used to enter a nickname for the entry. The Nickname is not displayed when calls are made to or received from the contact. • Company: adds a Company field for this entry. • Job Title: adds a Job Title field for this entry. • Address - Home: adds a field used to assign a physical home address for this entry. • Address - Work: adds a field used to assign a physical work address for this entry. 3. Touch Done to store the new fields to the entry and return to the previous screen. 4. Touch the new fields to enter information. Note: By default, Contacts are saved on the phone. To copy them to a SIM card, see "Copying Entries to the SIM Card" on page 64. Deleting Fields from a Number 1. Within the open Contact Screen, touch Delete Fields. Note: Only certain new fields may be deleted. If you have not added any new fields to the contact, the Delete fields button does not appear. 56
-
 1
1 -
2
-
3
-
4
-
5
-
6
-
7
-
8
-
9
-
10
-
11
-
12
-
13
-
14
-
15
-
16
-
17
-
18
-
19
-
20
-
21
-
22
-
23
-
24
-
25
-
26
-
27
-
28
-
29
-
30
-
31
-
32
-
33
-
34
-
35
-
36
-
37
-
38
-
39
-
40
-
41
-
42
-
43
-
44
-
45
-
46
-
47
-
48
-
49
-
50
-
51
-
52
-
53
-
54
-
 55
55 -
 56
56 -
 57
57 -
 58
58 -
 59
59 -
 60
60 -
 61
61 -
 62
62 -
 63
63 -
 64
64 -
 65
65 -
66
-
67
-
68
-
69
-
70
-
71
-
72
-
73
-
74
-
75
-
76
-
77
-
78
-
79
-
80
-
81
-
82
-
83
-
84
-
85
-
86
-
87
-
88
-
89
-
90
-
91
-
92
-
93
-
94
-
95
-
96
-
97
-
98
-
99
-
100
-
101
-
102
-
103
-
104
-
105
-
106
-
107
-
108
-
109
-
110
-
111
-
112
-
113
-
114
-
115
-
116
-
117
-
118
-
119
-
120
-
121
-
122
-
123
-
124
-
125
-
126
-
127
-
128
-
129
-
130
-
131
-
132
-
133
-
134
-
135
-
136
-
137
-
138
-
139
-
140
-
141
-
142
-
143
-
144
-
145
-
146
-
147
-
148
-
149
-
150
-
151
-
152
-
153
-
154
-
155
-
156
-
157
-
158
-
159
-
160
-
161
-
162
-
163
-
164
-
165
-
166
-
167
-
168
-
169
-
170
-
171
-
172
-
173
-
174
-
175
-
176
-
177
-
178
-
179
-
180
-
181
-
182
-
183
-
184
-
185
-
186
-
187
-
188
-
189
-
190
-
191
-
192
-
193
-
194
-
195
-
196
-
197
-
198
-
199
 |
 |