Yamaha A5000 Owner's Manual - Page 118
About the EDIT Mode, EDIT Mode Functions
 |
View all Yamaha A5000 manuals
Add to My Manuals
Save this manual to your list of manuals |
Page 118 highlights
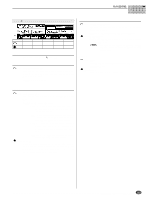
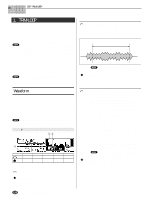
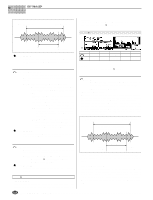
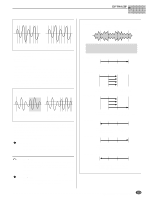
About the EDIT Mode About the EDIT Mode The EDIT mode is used to directly edit samples and sample banks. Press the [EDIT] button to enter the EDIT mode. • A "sample" is the smallest sound unit handled by the A5000 or A4000, consisting of a digitally-recorded waveform and related playback parameters. • A "sample bank" is a group of samples which can be handled as a single sample. Sample banks make it easy to manage samples for multi-sampled instruments or drum kits, for example. EDIT Mode Functions The EDIT mode includes the 6 functions listed below (selected via the [F1] - [F6] function buttons, respectively). s [F1] TRIM/LOOP Button Use this function to select the playback area on the waveform (the playback "start" and "end" points), to trim off extraneous waveform data, and to set up the playback direction (forward or backward) and loop characteristics (loop range and type) (page 120). 3 display pages are provided: Waveform, SmpInfo (Sample Information), and LoopRmx (Loop Remix). s [F2] MAP/OUT Button Use this function to edit the sample's key range, original-key value, output level, tuning, and various other playback settings (page 127). 4 display pages are provided: Mix&Key (Mix & Key Range), Pitch, Exp&Vel (Expand & Velocity Range), and LvlScal (Level Scaling). s [F3] FILTER Button This function sets the sample's filter type, filter characteristics, and equalization (page 133). 2 display pages are provided: Fltr&EQ (Filter & EQ), and FltrScal (Filter Scaling). s [F4] EG Button Use this function to set up the sample's three envelope generators: amplitude EG, filter EG, and pitch EG. The EG settings determine how the sound of each note develops over time (page 137). 3 display pages are provided: AmpEG (Amplitude EG), FilterEG, and PitchEG. s [F5] LFO Button This function sets up the sample's low-frequency oscillator (LFO). You use the LFO to apply an audible modulation to the output level, filtering, and pitch (page 143). This function has only one page: LFO (Low Frequency Oscillator). s [F6] MIDI/CTRL Button This function selects the MIDI channel that drives the sample, and determines how the sample responds to controller action. You can also use this function to select the sample's "alternate group" (page 145). 3 display pages are provided: MIDISet (MIDI Setup), SmpCtrlA (Sample Controller A), and SmpCtrlB (Sample Controller B). • You can listen to the sound of the sample you are editing by pressing the [AUDITION] button. This makes it easy to monitor the results of your changes as you make them. • When editing a sample which is used by the currently selected program, an arrow mark will not appear to the left of the sample name in upper left corner of the display. Further, when editing a sample contained in a sample bank, "B" will appear to the left of the arrow. 118 Chapter 5 EDIT Mode • A5000/A4000 q q q q q q q q q q q q q q q q q q q q q q q q q q q q q q q q q q q q q q q q q q q q q q q q q q q q q q q q
-
 1
1 -
2
-
3
-
4
-
5
-
6
-
7
-
8
-
9
-
10
-
11
-
12
-
13
-
14
-
15
-
16
-
17
-
18
-
19
-
20
-
21
-
22
-
23
-
24
-
25
-
26
-
27
-
28
-
29
-
30
-
31
-
32
-
33
-
34
-
35
-
36
-
37
-
38
-
39
-
40
-
41
-
42
-
43
-
44
-
45
-
46
-
47
-
48
-
49
-
50
-
51
-
52
-
53
-
54
-
55
-
56
-
57
-
58
-
59
-
60
-
61
-
62
-
63
-
64
-
65
-
66
-
67
-
68
-
69
-
70
-
71
-
72
-
73
-
74
-
75
-
76
-
77
-
78
-
79
-
80
-
81
-
82
-
83
-
84
-
85
-
86
-
87
-
88
-
89
-
90
-
91
-
92
-
93
-
94
-
95
-
96
-
97
-
98
-
99
-
100
-
101
-
102
-
103
-
104
-
105
-
106
-
107
-
108
-
109
-
110
-
111
-
112
-
 113
113 -
 114
114 -
 115
115 -
 116
116 -
 117
117 -
 118
118 -
 119
119 -
 120
120 -
 121
121 -
 122
122 -
 123
123 -
124
-
125
-
126
-
127
-
128
-
129
-
130
-
131
-
132
-
133
-
134
-
135
-
136
-
137
-
138
-
139
-
140
-
141
-
142
-
143
-
144
-
145
-
146
-
147
-
148
-
149
-
150
-
151
-
152
-
153
-
154
-
155
-
156
-
157
-
158
-
159
-
160
-
161
-
162
-
163
-
164
-
165
-
166
-
167
-
168
-
169
-
170
-
171
-
172
-
173
-
174
-
175
-
176
-
177
-
178
-
179
-
180
-
181
-
182
-
183
-
184
-
185
-
186
-
187
-
188
-
189
-
190
-
191
-
192
-
193
-
194
-
195
-
196
-
197
-
198
-
199
-
200
-
201
-
202
-
203
-
204
-
205
-
206
-
207
-
208
-
209
-
210
-
211
-
212
-
213
-
214
-
215
-
216
-
217
-
218
-
219
-
220
-
221
-
222
-
223
-
224
-
225
-
226
-
227
-
228
-
229
-
230
-
231
-
232
-
233
-
234
-
235
-
236
-
237
-
238
-
239
-
240
-
241
-
242
-
243
-
244
-
245
-
246
-
247
-
248
-
249
-
250
-
251
-
252
-
253
-
254
-
255
-
256
-
257
-
258
-
259
-
260
-
261
-
262
-
263
-
264
-
265
-
266
-
267
-
268
-
269
-
270
-
271
-
272
-
273
-
274
-
275
-
276
-
277
-
278
-
279
-
280
-
281
-
282
-
283
-
284
-
285
-
286
-
287
-
288
-
289
-
290
-
291
-
292
-
293
-
294
-
295
-
296
 |
 |
