Yamaha A5000 Owner's Manual - Page 235
Remove the top cover Insert the SIMM module into the slot on the circuit board.
 |
View all Yamaha A5000 manuals
Add to My Manuals
Save this manual to your list of manuals |
Page 235 highlights
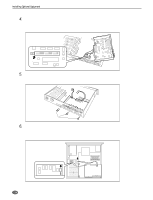
Installing Optional Equipment 2. Remove the top cover (page 232). 3. Insert the SIMM module into the slot on the circuit board. • First identify the sockets you will install the SIMMs into. • There are four sockets, divided into two banks. The two sockets for bank 1 are labeled z, and the two sockets for bank 2 are labeled x. Bank 1 must be filled first, and then if necessary you can proceed to fill bank 2. (The labels z and x are located at the left side of the slot when viewed from the front panel.) If you are using different SIMM sizes in the two banks, the larger size must be installed into the Bank 1 sockets to ensure that the A5000/A4000 handles the memory correctly. For example, if you are adding one pair of 32MB SIMMs and one pair of 8MB SIMMs, you must install the 32MB SIMMs into Bank 1. If you already have SIMMs installed in Bank 1 and are now adding a larger pair, you will need to move the original pair into Bank 2 and insert the new pair into Bank 1. • When inserting SIMMs, always begin with the free socket furthest from the A5000/A4000 front side. (SIMMs will not fit into the sockets if you reverse this order.) • Hold the SIMM with its cutout part facing to the left (as viewed from the front panel), and set it into the socket at an angle as shown in Figure (1). Then push in direction shown in Figure (2) so that it becomes upright and the hook snaps into place. (1) (2) 235 q q q q q q q q q q q q q q q q q q q q q q q q q q q q q q q q q q q q q q q q q q q q q q q q q q q q q q q q q q q q q q A5000/A4000 • Appendix
-
 1
1 -
2
-
3
-
4
-
5
-
6
-
7
-
8
-
9
-
10
-
11
-
12
-
13
-
14
-
15
-
16
-
17
-
18
-
19
-
20
-
21
-
22
-
23
-
24
-
25
-
26
-
27
-
28
-
29
-
30
-
31
-
32
-
33
-
34
-
35
-
36
-
37
-
38
-
39
-
40
-
41
-
42
-
43
-
44
-
45
-
46
-
47
-
48
-
49
-
50
-
51
-
52
-
53
-
54
-
55
-
56
-
57
-
58
-
59
-
60
-
61
-
62
-
63
-
64
-
65
-
66
-
67
-
68
-
69
-
70
-
71
-
72
-
73
-
74
-
75
-
76
-
77
-
78
-
79
-
80
-
81
-
82
-
83
-
84
-
85
-
86
-
87
-
88
-
89
-
90
-
91
-
92
-
93
-
94
-
95
-
96
-
97
-
98
-
99
-
100
-
101
-
102
-
103
-
104
-
105
-
106
-
107
-
108
-
109
-
110
-
111
-
112
-
113
-
114
-
115
-
116
-
117
-
118
-
119
-
120
-
121
-
122
-
123
-
124
-
125
-
126
-
127
-
128
-
129
-
130
-
131
-
132
-
133
-
134
-
135
-
136
-
137
-
138
-
139
-
140
-
141
-
142
-
143
-
144
-
145
-
146
-
147
-
148
-
149
-
150
-
151
-
152
-
153
-
154
-
155
-
156
-
157
-
158
-
159
-
160
-
161
-
162
-
163
-
164
-
165
-
166
-
167
-
168
-
169
-
170
-
171
-
172
-
173
-
174
-
175
-
176
-
177
-
178
-
179
-
180
-
181
-
182
-
183
-
184
-
185
-
186
-
187
-
188
-
189
-
190
-
191
-
192
-
193
-
194
-
195
-
196
-
197
-
198
-
199
-
200
-
201
-
202
-
203
-
204
-
205
-
206
-
207
-
208
-
209
-
210
-
211
-
212
-
213
-
214
-
215
-
216
-
217
-
218
-
219
-
220
-
221
-
222
-
223
-
224
-
225
-
226
-
227
-
228
-
229
-
 230
230 -
 231
231 -
 232
232 -
 233
233 -
 234
234 -
 235
235 -
 236
236 -
 237
237 -
 238
238 -
 239
239 -
 240
240 -
241
-
242
-
243
-
244
-
245
-
246
-
247
-
248
-
249
-
250
-
251
-
252
-
253
-
254
-
255
-
256
-
257
-
258
-
259
-
260
-
261
-
262
-
263
-
264
-
265
-
266
-
267
-
268
-
269
-
270
-
271
-
272
-
273
-
274
-
275
-
276
-
277
-
278
-
279
-
280
-
281
-
282
-
283
-
284
-
285
-
286
-
287
-
288
-
289
-
290
-
291
-
292
-
293
-
294
-
295
-
296
 |
 |
