Yamaha A5000 Owner's Manual - Page 121
EDIT-TRIM/LOOP, Knob 4, DISPLAY], Knob 1 / Knob 4
 |
View all Yamaha A5000 manuals
Add to My Manuals
Save this manual to your list of manuals |
Page 121 highlights
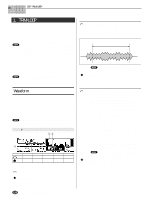
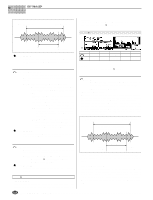
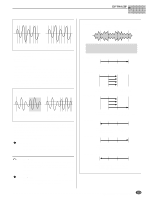
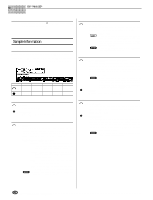
EDIT-TRIM/LOOP Knob 4 [ Turn] Step This knob selects the increment used for address adjustments made with Knobs 2 and 3. Specifically, the value that you set here determines the amount that the address value changes when you turn Knob 2 or Knob 3 by a single click. [Range] x1, x10, x100, x1000, x10000 • The step setting does not appear on the display as actual numbers, but rather as an underline below the appropriate digits of the Wave Start Address and Wave End Address values. Only digits higher than the underline will be edited. [ Press] S-CATCH If you push this knob while playing the sample with the [AUDITION] button or an external keyboard, the wave start address (Loop Start Address for Cursor w) automatically resets to the current playback location. Knob 5 [ Turn] Shortcut Command Positions the cursor within the pop-up window to select one of the available shortcut commands. [Range] EXTRACT..., NORM..., VIEW, E-CATCH (See "Cursor q Shortcut Commands" for details on the commands) [ Press] EXECUTE Executes the shortcut command at the current cursor position. Cursor q Shortcut Commands • EXTRACT... Push this knob to "trim" the waveform, deleting all waveform data ahead of the start address and all waveform data located after the end address. This operation reduces the size of the sample and frees up additional waveform memory. Start Address End Address Start Address End Address Extract When you push the knob, the A5000/A4000 returns a confirmation screen. Push Knob 5 (>YES) to proceed. Note that the deleted waveform area cannot be recovered (unless you have already saved the data to disk.) • NORM... This command adjusts the waveform to its optimal level. Adjustment is made by proportionately raising all levels such that the highest level comes to just below the clip point, as illustrated below. (The "clip point" is the maximum level appropriate for digital processing.) Normalize Push Knob 5 (>YES) to proceed. • VIEW Alternately switches the waveform display address between the Wave Start Address and Wave End Address. • The waveform display will automatically move to the start address area when Knob 2 is used to adjust the start address, and to the end address area when Knob 3 is used to adjust the end address. • E-CATCH If this knob is pressed during playback triggered either from an external MIDI device or the [AUDITION] button, the wave address at that precise point (Loop End Address for Cursor w) will be entered as the Wave End Address. [DISPLAY] q Waveform Display w VIEWED..... Displays the number of words shown in the expanded waveform display. TOTAL........ Shows the total number of words in the sample. Cursor w Cursor w Turn action Press action Knob 1 Cursor/Page Tree View Knob 2 Loop Start Address ZOOM IN Knob 3 Loop End Address ZOOM OUT Knob 4 Step S-CATCH Knob 5 Shortcut Command EXECUTE Knob 1 / Knob 4 Same function as Cursor q (page 120). Knob 2 [ Turn] Loop Start Address Sets the start point of the loop on the waveform. The concept is illustrated below. Note that actual loop handling depends on the loop-mode setting [Range] Wave Start Address - Loop End Address 121 q q q q q q q q q q q q q q q q q q q q q q q q q q q q q q q q q q q q q q q q q q q q q q q q q q q q q q q A5000/A4000 • Chapter 5 EDIT Mode
-
 1
1 -
2
-
3
-
4
-
5
-
6
-
7
-
8
-
9
-
10
-
11
-
12
-
13
-
14
-
15
-
16
-
17
-
18
-
19
-
20
-
21
-
22
-
23
-
24
-
25
-
26
-
27
-
28
-
29
-
30
-
31
-
32
-
33
-
34
-
35
-
36
-
37
-
38
-
39
-
40
-
41
-
42
-
43
-
44
-
45
-
46
-
47
-
48
-
49
-
50
-
51
-
52
-
53
-
54
-
55
-
56
-
57
-
58
-
59
-
60
-
61
-
62
-
63
-
64
-
65
-
66
-
67
-
68
-
69
-
70
-
71
-
72
-
73
-
74
-
75
-
76
-
77
-
78
-
79
-
80
-
81
-
82
-
83
-
84
-
85
-
86
-
87
-
88
-
89
-
90
-
91
-
92
-
93
-
94
-
95
-
96
-
97
-
98
-
99
-
100
-
101
-
102
-
103
-
104
-
105
-
106
-
107
-
108
-
109
-
110
-
111
-
112
-
113
-
114
-
115
-
 116
116 -
 117
117 -
 118
118 -
 119
119 -
 120
120 -
 121
121 -
 122
122 -
 123
123 -
 124
124 -
 125
125 -
 126
126 -
127
-
128
-
129
-
130
-
131
-
132
-
133
-
134
-
135
-
136
-
137
-
138
-
139
-
140
-
141
-
142
-
143
-
144
-
145
-
146
-
147
-
148
-
149
-
150
-
151
-
152
-
153
-
154
-
155
-
156
-
157
-
158
-
159
-
160
-
161
-
162
-
163
-
164
-
165
-
166
-
167
-
168
-
169
-
170
-
171
-
172
-
173
-
174
-
175
-
176
-
177
-
178
-
179
-
180
-
181
-
182
-
183
-
184
-
185
-
186
-
187
-
188
-
189
-
190
-
191
-
192
-
193
-
194
-
195
-
196
-
197
-
198
-
199
-
200
-
201
-
202
-
203
-
204
-
205
-
206
-
207
-
208
-
209
-
210
-
211
-
212
-
213
-
214
-
215
-
216
-
217
-
218
-
219
-
220
-
221
-
222
-
223
-
224
-
225
-
226
-
227
-
228
-
229
-
230
-
231
-
232
-
233
-
234
-
235
-
236
-
237
-
238
-
239
-
240
-
241
-
242
-
243
-
244
-
245
-
246
-
247
-
248
-
249
-
250
-
251
-
252
-
253
-
254
-
255
-
256
-
257
-
258
-
259
-
260
-
261
-
262
-
263
-
264
-
265
-
266
-
267
-
268
-
269
-
270
-
271
-
272
-
273
-
274
-
275
-
276
-
277
-
278
-
279
-
280
-
281
-
282
-
283
-
284
-
285
-
286
-
287
-
288
-
289
-
290
-
291
-
292
-
293
-
294
-
295
-
296
 |
 |
