Yamaha A5000 Owner's Manual - Page 125
Loop Remix
 |
View all Yamaha A5000 manuals
Add to My Manuals
Save this manual to your list of manuals |
Page 125 highlights
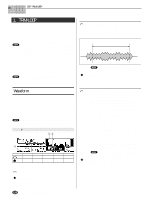
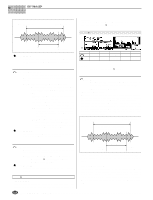
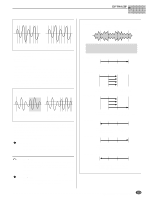
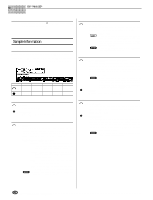
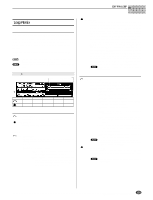
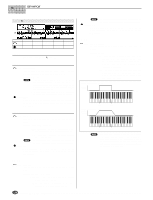
EDIT-TRIM/LOOP Loop Remix [EDIT] Button → [F1] Button → Knob 1 to select "EDIT-LoopRmx" This function divides and randomly re-orders a specified range of "Remix Zones" between the Loop Start Address and Loop End Address, in some cases changing the sound of certain portions, thus creating new "remixed" versions of your samples. * Make sure the loop is properly setup before using the Loop Remix function. • This function can be used on a 1 or 2-measure drumm loop, for example, to create a different drum pattern. • The Loop Remix function cannot be used when editing a sample bank. Cursor q Remix Zone Remix Pattern Cursor q Turn action Press action Knob 1 Cursor/Page Tree View Knob 2 Remix Type REMIX Knob 3 Remix Type Variation ZONE MONITOR Knob 4 Remix Zone Start REGISTER... Knob 5 Remix Zone End CREATE Knob 1 [ Turn] Cursor/Page Positions the cursor and selects display pages. [ Press] Tree View Calls the Tree View display (page 83). Knob 2 [ Turn] Remix Type Determines which area of the loop will be affected by the Loop Remix function, and how the remix zones will be reordered. [Range] 1 - 5, User1 - User5 • 1 - 5 ... The effect changes randomly each time the Loop Remix function is executed. • User1 - User5 ... These choices use results of a remix operation which have been registered via Knob 4. The registered pattern will appear on the remix pattern display. [ Press] REMIX The Loop Remix function is executed when this knob is pressed, and the results are temporarily stored in memory as a "working sample." If the REMIX button is pressed again the Loop Remix function will be executed again and the previous results erased. You can execute the REMIX function as many times as necessary until satisfactory results are achieved. When Remix Type 1 - 5 is selected, different results will be achieved each time REMIX is executed even if the same Remix Type Variation is selected. When satisfactory results have been achieved and the CREATE function is executed (Knob 5), the Working Sample is stored as a normal sample. If the AUTO AUDITION function is on (Knob 3) the result of each remix operation will be automatically played back after REMIX is executed. Further, the Working Sample can be monitored by pressing the [AUDITION] button. • This parameter cannot be edited when editing a sample bank. Knob 3 [ Turn] Remix Type Variation Determines the degree to which the original waveform will be changed by the Loop Remix function. [Range] Normal1, Normal2, Reverse1, Reverse2, Break, LoFi, Pitch, Gate • Normal1 ... The wave is divided and re-ordered. • Normal2 ... A variation of Normal1. • Reverse1 ... In addition to division and re-ordering, parts of the wave a reversed. • Reverse2 ... A variation of Reverse1. • Break ... Silent "breaks" are created in addition to division and re-ordering. • LoFi ... In addition to division and re-ordering, portions of the wave are converted to Lo-Fi sound. • Pitch ... In addition to division and re-ordering, portions of the wave are lowered in pitch and converted to Lo-Fi sound. • Gate ... In addition to division and re-ordering, portions of the wave are shortened. • "---" will appear on the display and this parameter cannot be edited when one of the User Remix Types - User1 - User5 - is selected. [ Press] ZONE MONITOR Plays back only the remix zone (from the specified Remix Zone Start to Remix Zone End) without playing the rest of the loop. • This parameter cannot be edited when editing a sample bank. 125 q q q q q q q q q q q q q q q q q q q q q q q q q q q q q q q q q q q q q q q q q q q q q q q q q q q q q q q A5000/A4000 • Chapter 5 EDIT Mode
-
 1
1 -
2
-
3
-
4
-
5
-
6
-
7
-
8
-
9
-
10
-
11
-
12
-
13
-
14
-
15
-
16
-
17
-
18
-
19
-
20
-
21
-
22
-
23
-
24
-
25
-
26
-
27
-
28
-
29
-
30
-
31
-
32
-
33
-
34
-
35
-
36
-
37
-
38
-
39
-
40
-
41
-
42
-
43
-
44
-
45
-
46
-
47
-
48
-
49
-
50
-
51
-
52
-
53
-
54
-
55
-
56
-
57
-
58
-
59
-
60
-
61
-
62
-
63
-
64
-
65
-
66
-
67
-
68
-
69
-
70
-
71
-
72
-
73
-
74
-
75
-
76
-
77
-
78
-
79
-
80
-
81
-
82
-
83
-
84
-
85
-
86
-
87
-
88
-
89
-
90
-
91
-
92
-
93
-
94
-
95
-
96
-
97
-
98
-
99
-
100
-
101
-
102
-
103
-
104
-
105
-
106
-
107
-
108
-
109
-
110
-
111
-
112
-
113
-
114
-
115
-
116
-
117
-
118
-
119
-
 120
120 -
 121
121 -
 122
122 -
 123
123 -
 124
124 -
 125
125 -
 126
126 -
 127
127 -
 128
128 -
 129
129 -
 130
130 -
131
-
132
-
133
-
134
-
135
-
136
-
137
-
138
-
139
-
140
-
141
-
142
-
143
-
144
-
145
-
146
-
147
-
148
-
149
-
150
-
151
-
152
-
153
-
154
-
155
-
156
-
157
-
158
-
159
-
160
-
161
-
162
-
163
-
164
-
165
-
166
-
167
-
168
-
169
-
170
-
171
-
172
-
173
-
174
-
175
-
176
-
177
-
178
-
179
-
180
-
181
-
182
-
183
-
184
-
185
-
186
-
187
-
188
-
189
-
190
-
191
-
192
-
193
-
194
-
195
-
196
-
197
-
198
-
199
-
200
-
201
-
202
-
203
-
204
-
205
-
206
-
207
-
208
-
209
-
210
-
211
-
212
-
213
-
214
-
215
-
216
-
217
-
218
-
219
-
220
-
221
-
222
-
223
-
224
-
225
-
226
-
227
-
228
-
229
-
230
-
231
-
232
-
233
-
234
-
235
-
236
-
237
-
238
-
239
-
240
-
241
-
242
-
243
-
244
-
245
-
246
-
247
-
248
-
249
-
250
-
251
-
252
-
253
-
254
-
255
-
256
-
257
-
258
-
259
-
260
-
261
-
262
-
263
-
264
-
265
-
266
-
267
-
268
-
269
-
270
-
271
-
272
-
273
-
274
-
275
-
276
-
277
-
278
-
279
-
280
-
281
-
282
-
283
-
284
-
285
-
286
-
287
-
288
-
289
-
290
-
291
-
292
-
293
-
294
-
295
-
296
 |
 |
