Brother International DCP1000 Service Manual - Page 39
Reassembling
 |
UPC - 012502565796
View all Brother International DCP1000 manuals
Add to My Manuals
Save this manual to your list of manuals |
Page 39 highlights
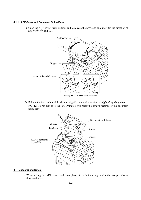
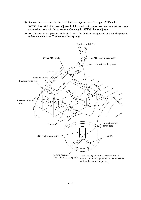
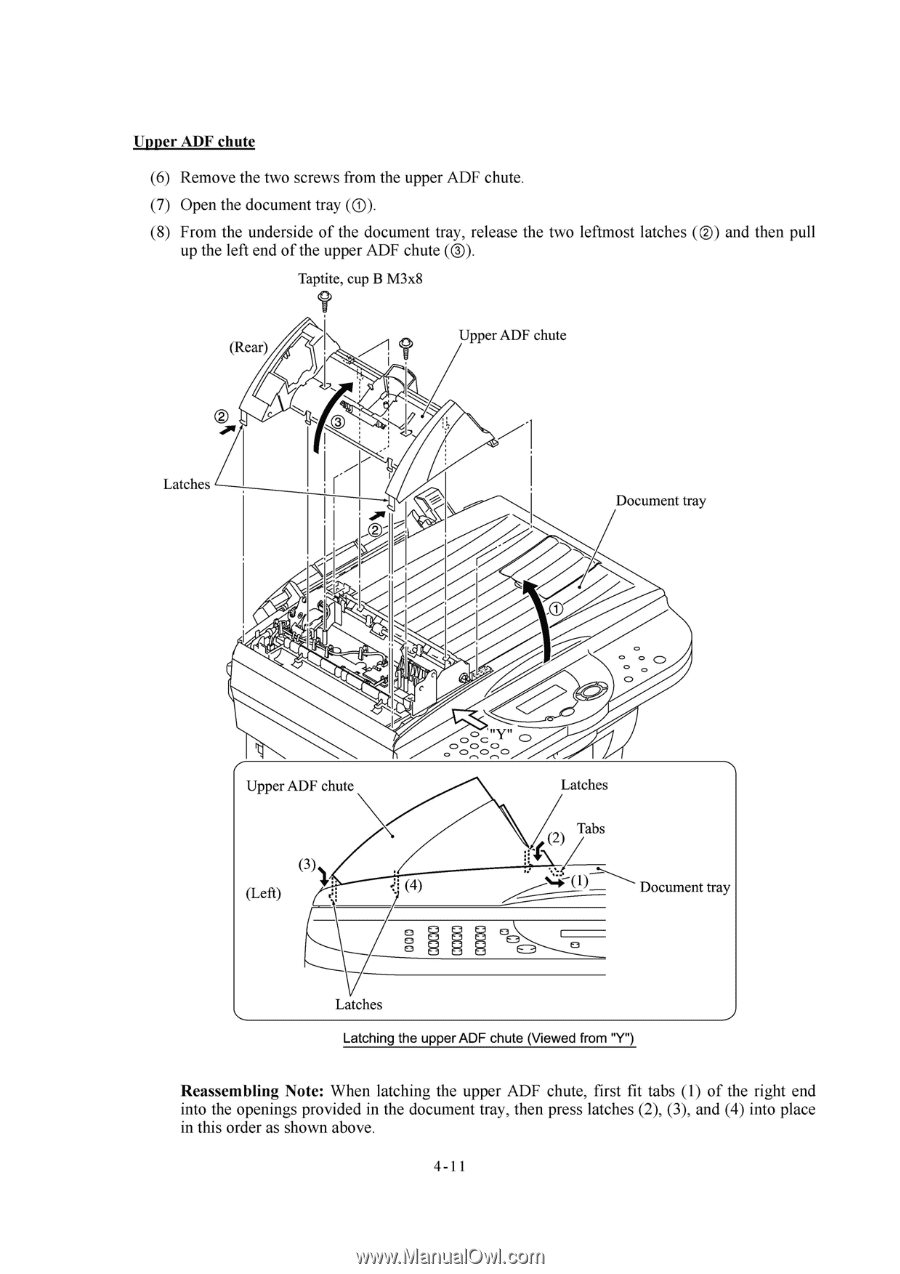
Upper ADF chute (6) Remove the two screws from the upper ADF chute. (7) Open the document tray (®). (8) From the underside of the document tray, release the two leftmost latches (C)) and then pull up the left end of the upper ADF chute (®). Taptite, cup B M3x8 (Rear) Upper ADF chute Latches Document tray o 0 0 Upper ADF chute (3) (Left) 0 0 C, 00 C. C. 4.-1 Latches ( ) Tabs 1:. (4) Document tray 8 M Latches Latching the upper ADF chute (Viewed from "Y") Reassembling Note: When latching the upper ADF chute, first fit tabs (1) of the right end into the openings provided in the document tray, then press latches (2), (3), and (4) into place in this order as shown above. 4- 1 1
-
 1
1 -
2
-
3
-
4
-
5
-
6
-
7
-
8
-
9
-
10
-
11
-
12
-
13
-
14
-
15
-
16
-
17
-
18
-
19
-
20
-
21
-
22
-
23
-
24
-
25
-
26
-
27
-
28
-
29
-
30
-
31
-
32
-
33
-
 34
34 -
 35
35 -
 36
36 -
 37
37 -
 38
38 -
 39
39 -
 40
40 -
 41
41 -
 42
42 -
 43
43 -
 44
44 -
45
-
46
-
47
-
48
-
49
-
50
-
51
-
52
-
53
-
54
-
55
-
56
-
57
-
58
-
59
-
60
-
61
-
62
-
63
-
64
-
65
-
66
-
67
-
68
-
69
-
70
-
71
-
72
-
73
-
74
-
75
-
76
-
77
-
78
-
79
-
80
-
81
-
82
-
83
-
84
-
85
-
86
-
87
-
88
-
89
-
90
-
91
-
92
-
93
-
94
-
95
-
96
-
97
-
98
-
99
-
100
-
101
-
102
-
103
-
104
-
105
-
106
-
107
-
108
-
109
-
110
-
111
-
112
-
113
-
114
-
115
-
116
-
117
-
118
-
119
-
120
-
121
-
122
-
123
-
124
-
125
-
126
-
127
-
128
-
129
-
130
-
131
-
132
-
133
-
134
-
135
-
136
-
137
-
138
-
139
-
140
-
141
-
142
-
143
-
144
-
145
-
146
-
147
-
148
-
149
-
150
-
151
-
152
-
153
-
154
-
155
-
156
-
157
-
158
-
159
-
160
-
161
-
162
-
163
-
164
-
165
-
166
-
167
-
168
-
169
-
170
-
171
-
172
-
173
-
174
-
175
-
176
-
177
-
178
-
179
-
180
-
181
-
182
-
183
-
184
-
185
-
186
-
187
-
188
-
189
-
190
-
191
-
192
-
193
-
194
-
195
-
196
-
197
-
198
-
199
-
200
-
201
-
202
-
203
-
204
 |
 |
Upper
ADF
chute
(6)
Remove
the
two
screws
from
the
upper
ADF
chute.
(7)
Open
the
document
tray
(®).
(8)
From
the
underside
of
the
document
tray,
release
the
two
leftmost
latches
(C))
and
then
pull
up
the
left
end
of
the
upper
ADF
chute
(®).
Taptite,
cup
B
M3x8
Latches
(Rear)
Upper
ADF
chute
0
0
C,
00
C.
C.
4
.-
1
Document
tray
0
o
0
Upper
ADF
chute
(
3
)
(Left)
(4)
1:
.
Latches
(
)
Tabs
Document
tray
8
M
Latches
Latching
the
upper
ADF
chute
(Viewed
from
"Y")
Reassembling
Note:
When
latching
the
upper
ADF
chute,
first
fit
tabs
(1)
of
the
right
end
into
the
openings
provided
in
the
document
tray,
then
press
latches
(2), (3),
and
(4)
into
place
in
this
order
as
shown
above.
4-
1
1