Brother International DCP1000 Service Manual - Page 67
Black, Double, sided, chute
 |
UPC - 012502565796
View all Brother International DCP1000 manuals
Add to My Manuals
Save this manual to your list of manuals |
Page 67 highlights
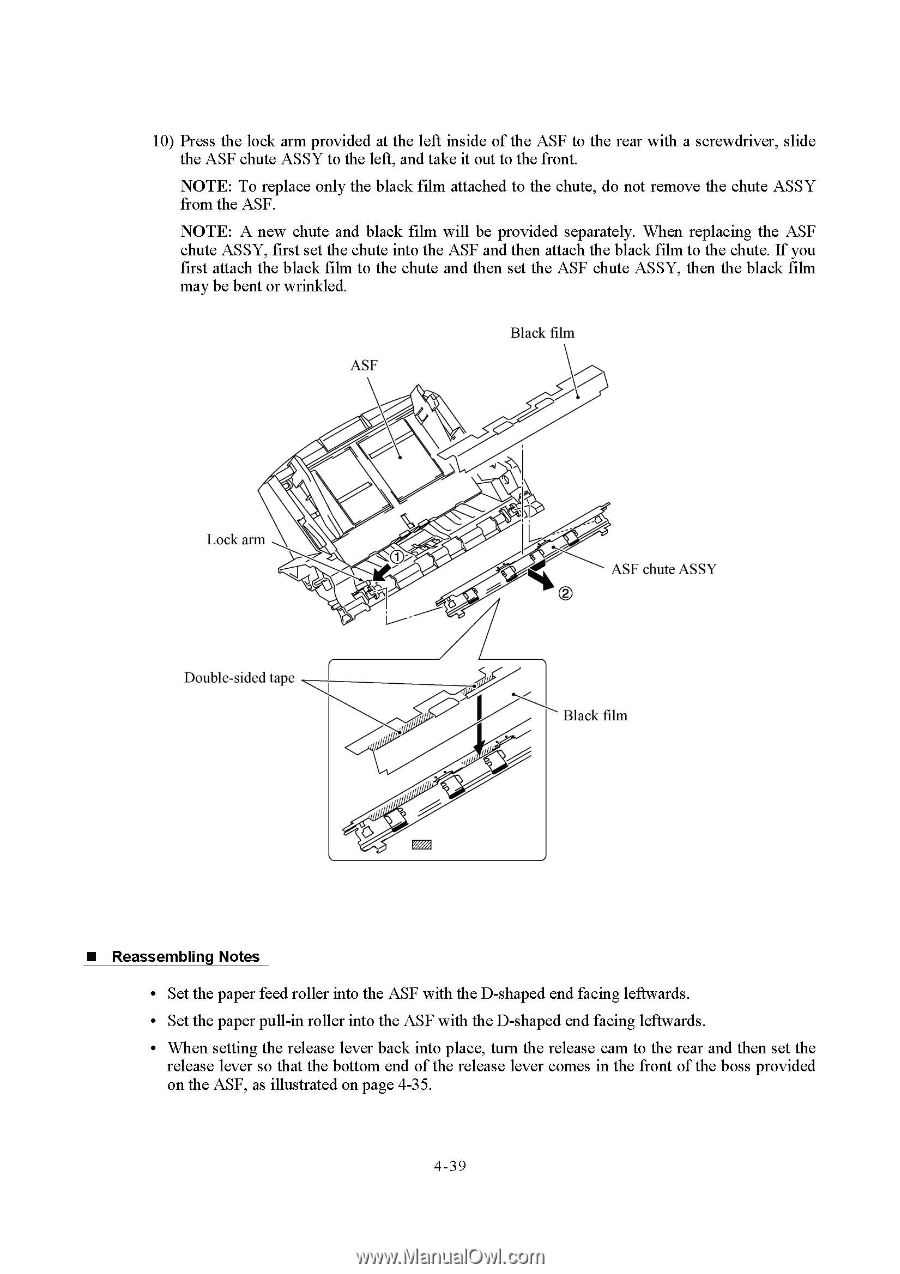
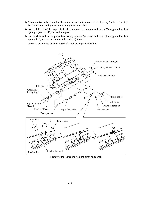
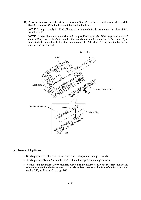
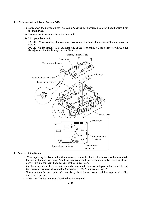
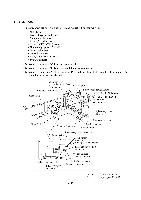
10) Press the lock arm provided at the left inside of the ASF to the rear with a screwdriver, slide the ASF chute ASSY to the left, and take it out to the front. NOTE: To replace only the black film attached to the chute, do not remove the chute ASSY from the ASF. NOTE: A new chute and black film will be provided separately. When replacing the ASF chute ASSY, first set the chute into the ASF and then attach the black film to the chute. If you first attach the black film to the chute and then set the ASF chute ASSY, then the black film may be bent or wrinkled. Black film ASF Lock arm 0 Double-sided tape ASF chute ASSY Black film 0 iii ■ Reassembling Notes • Set the paper feed roller into the ASF with the D-shaped end facing leftwards. • Set the paper pull-in roller into the ASF with the D-shaped end facing leftwards. • When setting the release lever back into place, turn the release cam to the rear and then set the release lever so that the bottom end of the release lever comes in the front of the boss provided on the ASF, as illustrated on page 4-35. 4-39
-
 1
1 -
2
-
3
-
4
-
5
-
6
-
7
-
8
-
9
-
10
-
11
-
12
-
13
-
14
-
15
-
16
-
17
-
18
-
19
-
20
-
21
-
22
-
23
-
24
-
25
-
26
-
27
-
28
-
29
-
30
-
31
-
32
-
33
-
34
-
35
-
36
-
37
-
38
-
39
-
40
-
41
-
42
-
43
-
44
-
45
-
46
-
47
-
48
-
49
-
50
-
51
-
52
-
53
-
54
-
55
-
56
-
57
-
58
-
59
-
60
-
61
-
 62
62 -
 63
63 -
 64
64 -
 65
65 -
 66
66 -
 67
67 -
 68
68 -
 69
69 -
 70
70 -
 71
71 -
 72
72 -
73
-
74
-
75
-
76
-
77
-
78
-
79
-
80
-
81
-
82
-
83
-
84
-
85
-
86
-
87
-
88
-
89
-
90
-
91
-
92
-
93
-
94
-
95
-
96
-
97
-
98
-
99
-
100
-
101
-
102
-
103
-
104
-
105
-
106
-
107
-
108
-
109
-
110
-
111
-
112
-
113
-
114
-
115
-
116
-
117
-
118
-
119
-
120
-
121
-
122
-
123
-
124
-
125
-
126
-
127
-
128
-
129
-
130
-
131
-
132
-
133
-
134
-
135
-
136
-
137
-
138
-
139
-
140
-
141
-
142
-
143
-
144
-
145
-
146
-
147
-
148
-
149
-
150
-
151
-
152
-
153
-
154
-
155
-
156
-
157
-
158
-
159
-
160
-
161
-
162
-
163
-
164
-
165
-
166
-
167
-
168
-
169
-
170
-
171
-
172
-
173
-
174
-
175
-
176
-
177
-
178
-
179
-
180
-
181
-
182
-
183
-
184
-
185
-
186
-
187
-
188
-
189
-
190
-
191
-
192
-
193
-
194
-
195
-
196
-
197
-
198
-
199
-
200
-
201
-
202
-
203
-
204
 |
 |