Brother International DCP1000 Service Manual - Page 48
V11,1
 |
UPC - 012502565796
View all Brother International DCP1000 manuals
Add to My Manuals
Save this manual to your list of manuals |
Page 48 highlights
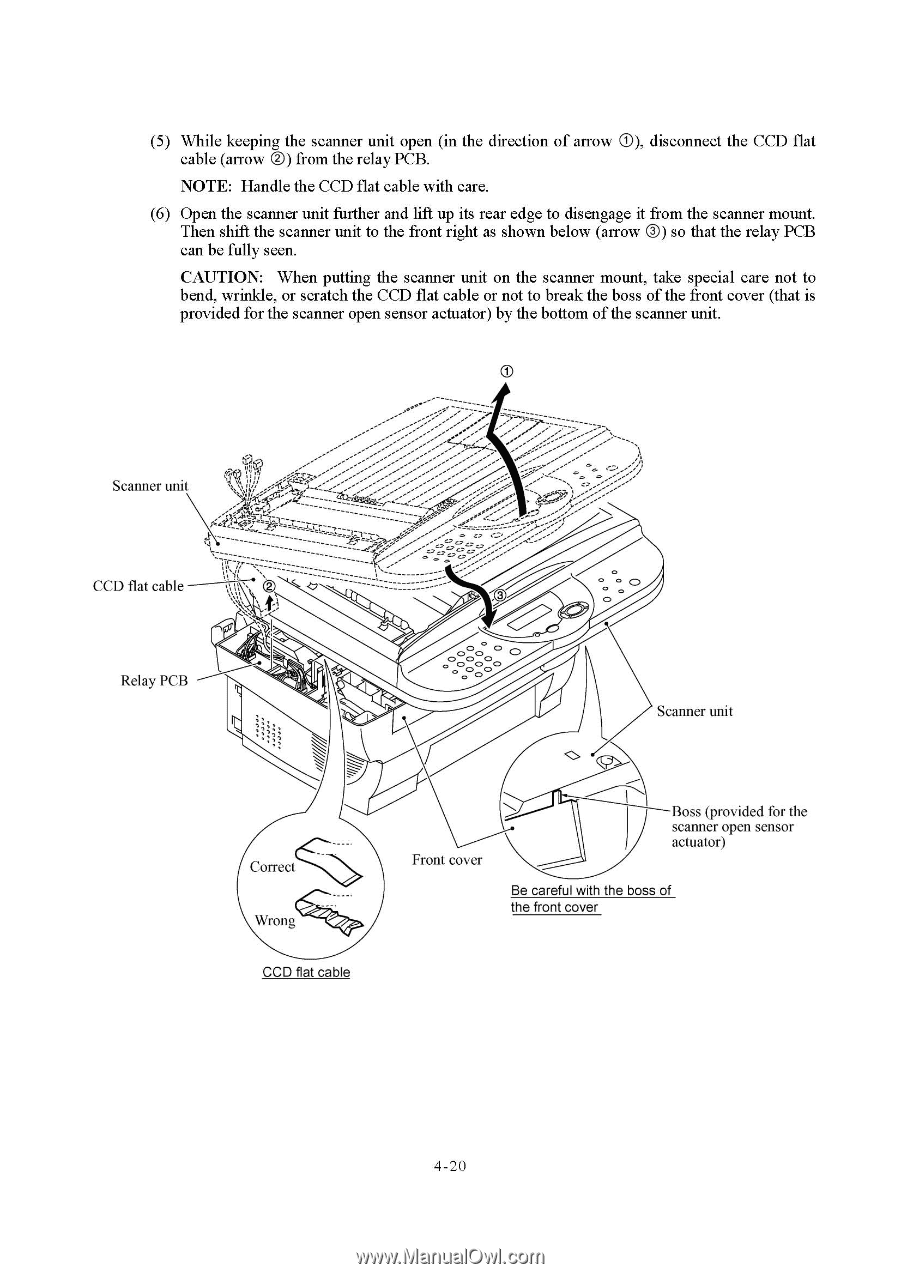
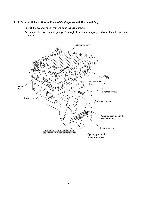
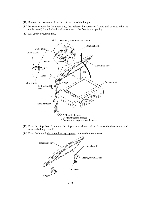
(5) While keeping the scanner unit open (in the direction of arrow T), disconnect the CCD flat cable (arrow ®) from the relay PCB. NOTE: Handle the CCD flat cable with care. (6) Open the scanner unit further and lift up its rear edge to disengage it from the scanner mount. Then shift the scanner unit to the front right as shown below (arrow ®) so that the relay PCB can be fully seen. CAUTION: When putting the scanner unit on the scanner mount, take special care not to bend, wrinkle, or scratch the CCD flat cable or not to break the boss of the front cover (that is provided for the scanner open sensor actuator) by the bottom of the scanner unit. Scanner unit CCD flat cable ------ ,-- -' ;:"'" 7r,-, ' 7,-,-",--,1 (1,1,,,,'f(VW15.51?-,t,t1,e,"4AL'--0W.„f(_--_t--3 2---:.-:.--c----.;-;--:1 1 1::.-,-:17.-':,'',",'"s --":2,--- ,---1,-• -7-1---- --- :4 • -, ,f,--,--;--' _ J.,4.-,j-_-ti-tz 6 1 K--rz---:-:---:.-2 1 r ! 11\111 O o 0 0 Relay PCB e 0 C.00 C. 0 o 0 0 0 0 0 O Scanner unit Correct Wrong CCD flat cable Front cover Boss (provided for the scanner open sensor actuator) Be careful with the boss of the front cover 4-20
-
 1
1 -
2
-
3
-
4
-
5
-
6
-
7
-
8
-
9
-
10
-
11
-
12
-
13
-
14
-
15
-
16
-
17
-
18
-
19
-
20
-
21
-
22
-
23
-
24
-
25
-
26
-
27
-
28
-
29
-
30
-
31
-
32
-
33
-
34
-
35
-
36
-
37
-
38
-
39
-
40
-
41
-
42
-
 43
43 -
 44
44 -
 45
45 -
 46
46 -
 47
47 -
 48
48 -
 49
49 -
 50
50 -
 51
51 -
 52
52 -
 53
53 -
54
-
55
-
56
-
57
-
58
-
59
-
60
-
61
-
62
-
63
-
64
-
65
-
66
-
67
-
68
-
69
-
70
-
71
-
72
-
73
-
74
-
75
-
76
-
77
-
78
-
79
-
80
-
81
-
82
-
83
-
84
-
85
-
86
-
87
-
88
-
89
-
90
-
91
-
92
-
93
-
94
-
95
-
96
-
97
-
98
-
99
-
100
-
101
-
102
-
103
-
104
-
105
-
106
-
107
-
108
-
109
-
110
-
111
-
112
-
113
-
114
-
115
-
116
-
117
-
118
-
119
-
120
-
121
-
122
-
123
-
124
-
125
-
126
-
127
-
128
-
129
-
130
-
131
-
132
-
133
-
134
-
135
-
136
-
137
-
138
-
139
-
140
-
141
-
142
-
143
-
144
-
145
-
146
-
147
-
148
-
149
-
150
-
151
-
152
-
153
-
154
-
155
-
156
-
157
-
158
-
159
-
160
-
161
-
162
-
163
-
164
-
165
-
166
-
167
-
168
-
169
-
170
-
171
-
172
-
173
-
174
-
175
-
176
-
177
-
178
-
179
-
180
-
181
-
182
-
183
-
184
-
185
-
186
-
187
-
188
-
189
-
190
-
191
-
192
-
193
-
194
-
195
-
196
-
197
-
198
-
199
-
200
-
201
-
202
-
203
-
204
 |
 |