Brother International DCP1000 Service Manual - Page 50
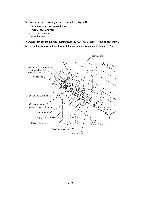
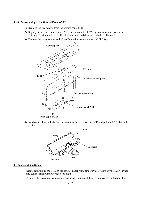
Latch, Cable, guide, sheath, Opening, binder, Taptite, M4x12, Panel, harness, Hinge, Document, motor
 |
UPC - 012502565796
View all Brother International DCP1000 manuals
Add to My Manuals
Save this manual to your list of manuals |
Page 50 highlights
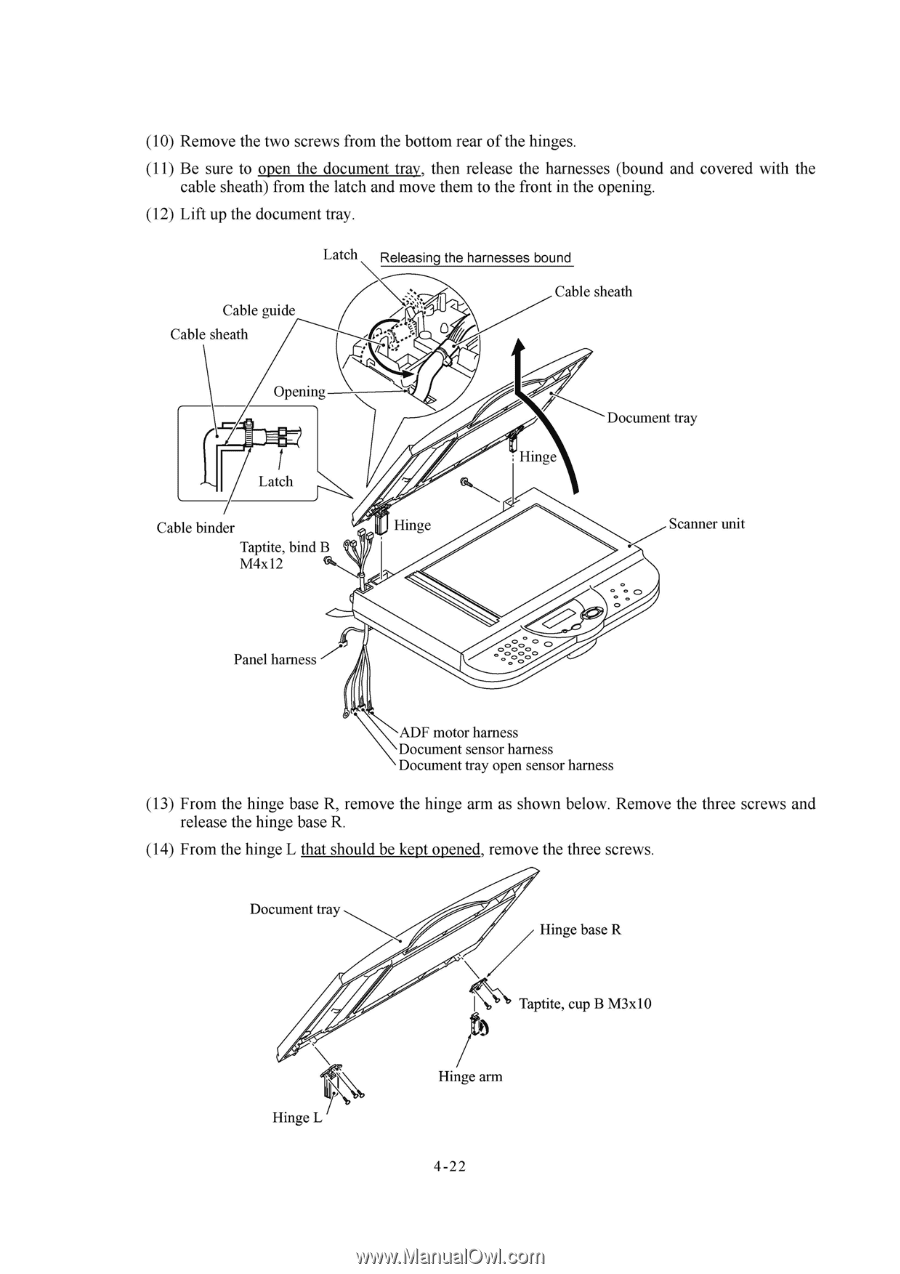
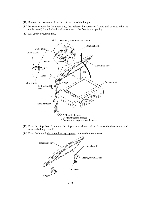
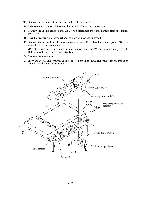
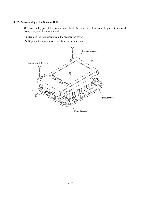
(10) Remove the two screws from the bottom rear of the hinges. (11) Be sure to open the document tray, then release the harnesses (bound and covered with the cable sheath) from the latch and move them to the front in the opening. (12) Lift up the document tray. Cable guide Cable sheath Latch Releasing the harnesses bound Cable sheath Opening Latch Cable binder Taptite, bind B M4x12 Panel harness Hinge Hinge Document tray Scanner unit O O. 0 C0 •0 0 0 o0 ADF motor harness Document sensor harness Document tray open sensor harness (13) From the hinge base R, remove the hinge arm as shown below. Remove the three screws and release the hinge base R. (14) From the hinge L that should be kept opened, remove the three screws. Document tray Hinge base R Taptite, cup B M3x10 Hinge L417 ' Hinge arm 4-22
-
 1
1 -
2
-
3
-
4
-
5
-
6
-
7
-
8
-
9
-
10
-
11
-
12
-
13
-
14
-
15
-
16
-
17
-
18
-
19
-
20
-
21
-
22
-
23
-
24
-
25
-
26
-
27
-
28
-
29
-
30
-
31
-
32
-
33
-
34
-
35
-
36
-
37
-
38
-
39
-
40
-
41
-
42
-
43
-
44
-
 45
45 -
 46
46 -
 47
47 -
 48
48 -
 49
49 -
 50
50 -
 51
51 -
 52
52 -
 53
53 -
 54
54 -
 55
55 -
56
-
57
-
58
-
59
-
60
-
61
-
62
-
63
-
64
-
65
-
66
-
67
-
68
-
69
-
70
-
71
-
72
-
73
-
74
-
75
-
76
-
77
-
78
-
79
-
80
-
81
-
82
-
83
-
84
-
85
-
86
-
87
-
88
-
89
-
90
-
91
-
92
-
93
-
94
-
95
-
96
-
97
-
98
-
99
-
100
-
101
-
102
-
103
-
104
-
105
-
106
-
107
-
108
-
109
-
110
-
111
-
112
-
113
-
114
-
115
-
116
-
117
-
118
-
119
-
120
-
121
-
122
-
123
-
124
-
125
-
126
-
127
-
128
-
129
-
130
-
131
-
132
-
133
-
134
-
135
-
136
-
137
-
138
-
139
-
140
-
141
-
142
-
143
-
144
-
145
-
146
-
147
-
148
-
149
-
150
-
151
-
152
-
153
-
154
-
155
-
156
-
157
-
158
-
159
-
160
-
161
-
162
-
163
-
164
-
165
-
166
-
167
-
168
-
169
-
170
-
171
-
172
-
173
-
174
-
175
-
176
-
177
-
178
-
179
-
180
-
181
-
182
-
183
-
184
-
185
-
186
-
187
-
188
-
189
-
190
-
191
-
192
-
193
-
194
-
195
-
196
-
197
-
198
-
199
-
200
-
201
-
202
-
203
-
204
 |
 |