Brother International DCP1000 Service Manual - Page 43
Disconnect
 |
UPC - 012502565796
View all Brother International DCP1000 manuals
Add to My Manuals
Save this manual to your list of manuals |
Page 43 highlights
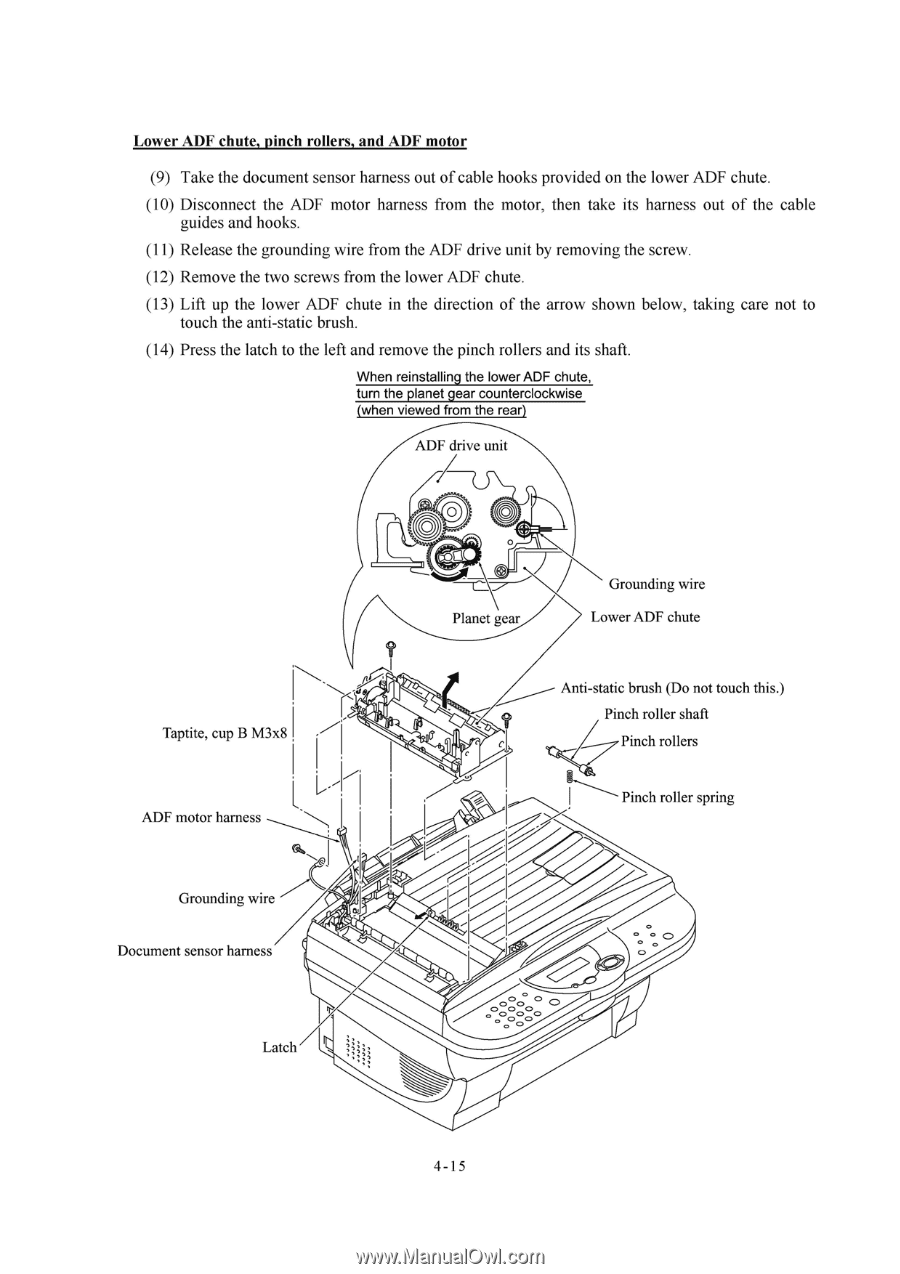
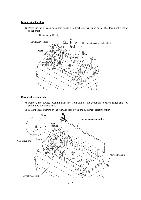
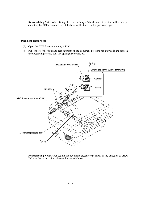
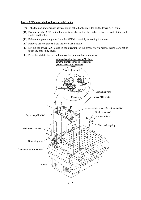
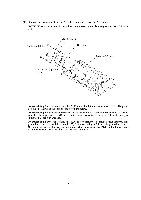
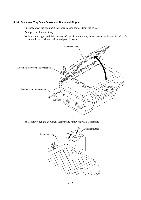
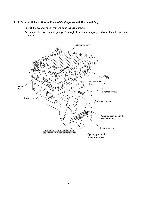
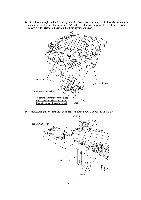
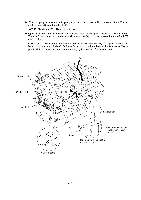
Lower ADF chute, pinch rollers, and ADF motor (9) Take the document sensor harness out of cable hooks provided on the lower ADF chute. (10) Disconnect the ADF motor harness from the motor, then take its harness out of the cable guides and hooks. (11) Release the grounding wire from the ADF drive unit by removing the screw. (12) Remove the two screws from the lower ADF chute. (13) Lift up the lower ADF chute in the direction of the arrow shown below, taking care not to touch the anti-static brush. (14) Press the latch to the left and remove the pinch rollers and its shaft. When reinstalling the lower ADF chute, turn the planet gear counterclockwise (when viewed from the rear) ADF drive unit 0 Planet gear Grounding wire Lower ADF chute Taptite, cup B M3x8 ADF motor harness Anti-static brush (Do not touch this.) I Pinch roller shaft 6' nic&Pinch rollers Pinch roller spring Grounding wire Document sensor harness Latch O0 ° 0 0 0 0 0 0 O OcO0O O 4 - 1 5
-
 1
1 -
2
-
3
-
4
-
5
-
6
-
7
-
8
-
9
-
10
-
11
-
12
-
13
-
14
-
15
-
16
-
17
-
18
-
19
-
20
-
21
-
22
-
23
-
24
-
25
-
26
-
27
-
28
-
29
-
30
-
31
-
32
-
33
-
34
-
35
-
36
-
37
-
 38
38 -
 39
39 -
 40
40 -
 41
41 -
 42
42 -
 43
43 -
 44
44 -
 45
45 -
 46
46 -
 47
47 -
 48
48 -
49
-
50
-
51
-
52
-
53
-
54
-
55
-
56
-
57
-
58
-
59
-
60
-
61
-
62
-
63
-
64
-
65
-
66
-
67
-
68
-
69
-
70
-
71
-
72
-
73
-
74
-
75
-
76
-
77
-
78
-
79
-
80
-
81
-
82
-
83
-
84
-
85
-
86
-
87
-
88
-
89
-
90
-
91
-
92
-
93
-
94
-
95
-
96
-
97
-
98
-
99
-
100
-
101
-
102
-
103
-
104
-
105
-
106
-
107
-
108
-
109
-
110
-
111
-
112
-
113
-
114
-
115
-
116
-
117
-
118
-
119
-
120
-
121
-
122
-
123
-
124
-
125
-
126
-
127
-
128
-
129
-
130
-
131
-
132
-
133
-
134
-
135
-
136
-
137
-
138
-
139
-
140
-
141
-
142
-
143
-
144
-
145
-
146
-
147
-
148
-
149
-
150
-
151
-
152
-
153
-
154
-
155
-
156
-
157
-
158
-
159
-
160
-
161
-
162
-
163
-
164
-
165
-
166
-
167
-
168
-
169
-
170
-
171
-
172
-
173
-
174
-
175
-
176
-
177
-
178
-
179
-
180
-
181
-
182
-
183
-
184
-
185
-
186
-
187
-
188
-
189
-
190
-
191
-
192
-
193
-
194
-
195
-
196
-
197
-
198
-
199
-
200
-
201
-
202
-
203
-
204
 |
 |