Brother International DCP1000 Service Manual - Page 70
Laser, Toner, Sensor
 |
UPC - 012502565796
View all Brother International DCP1000 manuals
Add to My Manuals
Save this manual to your list of manuals |
Page 70 highlights
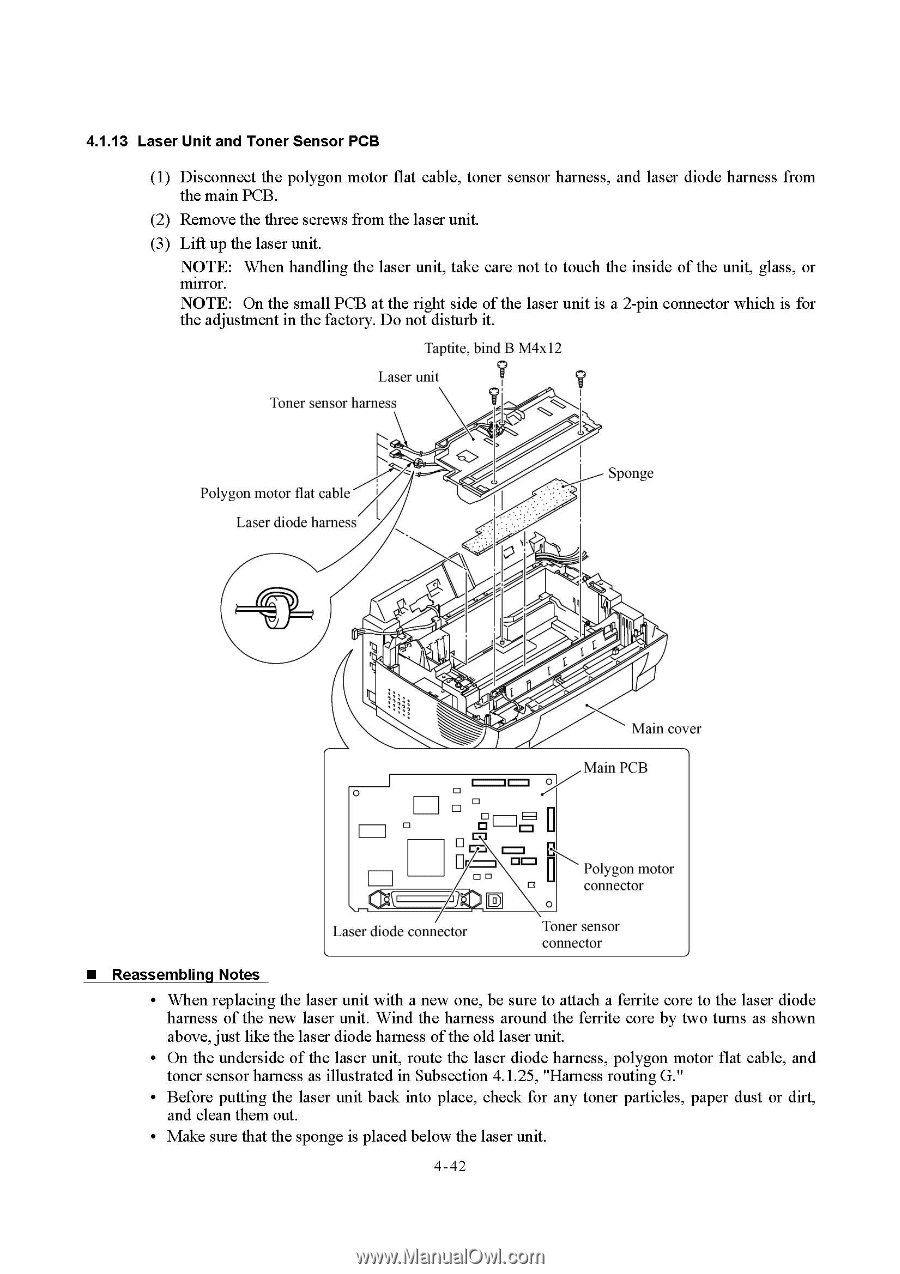
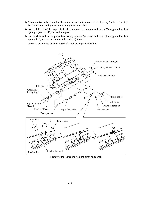
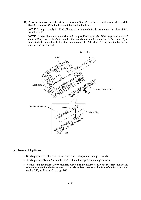
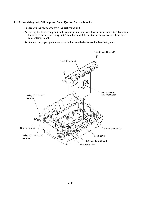
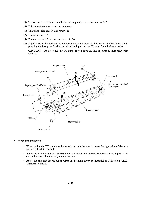
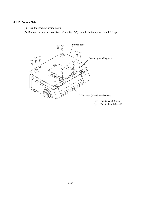
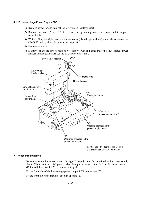
4.1.13 Laser Unit and Toner Sensor PCB (1) Disconnect the polygon motor flat cable, toner sensor harness, and laser diode harness from the main PCB. (2) Remove the three screws from the laser unit. (3) Lift up the laser unit. NOTE: When handling the laser unit, take care not to touch the inside of the unit, glass, or mirror. NOTE: On the small PCB at the right side of the laser unit is a 2-pin connector which is for the adjustment in the factory. Do not disturb it. Taptite, bind B M4x12 Laser unit Toner sensor harness Polygon motor flat cable Laser diode harness Sponge A Main cover 0 I=I = 0 O O ' Main PCB = DI=1 2)0 O Polygon motor connector Laser diode connector Toner sensor connector ■ Reassembling Notes • When replacing the laser unit with a new one, be sure to attach a ferrite core to the laser diode harness of the new laser unit. Wind the harness around the ferrite core by two turns as shown above, just like the laser diode harness of the old laser unit. • On the underside of the laser unit, route the laser diode harness, polygon motor flat cable, and toner sensor harness as illustrated in Subsection 4.1.25, "Harness routing G." • Before putting the laser unit back into place, check for any toner particles, paper dust or dirt, and clean them out. • Make sure that the sponge is placed below the laser unit. 4-42
-
 1
1 -
2
-
3
-
4
-
5
-
6
-
7
-
8
-
9
-
10
-
11
-
12
-
13
-
14
-
15
-
16
-
17
-
18
-
19
-
20
-
21
-
22
-
23
-
24
-
25
-
26
-
27
-
28
-
29
-
30
-
31
-
32
-
33
-
34
-
35
-
36
-
37
-
38
-
39
-
40
-
41
-
42
-
43
-
44
-
45
-
46
-
47
-
48
-
49
-
50
-
51
-
52
-
53
-
54
-
55
-
56
-
57
-
58
-
59
-
60
-
61
-
62
-
63
-
64
-
 65
65 -
 66
66 -
 67
67 -
 68
68 -
 69
69 -
 70
70 -
 71
71 -
 72
72 -
 73
73 -
 74
74 -
 75
75 -
76
-
77
-
78
-
79
-
80
-
81
-
82
-
83
-
84
-
85
-
86
-
87
-
88
-
89
-
90
-
91
-
92
-
93
-
94
-
95
-
96
-
97
-
98
-
99
-
100
-
101
-
102
-
103
-
104
-
105
-
106
-
107
-
108
-
109
-
110
-
111
-
112
-
113
-
114
-
115
-
116
-
117
-
118
-
119
-
120
-
121
-
122
-
123
-
124
-
125
-
126
-
127
-
128
-
129
-
130
-
131
-
132
-
133
-
134
-
135
-
136
-
137
-
138
-
139
-
140
-
141
-
142
-
143
-
144
-
145
-
146
-
147
-
148
-
149
-
150
-
151
-
152
-
153
-
154
-
155
-
156
-
157
-
158
-
159
-
160
-
161
-
162
-
163
-
164
-
165
-
166
-
167
-
168
-
169
-
170
-
171
-
172
-
173
-
174
-
175
-
176
-
177
-
178
-
179
-
180
-
181
-
182
-
183
-
184
-
185
-
186
-
187
-
188
-
189
-
190
-
191
-
192
-
193
-
194
-
195
-
196
-
197
-
198
-
199
-
200
-
201
-
202
-
203
-
204
 |
 |