Brother International DCP1000 Service Manual - Page 55
Release, drive, front, unhook, spring, remove, belt., illustrated, below, right, upright., pulley,
 |
UPC - 012502565796
View all Brother International DCP1000 manuals
Add to My Manuals
Save this manual to your list of manuals |
Page 55 highlights
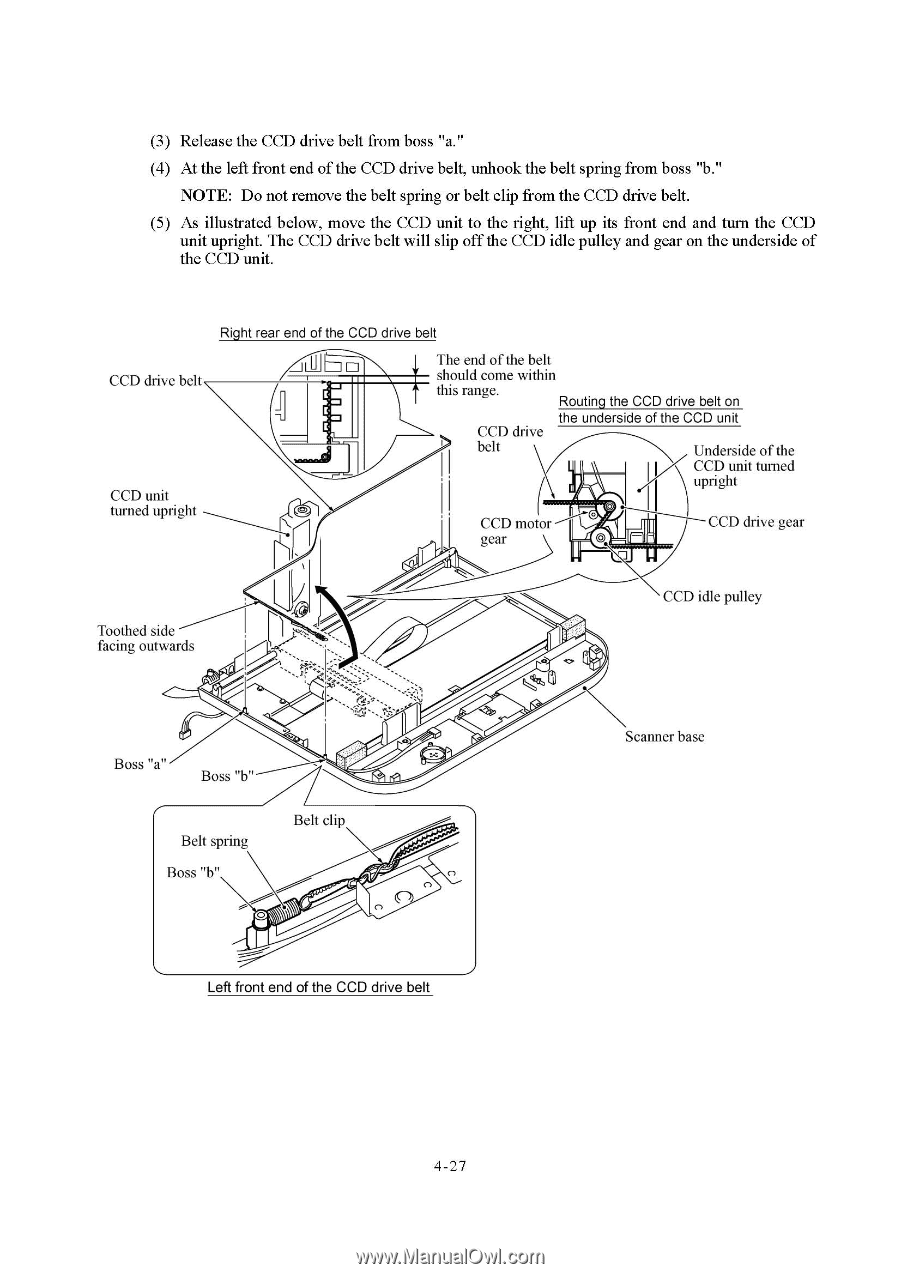
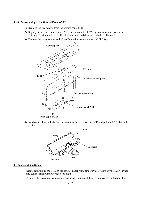
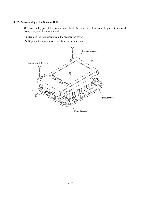
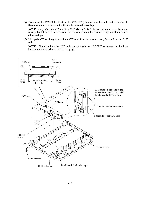
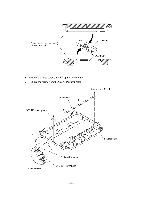
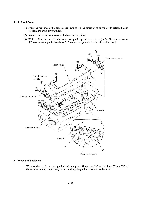
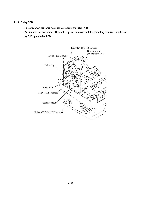
(3) Release the CCD drive belt from boss "a." (4) At the left front end of the CCD drive belt, unhook the belt spring from boss "b." NOTE: Do not remove the belt spring or belt clip from the CCD drive belt. (5) As illustrated below, move the CCD unit to the right, lift up its front end and turn the CCD unit upright. The CCD drive belt will slip off the CCD idle pulley and gear on the underside of the CCD unit. Right rear end of the CCD drive belt CCD drive belt CCD unit turned upright \ The end of the belt should come within this range. Routing the CCD drive belt on the underside of the CCD unit CCD drive belt Underside of the CCD unit turned upright CCD motor gear CCD drive gear Toothed side facing outwards CCD idle pulley 0 Boss " Boss "b" Belt spring Boss "b" Belt clip 0 Left front end of the CCD drive belt Scanner base 4-27
-
 1
1 -
2
-
3
-
4
-
5
-
6
-
7
-
8
-
9
-
10
-
11
-
12
-
13
-
14
-
15
-
16
-
17
-
18
-
19
-
20
-
21
-
22
-
23
-
24
-
25
-
26
-
27
-
28
-
29
-
30
-
31
-
32
-
33
-
34
-
35
-
36
-
37
-
38
-
39
-
40
-
41
-
42
-
43
-
44
-
45
-
46
-
47
-
48
-
49
-
 50
50 -
 51
51 -
 52
52 -
 53
53 -
 54
54 -
 55
55 -
 56
56 -
 57
57 -
 58
58 -
 59
59 -
 60
60 -
61
-
62
-
63
-
64
-
65
-
66
-
67
-
68
-
69
-
70
-
71
-
72
-
73
-
74
-
75
-
76
-
77
-
78
-
79
-
80
-
81
-
82
-
83
-
84
-
85
-
86
-
87
-
88
-
89
-
90
-
91
-
92
-
93
-
94
-
95
-
96
-
97
-
98
-
99
-
100
-
101
-
102
-
103
-
104
-
105
-
106
-
107
-
108
-
109
-
110
-
111
-
112
-
113
-
114
-
115
-
116
-
117
-
118
-
119
-
120
-
121
-
122
-
123
-
124
-
125
-
126
-
127
-
128
-
129
-
130
-
131
-
132
-
133
-
134
-
135
-
136
-
137
-
138
-
139
-
140
-
141
-
142
-
143
-
144
-
145
-
146
-
147
-
148
-
149
-
150
-
151
-
152
-
153
-
154
-
155
-
156
-
157
-
158
-
159
-
160
-
161
-
162
-
163
-
164
-
165
-
166
-
167
-
168
-
169
-
170
-
171
-
172
-
173
-
174
-
175
-
176
-
177
-
178
-
179
-
180
-
181
-
182
-
183
-
184
-
185
-
186
-
187
-
188
-
189
-
190
-
191
-
192
-
193
-
194
-
195
-
196
-
197
-
198
-
199
-
200
-
201
-
202
-
203
-
204
 |
 |