Dell PowerEdge C6300 Dell PowerEdge C6320 Owners Manual - Page 56
SSD and SSD holder, Removing the SSD and SSD Holder
 |
View all Dell PowerEdge C6300 manuals
Add to My Manuals
Save this manual to your list of manuals |
Page 56 highlights
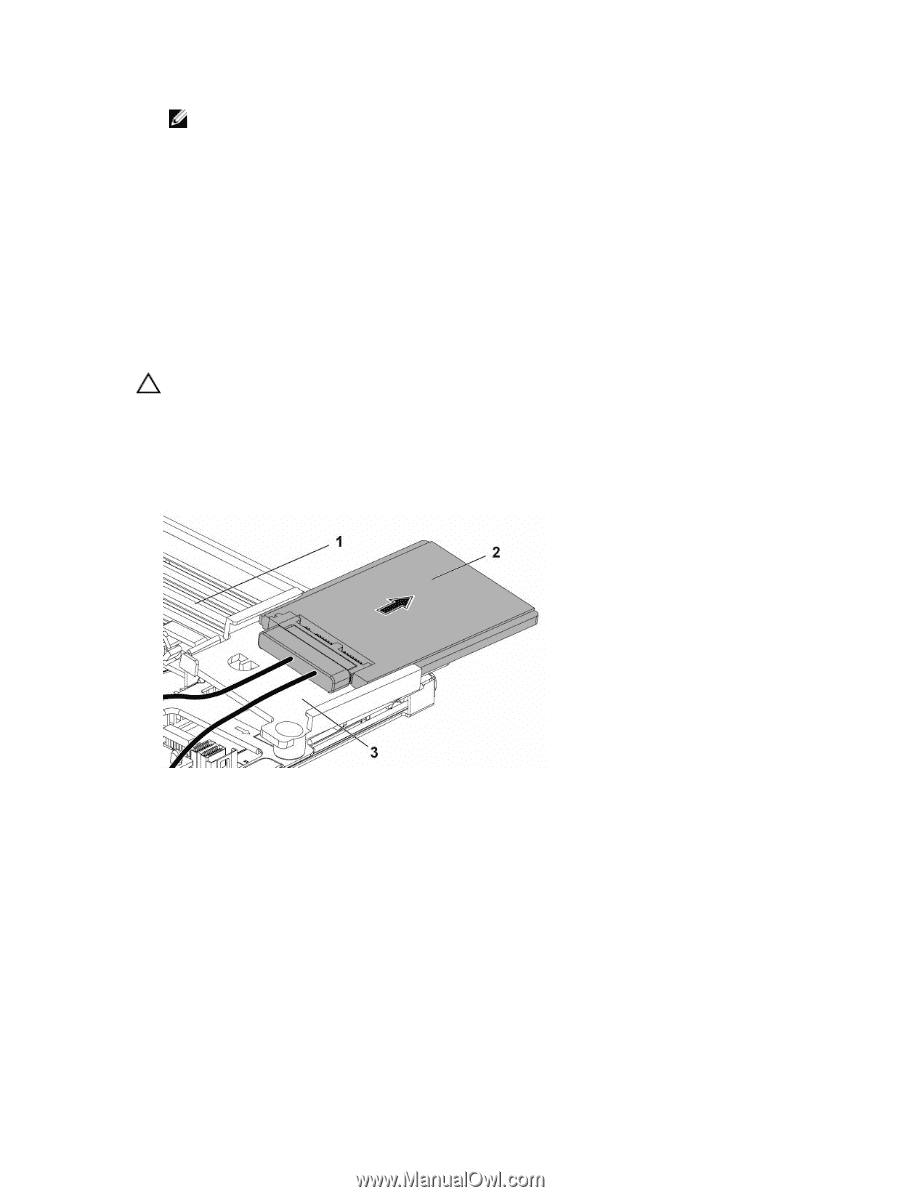
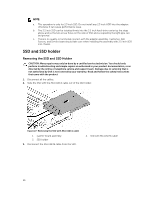
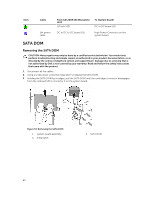
NOTE: a. This operation is only for 2.5 inch SSD. Do not install any 2.5 inch HDD into the adapter; otherwise it can cause performance issue. b. The 2.5 inch SSD can be installed firmly into the 3.5 inch hard-drive carrier by the steps above and so the two screw holes on the side of SSD and occupied by the light pipe can be ignored. c. There is no quality or functional concern with the adapter assembly. Customer, Dell Factory, and Service team should take care when installing the assembly with 2.5 inch SDD into chassis. SSD and SSD holder Removing the SSD and SSD Holder CAUTION: Many repairs may only be done by a certified service technician. You should only perform troubleshooting and simple repairs as authorized in your product documentation, or as directed by the online or telephone service and support team. Damage due to servicing that is not authorized by Dell is not covered by your warranty. Read and follow the safety instructions that came with the product. 1. Disconnect all the cables. 2. Slide the SSD with the MicroSATA cable out of the SSD holder. Figure 27. Removing the SSD with MicroSATA cable 1. system-board assembly 3. SSD holder 3. Disconnect the MicroSATA cable from the SSD. 2. SSD with MicroSATA cable 56
-
 1
1 -
2
-
3
-
4
-
5
-
6
-
7
-
8
-
9
-
10
-
11
-
12
-
13
-
14
-
15
-
16
-
17
-
18
-
19
-
20
-
21
-
22
-
23
-
24
-
25
-
26
-
27
-
28
-
29
-
30
-
31
-
32
-
33
-
34
-
35
-
36
-
37
-
38
-
39
-
40
-
41
-
42
-
43
-
44
-
45
-
46
-
47
-
48
-
49
-
50
-
 51
51 -
 52
52 -
 53
53 -
 54
54 -
 55
55 -
 56
56 -
 57
57 -
 58
58 -
 59
59 -
 60
60 -
 61
61 -
62
-
63
-
64
-
65
-
66
-
67
-
68
-
69
-
70
-
71
-
72
-
73
-
74
-
75
-
76
-
77
-
78
-
79
-
80
-
81
-
82
-
83
-
84
-
85
-
86
-
87
-
88
-
89
-
90
-
91
-
92
-
93
-
94
-
95
-
96
-
97
-
98
-
99
-
100
-
101
-
102
-
103
-
104
-
105
-
106
-
107
-
108
-
109
-
110
-
111
-
112
-
113
-
114
-
115
-
116
-
117
-
118
-
119
-
120
-
121
-
122
-
123
-
124
-
125
-
126
-
127
-
128
-
129
-
130
-
131
-
132
-
133
-
134
-
135
-
136
-
137
-
138
-
139
-
140
-
141
-
142
-
143
-
144
-
145
-
146
-
147
-
148
 |
 |