Dell PowerEdge C6300 Dell PowerEdge C6320 Owners Manual - Page 92
Installing a system board, Entering the system service tag using System Setup, Service Tag Settings
 |
View all Dell PowerEdge C6300 manuals
Add to My Manuals
Save this manual to your list of manuals |
Page 92 highlights
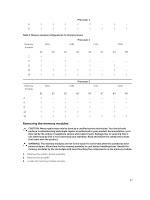
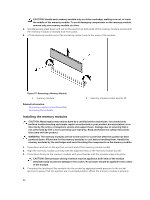
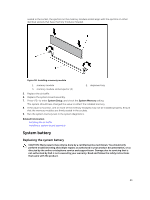
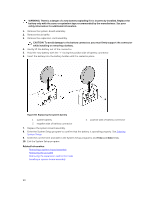
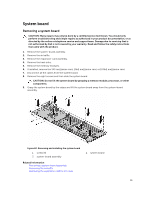
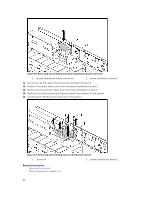
Removing the heat sink Removing the memory modules Removing the LSI 2008 SAS optional mezzanine card Removing the 1GbE mezzanine card Removing the 10GbE mezzanine card Installing a system board CAUTION: Many repairs may only be done by a certified service technician. You should only perform troubleshooting and simple repairs as authorized in your product documentation, or as directed by the online or telephone service and support team. Damage due to servicing that is not authorized by Dell is not covered by your warranty. Read and follow the safety instructions that came with the product. 1. Unpack the new system board. 2. Holding the system board by the edges, slide the system board into the system-board assembly. 3. Replace the eight screws to secure the system board to the system-board assembly. 4. Transfer the processors to the new system board. 5. Remove the memory modules and transfer them to the same locations on the new board. 6. Replace the heat sinks. 7. Install the expansion-card assembly. 8. If applicable, install the SAS mezzanine card, 1GbE mezzanine card, or 10GbE mezzanine card. 9. Connect all the cables to the system board. 10. Replace the air baffle. 11. Replace the system-board assembly. Related Information Removing a processor Installing a processor Removing the memory modules Installing the memory modules Installing the heat sink Installing the expansion card for 1U node Installing the LSI 2008 SAS mezzanine card Installing the 1GbE mezzanine card Installing the 10GbE mezzanine card Installing the air baffle Installing a system-board assembly Entering the system service tag using System Setup 1. If you know the system service tag, use the System Setup menu to enter the service tag. 2. Turn on the system. 3. Press to enter the System Setup. 4. Click Service Tag Settings. 5. Enter the service tag. NOTE: You can enter the service tag only when the Service Tag field is empty. 6. Ensure that you enter the correct service tag. Once the service tag is entered, it cannot be updated or changed. 92
-
 1
1 -
2
-
3
-
4
-
5
-
6
-
7
-
8
-
9
-
10
-
11
-
12
-
13
-
14
-
15
-
16
-
17
-
18
-
19
-
20
-
21
-
22
-
23
-
24
-
25
-
26
-
27
-
28
-
29
-
30
-
31
-
32
-
33
-
34
-
35
-
36
-
37
-
38
-
39
-
40
-
41
-
42
-
43
-
44
-
45
-
46
-
47
-
48
-
49
-
50
-
51
-
52
-
53
-
54
-
55
-
56
-
57
-
58
-
59
-
60
-
61
-
62
-
63
-
64
-
65
-
66
-
67
-
68
-
69
-
70
-
71
-
72
-
73
-
74
-
75
-
76
-
77
-
78
-
79
-
80
-
81
-
82
-
83
-
84
-
85
-
86
-
 87
87 -
 88
88 -
 89
89 -
 90
90 -
 91
91 -
 92
92 -
 93
93 -
 94
94 -
 95
95 -
 96
96 -
 97
97 -
98
-
99
-
100
-
101
-
102
-
103
-
104
-
105
-
106
-
107
-
108
-
109
-
110
-
111
-
112
-
113
-
114
-
115
-
116
-
117
-
118
-
119
-
120
-
121
-
122
-
123
-
124
-
125
-
126
-
127
-
128
-
129
-
130
-
131
-
132
-
133
-
134
-
135
-
136
-
137
-
138
-
139
-
140
-
141
-
142
-
143
-
144
-
145
-
146
-
147
-
148
 |
 |