Dell Poweredge C4130 Dell Owners Manual - Page 100
USB memory key, USB memory key connector
 |
View all Dell Poweredge C4130 manuals
Add to My Manuals
Save this manual to your list of manuals |
Page 100 highlights
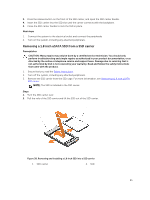
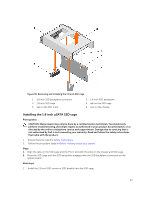
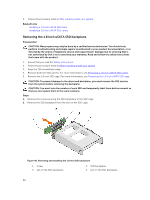
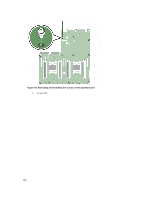
3. Follow the procedure listed in Before working inside your system. 4. Remove the 1.8 inch uSATA SSD cage. For more information, see Removing the 1.8 inch uSATA SSD cage. Steps 1. Locate the USB connector or the USB key on the system board. The internal USB connector is located under the 1.8 inch uSATA SSD cage. For more information, see System board connectors. 2. If installed, remove the USB key from the USB connector. 3. Insert the replacement USB key into the USB connector. Figure 41. Replacing the internal USB key 1. USB memory key 2. USB memory key connector Next steps 1. Install the 1.8 inch uSATA SSD cage. 2. Follow the procedure listed in After working inside your system. 3. While booting, press to enter System Setup and verify that the USB key is detected by the system. Related Links Installing the 1.8 inch uSATA SSD cage 100
-
 1
1 -
2
-
3
-
4
-
5
-
6
-
7
-
8
-
9
-
10
-
11
-
12
-
13
-
14
-
15
-
16
-
17
-
18
-
19
-
20
-
21
-
22
-
23
-
24
-
25
-
26
-
27
-
28
-
29
-
30
-
31
-
32
-
33
-
34
-
35
-
36
-
37
-
38
-
39
-
40
-
41
-
42
-
43
-
44
-
45
-
46
-
47
-
48
-
49
-
50
-
51
-
52
-
53
-
54
-
55
-
56
-
57
-
58
-
59
-
60
-
61
-
62
-
63
-
64
-
65
-
66
-
67
-
68
-
69
-
70
-
71
-
72
-
73
-
74
-
75
-
76
-
77
-
78
-
79
-
80
-
81
-
82
-
83
-
84
-
85
-
86
-
87
-
88
-
89
-
90
-
91
-
92
-
93
-
94
-
 95
95 -
 96
96 -
 97
97 -
 98
98 -
 99
99 -
 100
100 -
 101
101 -
 102
102 -
 103
103 -
 104
104 -
 105
105 -
106
-
107
-
108
-
109
-
110
-
111
-
112
-
113
-
114
-
115
-
116
-
117
-
118
-
119
-
120
-
121
-
122
-
123
-
124
-
125
-
126
-
127
-
128
-
129
-
130
-
131
-
132
-
133
-
134
-
135
-
136
-
137
-
138
-
139
-
140
-
141
-
142
-
143
-
144
-
145
-
146
-
147
-
148
-
149
-
150
-
151
-
152
-
153
-
154
-
155
-
156
-
157
-
158
-
159
-
160
-
161
-
162
-
163
 |
 |
