Dell Poweredge C4130 Dell Owners Manual - Page 67
Install the cooling shroud., Repeat the procedure for the remaining two screws.
 |
View all Dell Poweredge C4130 manuals
Add to My Manuals
Save this manual to your list of manuals |
Page 67 highlights
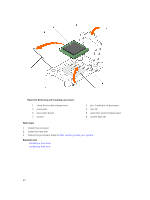
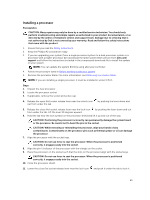
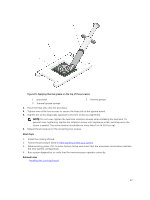
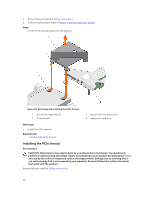
Figure 19. Applying thermal grease on the top of the processor 1. processor 3. thermal grease syringe 2. thermal grease 3. Place the heat sink onto the processor. 4. Tighten one of the four screws to secure the heat sink to the system board. 5. Tighten the screw diagonally opposite to the first screw you tightened. NOTE: Do not over-tighten the heat sink retention screws when installing the heat sink. To prevent over-tightening, tighten the retention screw until resistance is felt, and stop once the screw is seated. The screw tension should be no more than 6 in-lb (6.9 cm-kg). 6. Repeat the procedure for the remaining two screws. Next steps 1. Install the cooling shroud. 2. Follow the procedure listed in After working inside your system. 3. While booting, press to enter System Setup and check that the processor information matches the new system configuration. 4. Run system diagnostics to verify that the new processor operates correctly. Related Links Installing the cooling shroud 67
-
 1
1 -
2
-
3
-
4
-
5
-
6
-
7
-
8
-
9
-
10
-
11
-
12
-
13
-
14
-
15
-
16
-
17
-
18
-
19
-
20
-
21
-
22
-
23
-
24
-
25
-
26
-
27
-
28
-
29
-
30
-
31
-
32
-
33
-
34
-
35
-
36
-
37
-
38
-
39
-
40
-
41
-
42
-
43
-
44
-
45
-
46
-
47
-
48
-
49
-
50
-
51
-
52
-
53
-
54
-
55
-
56
-
57
-
58
-
59
-
60
-
61
-
 62
62 -
 63
63 -
 64
64 -
 65
65 -
 66
66 -
 67
67 -
 68
68 -
 69
69 -
 70
70 -
 71
71 -
 72
72 -
73
-
74
-
75
-
76
-
77
-
78
-
79
-
80
-
81
-
82
-
83
-
84
-
85
-
86
-
87
-
88
-
89
-
90
-
91
-
92
-
93
-
94
-
95
-
96
-
97
-
98
-
99
-
100
-
101
-
102
-
103
-
104
-
105
-
106
-
107
-
108
-
109
-
110
-
111
-
112
-
113
-
114
-
115
-
116
-
117
-
118
-
119
-
120
-
121
-
122
-
123
-
124
-
125
-
126
-
127
-
128
-
129
-
130
-
131
-
132
-
133
-
134
-
135
-
136
-
137
-
138
-
139
-
140
-
141
-
142
-
143
-
144
-
145
-
146
-
147
-
148
-
149
-
150
-
151
-
152
-
153
-
154
-
155
-
156
-
157
-
158
-
159
-
160
-
161
-
162
-
163
 |
 |
