Dell Poweredge C4130 Dell Owners Manual - Page 40
Installing the system top cover (back)
 |
View all Dell Poweredge C4130 manuals
Add to My Manuals
Save this manual to your list of manuals |
Page 40 highlights
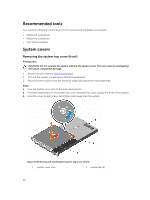
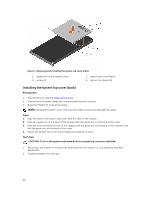
Figure 7. Removing and installing the system top cover (back) 1. guide slot on the system cover 3. screw (2) 2. system top cover (back) 4. tab on the chassis (6) Installing the system top cover (back) Prerequisites 1. Ensure that you read the Safety instructions. 2. Ensure that all internal cables are connected and routed correctly. 3. Keep the Phillips #1 screwdriver ready. NOTE: Closing the system cover with incorrect cable routing can damage the cables. Steps 1. Align the slots of the system top cover with the tabs on the chassis. 2. Align the guide pin on the back of the chassis with the guide slot on the back of the cover. 3. Slide the cover toward the front of the chassis until the guide pin on the back of the chassis locks into the guide slot on the back of the cover. 4. Secure the system top cover to the chassis by using the screws. Next steps CAUTION: Turn on the system only when both the system top covers are installed. 1. Reconnect the system to its electrical outlet and turn the system on, including any attached peripherals. 2. Install the system into the rack. 40
-
 1
1 -
2
-
3
-
4
-
5
-
6
-
7
-
8
-
9
-
10
-
11
-
12
-
13
-
14
-
15
-
16
-
17
-
18
-
19
-
20
-
21
-
22
-
23
-
24
-
25
-
26
-
27
-
28
-
29
-
30
-
31
-
32
-
33
-
34
-
 35
35 -
 36
36 -
 37
37 -
 38
38 -
 39
39 -
 40
40 -
 41
41 -
 42
42 -
 43
43 -
 44
44 -
 45
45 -
46
-
47
-
48
-
49
-
50
-
51
-
52
-
53
-
54
-
55
-
56
-
57
-
58
-
59
-
60
-
61
-
62
-
63
-
64
-
65
-
66
-
67
-
68
-
69
-
70
-
71
-
72
-
73
-
74
-
75
-
76
-
77
-
78
-
79
-
80
-
81
-
82
-
83
-
84
-
85
-
86
-
87
-
88
-
89
-
90
-
91
-
92
-
93
-
94
-
95
-
96
-
97
-
98
-
99
-
100
-
101
-
102
-
103
-
104
-
105
-
106
-
107
-
108
-
109
-
110
-
111
-
112
-
113
-
114
-
115
-
116
-
117
-
118
-
119
-
120
-
121
-
122
-
123
-
124
-
125
-
126
-
127
-
128
-
129
-
130
-
131
-
132
-
133
-
134
-
135
-
136
-
137
-
138
-
139
-
140
-
141
-
142
-
143
-
144
-
145
-
146
-
147
-
148
-
149
-
150
-
151
-
152
-
153
-
154
-
155
-
156
-
157
-
158
-
159
-
160
-
161
-
162
-
163
 |
 |
