Dell Poweredge C4130 Dell Owners Manual - Page 76
CAUTION: The expansion card riser should be installed in the system before you install
 |
View all Dell Poweredge C4130 manuals
Add to My Manuals
Save this manual to your list of manuals |
Page 76 highlights
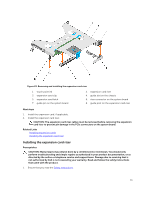
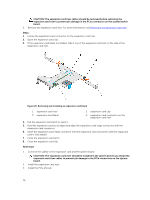
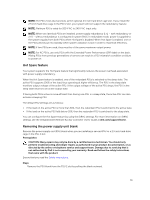
CAUTION: The expansion card riser cables should be removed before removing the expansion card riser to prevent pin damage in the PCIe connectors on the system/switch board. 5. Remove the expansion card riser. For more information, see Removing the expansion card riser. Steps 1. Locate the expansion card connector on the expansion card riser. 2. Open the expansion card clip. 3. If the expansion card blank is installed, slide it out of the expansion card slot on the side of the expansion card riser. Figure 25. Removing and installing an expansion card blank 1. expansion card riser 3. expansion card blank 2. expansion card clip 4. expansion card connector on the expansion card riser 4. Pull the expansion card latch to open it. 5. Hold the expansion card by its edges and align the expansion card-edge connector with the expansion card connector. 6. Insert the expansion card-edge connector into the expansion card connector until the expansion card is fully seated. 7. Close the expansion card latch. 8. Close the expansion card clip. Next steps 1. Connect the cables to the expansion card and the system board. CAUTION: The expansion card riser should be installed in the system before you install the expansion card riser cables to prevent pin damage in the PCIe connectors on the system board. 2. Install the expansion card riser. 3. Install the PCIe shroud. 76
-
 1
1 -
2
-
3
-
4
-
5
-
6
-
7
-
8
-
9
-
10
-
11
-
12
-
13
-
14
-
15
-
16
-
17
-
18
-
19
-
20
-
21
-
22
-
23
-
24
-
25
-
26
-
27
-
28
-
29
-
30
-
31
-
32
-
33
-
34
-
35
-
36
-
37
-
38
-
39
-
40
-
41
-
42
-
43
-
44
-
45
-
46
-
47
-
48
-
49
-
50
-
51
-
52
-
53
-
54
-
55
-
56
-
57
-
58
-
59
-
60
-
61
-
62
-
63
-
64
-
65
-
66
-
67
-
68
-
69
-
70
-
 71
71 -
 72
72 -
 73
73 -
 74
74 -
 75
75 -
 76
76 -
 77
77 -
 78
78 -
 79
79 -
 80
80 -
 81
81 -
82
-
83
-
84
-
85
-
86
-
87
-
88
-
89
-
90
-
91
-
92
-
93
-
94
-
95
-
96
-
97
-
98
-
99
-
100
-
101
-
102
-
103
-
104
-
105
-
106
-
107
-
108
-
109
-
110
-
111
-
112
-
113
-
114
-
115
-
116
-
117
-
118
-
119
-
120
-
121
-
122
-
123
-
124
-
125
-
126
-
127
-
128
-
129
-
130
-
131
-
132
-
133
-
134
-
135
-
136
-
137
-
138
-
139
-
140
-
141
-
142
-
143
-
144
-
145
-
146
-
147
-
148
-
149
-
150
-
151
-
152
-
153
-
154
-
155
-
156
-
157
-
158
-
159
-
160
-
161
-
162
-
163
 |
 |
