Dell Poweredge C4130 Dell Owners Manual - Page 112
Graphics processing unit, GPU installation guidelines, Removing a GPU blank (optional)
 |
View all Dell Poweredge C4130 manuals
Add to My Manuals
Save this manual to your list of manuals |
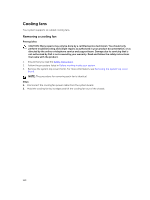
Page 112 highlights
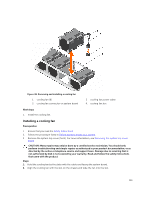
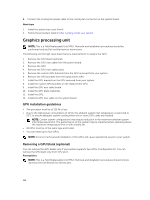
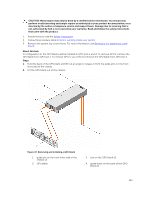
3. Connect the cooling fan power cable to the cooling fan connector on the system board. Next steps 1. Install the system top cover (front). 2. Follow the procedure listed in After working inside your system. Graphics processing unit NOTE: This is a Field Replaceable Unit (FRU). Removal and installation procedures should be performed only by Dell certified service technicians. The following are the high-level steps that you must perform to replace the GPU: 1. Remove the GPU blank (optional). 2. Remove the GPU riser cable from the system board. 3. Remove the GPU. 4. Remove the GPU riser cable board. 5. Remove the custom GPU brackets from the GPU removed from your system. 6. Remove the GPU brackets from the replacement GPU. 7. Install the GPU brackets on the GPU removed from your system. 8. Install the custom GPU brackets on the replacement GPU. 9. Install the GPU riser cable board. 10. Install the GPU blank (optional). 11. Install the GPU. 12. Install the GPU riser cable on the system board. GPU installation guidelines • The processor must be of 135 W or less. • Due to the high power consumption of GPUs, the ambient system inlet temperature is restricted to 25°C to ensure adequate system cooling when one or more GPU cards are installed. NOTE: Certain system configurations may require reduction in the maximum ambient system inlet temperature limit. The performance of the system may be impacted when operating above the maximum temperature limit or with a faulty fan. • All GPUs must be of the same type and model. • You can install up to four GPUs. NOTE: Incorrect removal and installation of the GPUs will cause operational issues to your system. Removing a GPU blank (optional) You can remove the GPU blanks only if your system supports two GPUs (Configuration D). You can remove the GPU blank only from GPU slot 1. Prerequisites NOTE: This is a Field Replaceable Unit (FRU). Removal and installation procedures should only be done by Dell certified service technicians. 112
-
 1
1 -
2
-
3
-
4
-
5
-
6
-
7
-
8
-
9
-
10
-
11
-
12
-
13
-
14
-
15
-
16
-
17
-
18
-
19
-
20
-
21
-
22
-
23
-
24
-
25
-
26
-
27
-
28
-
29
-
30
-
31
-
32
-
33
-
34
-
35
-
36
-
37
-
38
-
39
-
40
-
41
-
42
-
43
-
44
-
45
-
46
-
47
-
48
-
49
-
50
-
51
-
52
-
53
-
54
-
55
-
56
-
57
-
58
-
59
-
60
-
61
-
62
-
63
-
64
-
65
-
66
-
67
-
68
-
69
-
70
-
71
-
72
-
73
-
74
-
75
-
76
-
77
-
78
-
79
-
80
-
81
-
82
-
83
-
84
-
85
-
86
-
87
-
88
-
89
-
90
-
91
-
92
-
93
-
94
-
95
-
96
-
97
-
98
-
99
-
100
-
101
-
102
-
103
-
104
-
105
-
106
-
 107
107 -
 108
108 -
 109
109 -
 110
110 -
 111
111 -
 112
112 -
 113
113 -
 114
114 -
 115
115 -
 116
116 -
 117
117 -
118
-
119
-
120
-
121
-
122
-
123
-
124
-
125
-
126
-
127
-
128
-
129
-
130
-
131
-
132
-
133
-
134
-
135
-
136
-
137
-
138
-
139
-
140
-
141
-
142
-
143
-
144
-
145
-
146
-
147
-
148
-
149
-
150
-
151
-
152
-
153
-
154
-
155
-
156
-
157
-
158
-
159
-
160
-
161
-
162
-
163
 |
 |
