Dell Poweredge C4130 Dell Owners Manual - Page 62
socket release lever up., lever lifts up.
 |
View all Dell Poweredge C4130 manuals
Add to My Manuals
Save this manual to your list of manuals |
Page 62 highlights
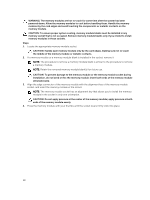
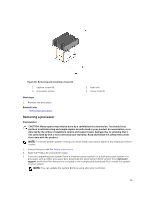
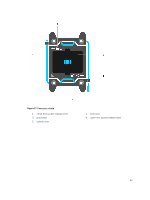
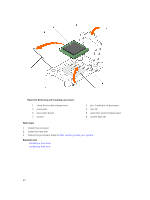
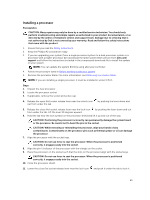
4. Follow the procedure listed in Before working inside your system. 5. Remove the cooling shroud. For more information, see Removing the cooling shroud. 6. Remove the heat sink. For more information, see Removing a heat sink WARNING: The processor will be hot to touch for some time after the system has been powered down. Allow the processor to cool before removing it. CAUTION: The processor is held in its socket under strong pressure. Be aware that the release lever can spring up suddenly if not firmly grasped. Steps 1. Release the open first socket release lever near the unlock icon out from under the tab. by pushing the lever down and 2. Release the close first socket release lever near the lock icon from under the tab. Lift the lever 90 degrees upward. by pushing the lever down and out 3. Lower the open first socket release lever to lift the processor shield. 4. Hold the tab on the processor shield and lift the processor shield until the open first socket release lever lifts up. CAUTION: The socket pins are fragile and can be permanently damaged. Be careful not to bend the pins in the socket when removing the processor out of the socket. 5. Lift the processor out of the socket and leave the open first socket release lever up. NOTE: If you are permanently removing the processor, you must install a socket protective cap in the vacant socket to protect the socket pins and keep the socket free of dust. NOTE: After removing the processor, place it in an anti-static container for reuse, return, or temporary storage. Do not touch the bottom of the processor. Touch only the side edges of the processor. 62
-
 1
1 -
2
-
3
-
4
-
5
-
6
-
7
-
8
-
9
-
10
-
11
-
12
-
13
-
14
-
15
-
16
-
17
-
18
-
19
-
20
-
21
-
22
-
23
-
24
-
25
-
26
-
27
-
28
-
29
-
30
-
31
-
32
-
33
-
34
-
35
-
36
-
37
-
38
-
39
-
40
-
41
-
42
-
43
-
44
-
45
-
46
-
47
-
48
-
49
-
50
-
51
-
52
-
53
-
54
-
55
-
56
-
 57
57 -
 58
58 -
 59
59 -
 60
60 -
 61
61 -
 62
62 -
 63
63 -
 64
64 -
 65
65 -
 66
66 -
 67
67 -
68
-
69
-
70
-
71
-
72
-
73
-
74
-
75
-
76
-
77
-
78
-
79
-
80
-
81
-
82
-
83
-
84
-
85
-
86
-
87
-
88
-
89
-
90
-
91
-
92
-
93
-
94
-
95
-
96
-
97
-
98
-
99
-
100
-
101
-
102
-
103
-
104
-
105
-
106
-
107
-
108
-
109
-
110
-
111
-
112
-
113
-
114
-
115
-
116
-
117
-
118
-
119
-
120
-
121
-
122
-
123
-
124
-
125
-
126
-
127
-
128
-
129
-
130
-
131
-
132
-
133
-
134
-
135
-
136
-
137
-
138
-
139
-
140
-
141
-
142
-
143
-
144
-
145
-
146
-
147
-
148
-
149
-
150
-
151
-
152
-
153
-
154
-
155
-
156
-
157
-
158
-
159
-
160
-
161
-
162
-
163
 |
 |
