Dell Poweredge C4130 Dell Owners Manual - Page 107
Entering the system Service Tag using System Setup - manual
 |
View all Dell Poweredge C4130 manuals
Add to My Manuals
Save this manual to your list of manuals |
Page 107 highlights
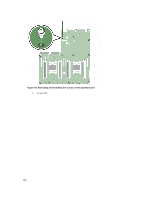
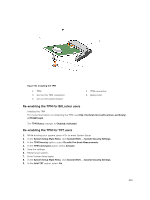
a. Use the Easy Restore feature to restore the service tag. For more information, see Restoring the Service Tag using the Easy Restore feature. b. If the service tag is not backed up in the backup flash device, enter the system service tag manually. For more information, see Entering the system service tag. c. Update the BIOS and iDRAC versions. d. Re-enable the Trusted Platform Module (TPM). For more information, see Re-enabling the TPM for TXT users. Entering the system Service Tag using System Setup If you know the system Service Tag, use System Setup menu to enter the Service Tag. 1. Turn on the system. 2. Press to enter System Setup. 3. Click Service Tag Settings. 4. Enter the Service Tag. NOTE: You can enter the Service Tag only when the Service Tag field is empty. Ensure that you enter the correct Service Tag. Once the Service Tag is entered, it cannot be updated or changed. 5. Click Ok. 6. Import your new or existing iDRAC Enterprise license. For more information, see Integrated Dell Remote Access Controller User's Guide, at dell.com/ esmmanuals. Restoring the Service Tag using the Easy Restore feature Use the Easy Restore feature if you do not know the Service Tag of your system. The Easy Restore feature allows you to restore your system's Service Tag, license, UEFI configuration, and the system configuration data after replacing the system board. All data is backed up in a backup flash device automatically. If BIOS detects a new system board and the Service Tag in the backup flash device, BIOS prompts the user to restore the backup information. 1. Turn on the system. If BIOS detects a new system board, and if the Service Tag is present in the backup flash device, BIOS displays the Service Tag, the status of the license, and the UEFI Diagnostics version. 2. Perform one of the following steps: • Press Y to restore the Service Tag, license, and diagnostics information. • Press N to navigate to the Lifecycle Controller based restore options. • Press to restore data from a previously created Hardware Server Profile. After the restore process is complete, BIOS prompts to restore the system configuration data. 3. Perform one of the following steps: • Press Y to restore the system configuration data. • Press N to use the default configuration settings. After the restore process is complete, the system restarts. 107
-
 1
1 -
2
-
3
-
4
-
5
-
6
-
7
-
8
-
9
-
10
-
11
-
12
-
13
-
14
-
15
-
16
-
17
-
18
-
19
-
20
-
21
-
22
-
23
-
24
-
25
-
26
-
27
-
28
-
29
-
30
-
31
-
32
-
33
-
34
-
35
-
36
-
37
-
38
-
39
-
40
-
41
-
42
-
43
-
44
-
45
-
46
-
47
-
48
-
49
-
50
-
51
-
52
-
53
-
54
-
55
-
56
-
57
-
58
-
59
-
60
-
61
-
62
-
63
-
64
-
65
-
66
-
67
-
68
-
69
-
70
-
71
-
72
-
73
-
74
-
75
-
76
-
77
-
78
-
79
-
80
-
81
-
82
-
83
-
84
-
85
-
86
-
87
-
88
-
89
-
90
-
91
-
92
-
93
-
94
-
95
-
96
-
97
-
98
-
99
-
100
-
101
-
 102
102 -
 103
103 -
 104
104 -
 105
105 -
 106
106 -
 107
107 -
 108
108 -
 109
109 -
 110
110 -
 111
111 -
 112
112 -
113
-
114
-
115
-
116
-
117
-
118
-
119
-
120
-
121
-
122
-
123
-
124
-
125
-
126
-
127
-
128
-
129
-
130
-
131
-
132
-
133
-
134
-
135
-
136
-
137
-
138
-
139
-
140
-
141
-
142
-
143
-
144
-
145
-
146
-
147
-
148
-
149
-
150
-
151
-
152
-
153
-
154
-
155
-
156
-
157
-
158
-
159
-
160
-
161
-
162
-
163
 |
 |
