Dell Poweredge C4130 Dell Owners Manual - Page 64
Next steps, Related Links, processor shield
 |
View all Dell Poweredge C4130 manuals
Add to My Manuals
Save this manual to your list of manuals |
Page 64 highlights
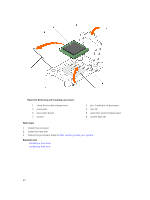
Figure 18. Removing and installing a processor 1. close first socket release lever 3. processor 5. processor shield 7. socket 2. pin-1 indicator of processor 4. slot (4) 6. open first socket release lever 8. socket keys (4) Next steps 1. Install the processor. 2. Install the heat sink. 3. Follow the procedure listed in After working inside your system. Related Links Installing a processor Installing a heat sink 64
-
 1
1 -
2
-
3
-
4
-
5
-
6
-
7
-
8
-
9
-
10
-
11
-
12
-
13
-
14
-
15
-
16
-
17
-
18
-
19
-
20
-
21
-
22
-
23
-
24
-
25
-
26
-
27
-
28
-
29
-
30
-
31
-
32
-
33
-
34
-
35
-
36
-
37
-
38
-
39
-
40
-
41
-
42
-
43
-
44
-
45
-
46
-
47
-
48
-
49
-
50
-
51
-
52
-
53
-
54
-
55
-
56
-
57
-
58
-
 59
59 -
 60
60 -
 61
61 -
 62
62 -
 63
63 -
 64
64 -
 65
65 -
 66
66 -
 67
67 -
 68
68 -
 69
69 -
70
-
71
-
72
-
73
-
74
-
75
-
76
-
77
-
78
-
79
-
80
-
81
-
82
-
83
-
84
-
85
-
86
-
87
-
88
-
89
-
90
-
91
-
92
-
93
-
94
-
95
-
96
-
97
-
98
-
99
-
100
-
101
-
102
-
103
-
104
-
105
-
106
-
107
-
108
-
109
-
110
-
111
-
112
-
113
-
114
-
115
-
116
-
117
-
118
-
119
-
120
-
121
-
122
-
123
-
124
-
125
-
126
-
127
-
128
-
129
-
130
-
131
-
132
-
133
-
134
-
135
-
136
-
137
-
138
-
139
-
140
-
141
-
142
-
143
-
144
-
145
-
146
-
147
-
148
-
149
-
150
-
151
-
152
-
153
-
154
-
155
-
156
-
157
-
158
-
159
-
160
-
161
-
162
-
163
 |
 |

Figure 18. Removing and installing a processor
1.
close first
socket release lever
2.
pin-1 indicator of processor
3.
processor
4.
slot (4)
5.
processor shield
6.
open first
socket release lever
7.
socket
8.
socket keys (4)
Next steps
1.
Install the processor.
2.
Install the heat sink.
3.
Follow the procedure listed in
After working inside your system
.
Related Links
Installing a processor
Installing a heat sink
64