HTC Touch Cruise 09 User Manual - Page 247
Set as Default Ring Tone, to Ring Tone Folder, Start > Settings > Personal, Phone
 |
View all HTC Touch Cruise 09 manuals
Add to My Manuals
Save this manual to your list of manuals |
Page 247 highlights
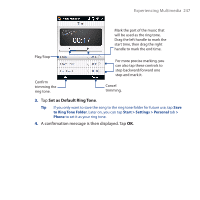
Experiencing Multimedia 247 Play/Stop Confirm trimming the ring tone. Mark the part of the music that will be used as the ring tone. Drag the left handle to mark the start time, then drag the right handle to mark the end time. For more precise marking, you can also tap these controls to step backward/forward one step and mark it. Cancel trimming. 3. Tap Set as Default Ring Tone. Tip If you only want to save the song to the ring tone folder for future use, tap Save to Ring Tone Folder. Later on, you can tap Start > Settings > Personal tab > Phone to set it as your ring tone. 4. A confirmation message is then displayed. Tap OK.
-
 1
1 -
2
-
3
-
4
-
5
-
6
-
7
-
8
-
9
-
10
-
11
-
12
-
13
-
14
-
15
-
16
-
17
-
18
-
19
-
20
-
21
-
22
-
23
-
24
-
25
-
26
-
27
-
28
-
29
-
30
-
31
-
32
-
33
-
34
-
35
-
36
-
37
-
38
-
39
-
40
-
41
-
42
-
43
-
44
-
45
-
46
-
47
-
48
-
49
-
50
-
51
-
52
-
53
-
54
-
55
-
56
-
57
-
58
-
59
-
60
-
61
-
62
-
63
-
64
-
65
-
66
-
67
-
68
-
69
-
70
-
71
-
72
-
73
-
74
-
75
-
76
-
77
-
78
-
79
-
80
-
81
-
82
-
83
-
84
-
85
-
86
-
87
-
88
-
89
-
90
-
91
-
92
-
93
-
94
-
95
-
96
-
97
-
98
-
99
-
100
-
101
-
102
-
103
-
104
-
105
-
106
-
107
-
108
-
109
-
110
-
111
-
112
-
113
-
114
-
115
-
116
-
117
-
118
-
119
-
120
-
121
-
122
-
123
-
124
-
125
-
126
-
127
-
128
-
129
-
130
-
131
-
132
-
133
-
134
-
135
-
136
-
137
-
138
-
139
-
140
-
141
-
142
-
143
-
144
-
145
-
146
-
147
-
148
-
149
-
150
-
151
-
152
-
153
-
154
-
155
-
156
-
157
-
158
-
159
-
160
-
161
-
162
-
163
-
164
-
165
-
166
-
167
-
168
-
169
-
170
-
171
-
172
-
173
-
174
-
175
-
176
-
177
-
178
-
179
-
180
-
181
-
182
-
183
-
184
-
185
-
186
-
187
-
188
-
189
-
190
-
191
-
192
-
193
-
194
-
195
-
196
-
197
-
198
-
199
-
200
-
201
-
202
-
203
-
204
-
205
-
206
-
207
-
208
-
209
-
210
-
211
-
212
-
213
-
214
-
215
-
216
-
217
-
218
-
219
-
220
-
221
-
222
-
223
-
224
-
225
-
226
-
227
-
228
-
229
-
230
-
231
-
232
-
233
-
234
-
235
-
236
-
237
-
238
-
239
-
240
-
241
-
 242
242 -
 243
243 -
 244
244 -
 245
245 -
 246
246 -
 247
247 -
 248
248 -
 249
249 -
 250
250 -
 251
251 -
 252
252 -
253
-
254
-
255
-
256
-
257
-
258
-
259
-
260
-
261
-
262
-
263
-
264
-
265
-
266
-
267
-
268
-
269
-
270
-
271
-
272
-
273
-
274
-
275
-
276
-
277
-
278
-
279
-
280
-
281
-
282
-
283
-
284
-
285
-
286
-
287
-
288
-
289
-
290
-
291
-
292
-
293
-
294
-
295
-
296
-
297
-
298
-
299
-
300
-
301
-
302
-
303
-
304
-
305
-
306
-
307
-
308
-
309
-
310
-
311
-
312
-
313
-
314
-
315
-
316
-
317
-
318
 |
 |
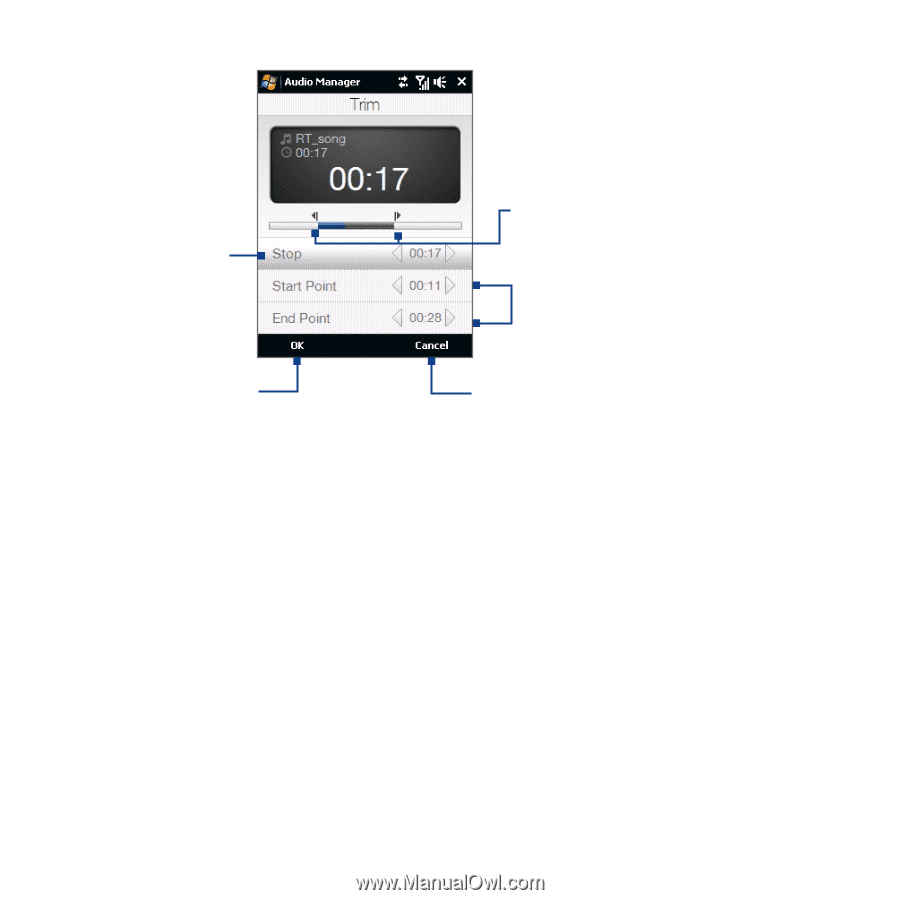
Experiencing Multimedia
±47
Play/Stop
Mark the part of the music that
will be used as the ring tone.
Drag the left handle to mark the
start time, then drag the right
handle to mark the end time.
For more precise marking, you
can also tap these controls to
step backward/forward one
step and mark it.
Confirm
trimming the
ring tone.
Cancel
trimming.
3.
Tap
Set as Default Ring Tone
.
Tip
If you only want to save the song to the ring tone folder for future use, tap
Save
to Ring Tone Folder
. Later on, you can tap
Start > Settings > Personal
tab
>
Phone
to set it as your ring tone.
4.
A confirmation message is then displayed. Tap
OK
.