HP Photosmart C7100 Basics Guide - Page 101
Clear paper jams, Caution
 |
View all HP Photosmart C7100 manuals
Add to My Manuals
Save this manual to your list of manuals |
Page 101 highlights
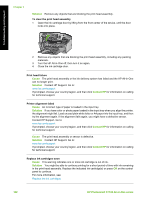
Troubleshooting and support Chapter 5 Note The HP All-in-One functionality will be limited during VPN sessions. Cause The Ethernet cable is not plugged in to the router, switch, or hub, or the cable is defective. Solution Reinsert the cables. Or, if necessary, try a different cable. Cause The HP All-in-One is assigned an AutoIP address instead of DHCP. Solution The HP All-in-One is not connected properly to the network. Check the following: ● Make sure all cables are connected properly and securely. ● If the cables are connected properly, your access point, router, or home gateway might not be sending an address. If this is the case, you might need to reset the HP All-in-One. ● Make sure the HP All-in-One is on the correct network. Cause The HP All-in-One is on the wrong subnet or gateway. Solution Print a network configuration page, and verify that the router and HP All-in-One are on the same subnet and gateway. For more information, see the onscreen Help that came with the HP All-in-One. Cause The HP All-in-One is not turned on. Solution Turn on the HP All-in-One. Clear paper jams If the HP All-in-One has a paper jam, first check the rear door. If the jammed paper is not in the rear rollers, check the front door. To clear a paper jam from the rear door 1. Turn off the HP All-in-One. 2. Press in the tab on the rear door to release the door. Remove the door by pulling it away from the HP All-in-One. Caution Trying to clear a paper jam from the front of the HP All-in-One can damage the print mechanism. Always access and clear paper jams through the rear door. 98 HP Photosmart C7100 All-in-One series
-
 1
1 -
2
-
3
-
4
-
5
-
6
-
7
-
8
-
9
-
10
-
11
-
12
-
13
-
14
-
15
-
16
-
17
-
18
-
19
-
20
-
21
-
22
-
23
-
24
-
25
-
26
-
27
-
28
-
29
-
30
-
31
-
32
-
33
-
34
-
35
-
36
-
37
-
38
-
39
-
40
-
41
-
42
-
43
-
44
-
45
-
46
-
47
-
48
-
49
-
50
-
51
-
52
-
53
-
54
-
55
-
56
-
57
-
58
-
59
-
60
-
61
-
62
-
63
-
64
-
65
-
66
-
67
-
68
-
69
-
70
-
71
-
72
-
73
-
74
-
75
-
76
-
77
-
78
-
79
-
80
-
81
-
82
-
83
-
84
-
85
-
86
-
87
-
88
-
89
-
90
-
91
-
92
-
93
-
94
-
95
-
 96
96 -
 97
97 -
 98
98 -
 99
99 -
 100
100 -
 101
101 -
 102
102 -
 103
103 -
 104
104 -
 105
105 -
 106
106 -
107
-
108
-
109
-
110
-
111
-
112
-
113
-
114
-
115
-
116
 |
 |
