HP Photosmart C7100 Basics Guide - Page 24
Connect to additional computers on a network
 |
View all HP Photosmart C7100 manuals
Add to My Manuals
Save this manual to your list of manuals |
Page 24 highlights
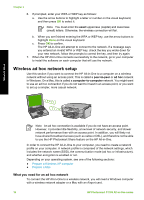
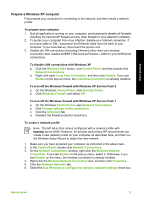
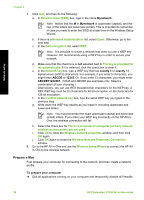
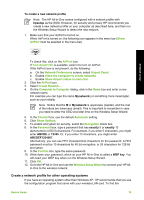
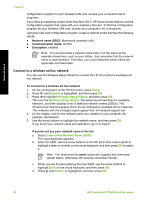
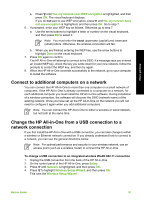
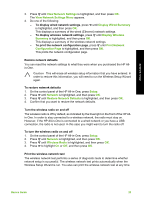
Network setup e. Press until Yes, my network uses WEP encryption is highlighted, and then press OK. The visual keyboard displays. If you do not want to use WEP encryption, press until No, my network does not use encryption is highlighted, and then press OK. Go to step 7. 6. If prompted, enter your WEP key as follows. Otherwise go to step 7. a. Use the arrow buttons to highlight a letter or number on the visual keyboard, and then press OK to select it. Note You must enter the exact uppercase (capital) and lowercase (small) letters. Otherwise, the wireless connection will fail. b. When you are finished entering the WEP key, use the arrow buttons to highlight Done on the visual keyboard. 7. Press OK again to confirm. The HP All-in-One will attempt to connect to the SSID. If a message says you entered an invalid WEP key, check the key you wrote down for your new network, follow the prompts to correct the WEP key, and then try again. 8. When the HP All-in-One connects successfully to the network, go to your computer to install the software. Connect to additional computers on a network You can connect the HP All-in-One to more than one computer on a small network of computers. If the HP All-in-One is already connected to a computer on a network, for each additional computer you must install the HP All-in-One software. During installation of a wireless connection, the software will discover the SSID (network name) of the existing network. Once you have set up the HP All-in-One on the network you will not need to configure it again when you add additional computers. Note You can connect the HP All-in-One to either a wireless or wired network, but not both at the same time. Change the HP All-in-One from a USB connection to a network connection If you first install the HP All-in-One with a USB connection, you can later change to either a wireless or Ethernet network connection. If you already understand how to connect to a network, you can use the general directions below. Note For optimal performance and security in your wireless network, use an access point (such as a wireless router) to connect the HP All-in-One. To change a USB connection to an integrated wireless WLAN 802.11 connection 1. Unplug the USB connection from the back of the HP All-in-One. 2. On the control panel of the HP All-in-One, press Setup. 3. Press until Network is highlighted, and then press OK. 4. Press to highlight Wireless Setup Wizard, and then press OK. This runs the Wireless Setup Wizard. Basics Guide 21
-
 1
1 -
2
-
3
-
4
-
5
-
6
-
7
-
8
-
9
-
10
-
11
-
12
-
13
-
14
-
15
-
16
-
17
-
18
-
 19
19 -
 20
20 -
 21
21 -
 22
22 -
 23
23 -
 24
24 -
 25
25 -
 26
26 -
 27
27 -
 28
28 -
 29
29 -
30
-
31
-
32
-
33
-
34
-
35
-
36
-
37
-
38
-
39
-
40
-
41
-
42
-
43
-
44
-
45
-
46
-
47
-
48
-
49
-
50
-
51
-
52
-
53
-
54
-
55
-
56
-
57
-
58
-
59
-
60
-
61
-
62
-
63
-
64
-
65
-
66
-
67
-
68
-
69
-
70
-
71
-
72
-
73
-
74
-
75
-
76
-
77
-
78
-
79
-
80
-
81
-
82
-
83
-
84
-
85
-
86
-
87
-
88
-
89
-
90
-
91
-
92
-
93
-
94
-
95
-
96
-
97
-
98
-
99
-
100
-
101
-
102
-
103
-
104
-
105
-
106
-
107
-
108
-
109
-
110
-
111
-
112
-
113
-
114
-
115
-
116
 |
 |
