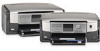
HP Photosmart C7100 Basics Guide - Page 9
Start Fax Color, Start Fax Black - software
 |
View all HP Photosmart C7100 manuals
Add to My Manuals
Save this manual to your list of manuals |
Page 9 highlights
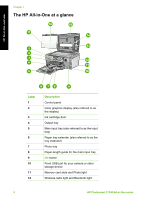
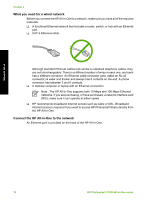
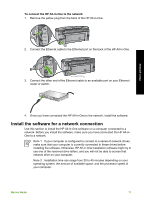
HP All-in-One overview Chapter 1 Label 1 2 3 4 5 6 7 8 9 10 11 12 13 14 15 16 17 18 19 Name and Description Keypad: Enters fax numbers, values, or text. Copy Menu: Selects copy options, such as number of copies, paper size, and paper type. Start Copy Black: Starts a black-and-white copy. Start Copy Color: Starts a color copy. Scan Menu: Opens the Scan Menu where you can select a destination for your scan. Start Scan: From the idle state, pressing the Start Scan button opens the Scan Menu where you can choose a destination for your scan. If you are already in the Scan Menu, it sends the scan job to the highlighted destination. Fax Menu: Presents the Enter Fax Number screen to enter a fax number. If you press it again, the Fax Menu appears where you can select fax options. Start Fax Black: Starts a black-and-white fax. Start Fax Color: Starts a color fax. Color graphics display (also referred to as the display): Displays menus, photos, and messages. Back button: Returns to the previous screen on the display. Preview: Displays a preview of a copy or photo job. Setup: Presents the Setup Menu for generating reports, changing fax and network settings, and accessing tools and preferences. Help: Opens the Help Menu on the display where you can select a topic to learn more about it. Depending on the topic you select, the topic will appear on your display or on your computer screen. Rotate: Rotates the currently displayed photo 90 degrees clockwise. Subsequent presses continue to rotate the photo 90 degrees. Print Photos: Prints the photos selected on your memory card. If no photos are currently selected, the HP All-in-One prints the photo currently showing on the display. From the idle state, pressing the Print Photos button launches the Photosmart Express menu. Film: Scans slides and negatives using the Slide and Negative Film holder and the Slide and Negative Film light in the lid of the HP All-in-One. Video: Plays videos, views video frames, and prints frames from a video file on your memory card or storage device. Share: Sends or receives images directly from a network-connected HP All-in-One. If the HP All-in-One is USB-connected, you can send images using the software on your computer. 6 HP Photosmart C7100 All-in-One series
-
 1
1 -
2
-
3
-
 4
4 -
 5
5 -
 6
6 -
 7
7 -
 8
8 -
 9
9 -
 10
10 -
 11
11 -
 12
12 -
 13
13 -
 14
14 -
15
-
16
-
17
-
18
-
19
-
20
-
21
-
22
-
23
-
24
-
25
-
26
-
27
-
28
-
29
-
30
-
31
-
32
-
33
-
34
-
35
-
36
-
37
-
38
-
39
-
40
-
41
-
42
-
43
-
44
-
45
-
46
-
47
-
48
-
49
-
50
-
51
-
52
-
53
-
54
-
55
-
56
-
57
-
58
-
59
-
60
-
61
-
62
-
63
-
64
-
65
-
66
-
67
-
68
-
69
-
70
-
71
-
72
-
73
-
74
-
75
-
76
-
77
-
78
-
79
-
80
-
81
-
82
-
83
-
84
-
85
-
86
-
87
-
88
-
89
-
90
-
91
-
92
-
93
-
94
-
95
-
96
-
97
-
98
-
99
-
100
-
101
-
102
-
103
-
104
-
105
-
106
-
107
-
108
-
109
-
110
-
111
-
112
-
113
-
114
-
115
-
116
 |
 |
