HP Photosmart C7100 Basics Guide - Page 65
Scan an original to a computer, Make reprints of your photos, HP Digital Imaging Monitor, Scan Menu
 |
View all HP Photosmart C7100 manuals
Add to My Manuals
Save this manual to your list of manuals |
Page 65 highlights
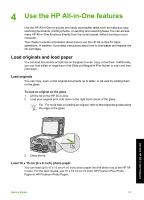
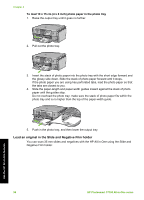
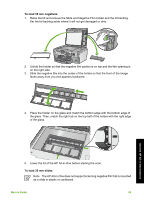
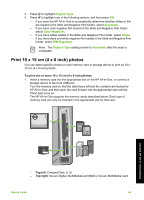
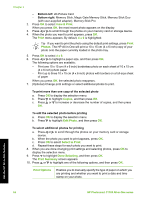
Chapter 4 Note Closing the HP Digital Imaging Monitor icon in the Windows system tray can cause the HP All-in-One to lose some of its scan functionality. If this happens, you can restore full functionality by restarting your computer or by starting the HP Photosmart Software. Scan an original to a computer You can scan originals placed on the glass by using the control panel. To scan to a computer 1. Load your original print side down in the right front corner of the glass. 2. Press Scan Menu. 3. Press to highlight Scan to Computer, and then press OK. 4. If the HP All-in-One is connected to one or more computers on a network, do the following: a. Press OK to select Select Computer. A list of the computers connected to the HP All-in-One appears on the display. Note The Select Computer menu might list computers with a USB connection in addition to those connected through the network. b. Press OK to select the default computer, or press to select a different computer, and then press OK. The Scan To menu appears on the display, listing the applications on the selected computer. If the HP All-in-One is connected directly to a computer with a USB cable, proceed to step 5. 5. Press OK to select the default application to receive the scan, or press to select a different application, and then press OK. A preview image of the scan appears on your computer, where you can edit it. 6. Make any edits to the preview image, and then click Accept when you are finished. Make reprints of your photos You can scan a printed copy of a photo to make reprints in a variety of sizes, up to the size of letter (8.5 x 11 inch) or A4 (210 x 297 mm) paper. By default, the HP All-in-One is set to detect the type of paper you are using automatically. For the best results when reprinting photos, leave the Paper Type set to Automatic, and load photo paper in the HP All-in-One. You should only change the Paper Type if you see print quality issues using the Automatic setting. To scan a photo and reprint it 1. Press Reprints. 2. When prompted, load your original photo print side down on the right front corner of the glass, and then do one of the following: To reprint your original photo using the default print settings ➔ Press Print Photos. Use the HP All-in-One features 62 HP Photosmart C7100 All-in-One series
-
 1
1 -
2
-
3
-
4
-
5
-
6
-
7
-
8
-
9
-
10
-
11
-
12
-
13
-
14
-
15
-
16
-
17
-
18
-
19
-
20
-
21
-
22
-
23
-
24
-
25
-
26
-
27
-
28
-
29
-
30
-
31
-
32
-
33
-
34
-
35
-
36
-
37
-
38
-
39
-
40
-
41
-
42
-
43
-
44
-
45
-
46
-
47
-
48
-
49
-
50
-
51
-
52
-
53
-
54
-
55
-
56
-
57
-
58
-
59
-
 60
60 -
 61
61 -
 62
62 -
 63
63 -
 64
64 -
 65
65 -
 66
66 -
 67
67 -
 68
68 -
 69
69 -
 70
70 -
71
-
72
-
73
-
74
-
75
-
76
-
77
-
78
-
79
-
80
-
81
-
82
-
83
-
84
-
85
-
86
-
87
-
88
-
89
-
90
-
91
-
92
-
93
-
94
-
95
-
96
-
97
-
98
-
99
-
100
-
101
-
102
-
103
-
104
-
105
-
106
-
107
-
108
-
109
-
110
-
111
-
112
-
113
-
114
-
115
-
116
 |
 |
