Lenovo ThinkStation P700 (English) User Guide - ThinkStation P500 (type 30A6, - Page 137
model, you might need to remove the optical drive bracket for easier access to the memory slots. See
 |
View all Lenovo ThinkStation P700 manuals
Add to My Manuals
Save this manual to your list of manuals |
Page 137 highlights
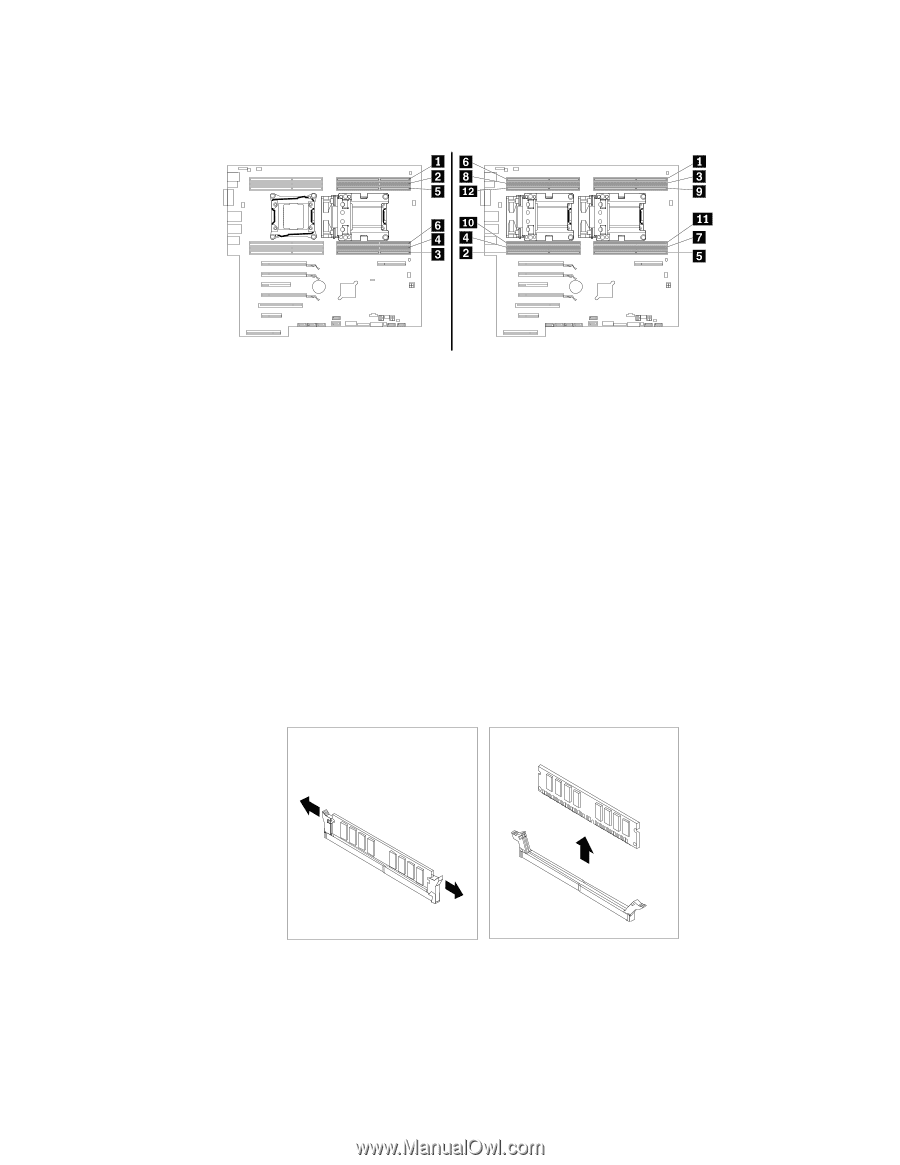
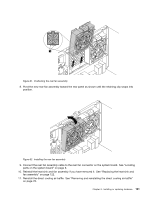
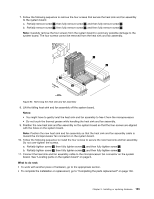
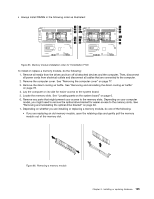
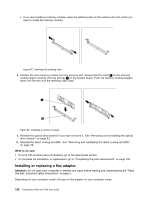
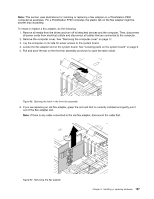
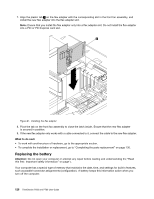
• Always install DIMMs in the following order as illustrated: Figure 85. Memory module installation order for ThinkStation P700 To install or replace a memory module, do the following: 1. Remove all media from the drives and turn off all attached devices and the computer. Then, disconnect all power cords from electrical outlets and disconnect all cables that are connected to the computer. 2. Remove the computer cover. See "Removing the computer cover" on page 77. 3. Remove the direct cooling air baffle. See "Removing and reinstalling the direct cooling air baffle" on page 78. 4. Lay the computer on its side for easier access to the system board. 5. Locate the memory slots. See "Locating parts on the system board" on page 6. 6. Remove any parts that might prevent your access to the memory slots. Depending on your computer model, you might need to remove the optical drive bracket for easier access to the memory slots. See "Removing and reinstalling the optical drive bracket" on page 83. 7. Depending on whether you are installing or replacing a memory module, do one of the following: • If you are replacing an old memory module, open the retaining clips and gently pull the memory module out of the memory slot. Figure 86. Removing a memory module Chapter 9. Installing or replacing hardware 125
-
 1
1 -
2
-
3
-
4
-
5
-
6
-
7
-
8
-
9
-
10
-
11
-
12
-
13
-
14
-
15
-
16
-
17
-
18
-
19
-
20
-
21
-
22
-
23
-
24
-
25
-
26
-
27
-
28
-
29
-
30
-
31
-
32
-
33
-
34
-
35
-
36
-
37
-
38
-
39
-
40
-
41
-
42
-
43
-
44
-
45
-
46
-
47
-
48
-
49
-
50
-
51
-
52
-
53
-
54
-
55
-
56
-
57
-
58
-
59
-
60
-
61
-
62
-
63
-
64
-
65
-
66
-
67
-
68
-
69
-
70
-
71
-
72
-
73
-
74
-
75
-
76
-
77
-
78
-
79
-
80
-
81
-
82
-
83
-
84
-
85
-
86
-
87
-
88
-
89
-
90
-
91
-
92
-
93
-
94
-
95
-
96
-
97
-
98
-
99
-
100
-
101
-
102
-
103
-
104
-
105
-
106
-
107
-
108
-
109
-
110
-
111
-
112
-
113
-
114
-
115
-
116
-
117
-
118
-
119
-
120
-
121
-
122
-
123
-
124
-
125
-
126
-
127
-
128
-
129
-
130
-
131
-
 132
132 -
 133
133 -
 134
134 -
 135
135 -
 136
136 -
 137
137 -
 138
138 -
 139
139 -
 140
140 -
 141
141 -
 142
142 -
143
-
144
-
145
-
146
-
147
-
148
-
149
-
150
-
151
-
152
-
153
-
154
-
155
-
156
-
157
-
158
-
159
-
160
-
161
-
162
-
163
-
164
-
165
-
166
-
167
-
168
-
169
-
170
 |
 |