Netgear GS728TPP GS728TP/GS728TPP/GS752TP Software Administration Manual - Page 160
Con RADIUS Settings, Global Configuration
 |
View all Netgear GS728TPP manuals
Add to My Manuals
Save this manual to your list of manuals |
Page 160 highlights
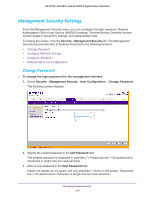
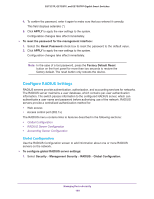
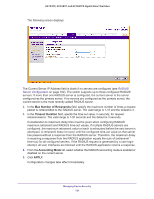
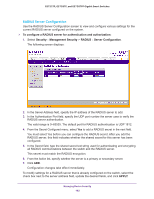
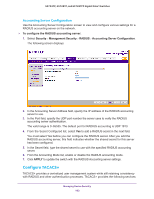
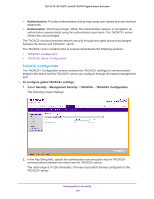
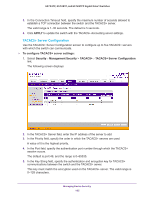
GS752TP, GS728TP, and GS728TPP Gigabit Smart Switches 4. To confirm the password, enter it again to make sure that you entered it correctly. This field displays asterisks (*) 5. Click APPLY to apply the new settings to the system. Configuration changes take effect immediately. To reset the password for the management interface: 1. Select the Reset Password check box to reset the password to the default value. 2. Click APPLY to apply the new settings to the system. Configuration changes take effect immediately. Note: In the case of a lost password, press the Factory Default Reset button on the front panel for more than two seconds to restore the factory default. The reset button only reboots the device. Configure RADIUS Settings RADIUS servers provide authentication, authorization, and accounting services for networks. The RADIUS server maintains a user database, which contains per-user authentication information. The switch passes information to the configured RADIUS server, which can authenticate a user name and password before authorizing use of the network. RADIUS servers provide a centralized authentication method for: • Web access • Access control port (802.1x) The RADIUS menu contains links to features described in the following sections: • Global Configuration • RADIUS Server Configuration • Accounting Server Configuration Global Configuration Use the RADIUS Configuration screen to add information about one or more RADIUS servers on the network. To configure global RADIUS server settings: 1. Select Security Management Security RADIUS Global Configuration. Managing Device Security 160
-
 1
1 -
2
-
3
-
4
-
5
-
6
-
7
-
8
-
9
-
10
-
11
-
12
-
13
-
14
-
15
-
16
-
17
-
18
-
19
-
20
-
21
-
22
-
23
-
24
-
25
-
26
-
27
-
28
-
29
-
30
-
31
-
32
-
33
-
34
-
35
-
36
-
37
-
38
-
39
-
40
-
41
-
42
-
43
-
44
-
45
-
46
-
47
-
48
-
49
-
50
-
51
-
52
-
53
-
54
-
55
-
56
-
57
-
58
-
59
-
60
-
61
-
62
-
63
-
64
-
65
-
66
-
67
-
68
-
69
-
70
-
71
-
72
-
73
-
74
-
75
-
76
-
77
-
78
-
79
-
80
-
81
-
82
-
83
-
84
-
85
-
86
-
87
-
88
-
89
-
90
-
91
-
92
-
93
-
94
-
95
-
96
-
97
-
98
-
99
-
100
-
101
-
102
-
103
-
104
-
105
-
106
-
107
-
108
-
109
-
110
-
111
-
112
-
113
-
114
-
115
-
116
-
117
-
118
-
119
-
120
-
121
-
122
-
123
-
124
-
125
-
126
-
127
-
128
-
129
-
130
-
131
-
132
-
133
-
134
-
135
-
136
-
137
-
138
-
139
-
140
-
141
-
142
-
143
-
144
-
145
-
146
-
147
-
148
-
149
-
150
-
151
-
152
-
153
-
154
-
 155
155 -
 156
156 -
 157
157 -
 158
158 -
 159
159 -
 160
160 -
 161
161 -
 162
162 -
 163
163 -
 164
164 -
 165
165 -
166
-
167
-
168
-
169
-
170
-
171
-
172
-
173
-
174
-
175
-
176
-
177
-
178
-
179
-
180
-
181
-
182
-
183
-
184
-
185
-
186
-
187
-
188
-
189
-
190
-
191
-
192
-
193
-
194
-
195
-
196
-
197
-
198
-
199
-
200
-
201
-
202
-
203
-
204
-
205
-
206
-
207
-
208
-
209
-
210
-
211
-
212
-
213
-
214
-
215
-
216
-
217
-
218
-
219
-
220
-
221
-
222
-
223
-
224
-
225
-
226
-
227
-
228
-
229
-
230
-
231
-
232
-
233
-
234
-
235
-
236
-
237
-
238
-
239
-
240
-
241
-
242
-
243
-
244
-
245
-
246
-
247
-
248
-
249
-
250
-
251
-
252
-
253
-
254
-
255
-
256
-
257
-
258
-
259
-
260
-
261
-
262
-
263
-
264
-
265
-
266
-
267
-
268
-
269
-
270
-
271
-
272
-
273
-
274
-
275
 |
 |