Netgear GS748Tv4 GS748Tv4 Software Administration Manual - Page 225
HTTP File Upload, the TFTP Server Address field
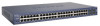 |
View all Netgear GS748Tv4 manuals
Add to My Manuals
Save this manual to your list of manuals |
Page 225 highlights
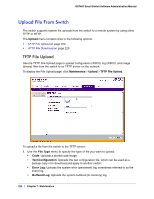
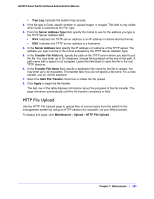
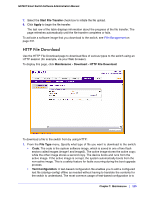
GS748T Smart Switch Software Administration Manual • Trap Log: Uploads the system trap records. 2. If the file type is Code, specify whether to upload image1 or image2. This field is only visible when Code is selected as the File Type. 3. From the Server Address Type filed, specify the format to use for the address you type in the TFTP Server Address field: • IPv4. Indicates the TFTP server address is an IP address in dotted-decimal format. • DNS. Indicates the TFTP server address is a hostname. 4. In the Server Address field, specify the IP address or hostname of the TFTP server. The address you type must be in the format indicated by the TFTP Server Address Type. 5. In the Transfer File Path field, specify the path on the TFTP server where you want to put the file. You may enter up to 32 characters. Include the backslash at the end of the path. A path name with a space is not accepted. Leave this field blank to save the file to the root TFTP directory. 6. In the Transfer File Name field, specify a destination file name for the file to upload. You may enter up to 32 characters. The transfer fails if you do not specify a file name. For a code transfer, use an .stk file extension. 7. Select the Start File Transfer check box to initiate the file upload. 8. Click Apply to begin the file transfer. The last row of the table displays information about the progress of the file transfer. The page refreshes automatically until the file transfer completes or fails. HTTP File Upload Use the HTTP File Upload page to upload files of various types from the switch to the management system by using an HTTP session (for example, via your Web browser). To display this page, click Maintenance > Upload > HTTP File Upload. Chapter 7: Maintenance | 225
-
 1
1 -
2
-
3
-
4
-
5
-
6
-
7
-
8
-
9
-
10
-
11
-
12
-
13
-
14
-
15
-
16
-
17
-
18
-
19
-
20
-
21
-
22
-
23
-
24
-
25
-
26
-
27
-
28
-
29
-
30
-
31
-
32
-
33
-
34
-
35
-
36
-
37
-
38
-
39
-
40
-
41
-
42
-
43
-
44
-
45
-
46
-
47
-
48
-
49
-
50
-
51
-
52
-
53
-
54
-
55
-
56
-
57
-
58
-
59
-
60
-
61
-
62
-
63
-
64
-
65
-
66
-
67
-
68
-
69
-
70
-
71
-
72
-
73
-
74
-
75
-
76
-
77
-
78
-
79
-
80
-
81
-
82
-
83
-
84
-
85
-
86
-
87
-
88
-
89
-
90
-
91
-
92
-
93
-
94
-
95
-
96
-
97
-
98
-
99
-
100
-
101
-
102
-
103
-
104
-
105
-
106
-
107
-
108
-
109
-
110
-
111
-
112
-
113
-
114
-
115
-
116
-
117
-
118
-
119
-
120
-
121
-
122
-
123
-
124
-
125
-
126
-
127
-
128
-
129
-
130
-
131
-
132
-
133
-
134
-
135
-
136
-
137
-
138
-
139
-
140
-
141
-
142
-
143
-
144
-
145
-
146
-
147
-
148
-
149
-
150
-
151
-
152
-
153
-
154
-
155
-
156
-
157
-
158
-
159
-
160
-
161
-
162
-
163
-
164
-
165
-
166
-
167
-
168
-
169
-
170
-
171
-
172
-
173
-
174
-
175
-
176
-
177
-
178
-
179
-
180
-
181
-
182
-
183
-
184
-
185
-
186
-
187
-
188
-
189
-
190
-
191
-
192
-
193
-
194
-
195
-
196
-
197
-
198
-
199
-
200
-
201
-
202
-
203
-
204
-
205
-
206
-
207
-
208
-
209
-
210
-
211
-
212
-
213
-
214
-
215
-
216
-
217
-
218
-
219
-
 220
220 -
 221
221 -
 222
222 -
 223
223 -
 224
224 -
 225
225 -
 226
226 -
 227
227 -
 228
228 -
 229
229 -
 230
230 -
231
-
232
-
233
-
234
-
235
-
236
-
237
-
238
-
239
-
240
-
241
-
242
-
243
-
244
-
245
-
246
-
247
-
248
-
249
-
250
-
251
-
252
-
253
-
254
-
255
-
256
-
257
-
258
-
259
-
260
-
261
-
262
-
263
-
264
-
265
-
266
-
267
-
268
-
269
-
270
-
271
-
272
-
273
 |
 |