Netgear GS748Tv4 GS748Tv4 Software Administration Manual - Page 90
Voice VLAN Port Setting, Voice VLAN Aging Time, Cancel, Apply, Switching, Voice VLAN, Advanced
 |
View all Netgear GS748Tv4 manuals
Add to My Manuals
Save this manual to your list of manuals |
Page 90 highlights
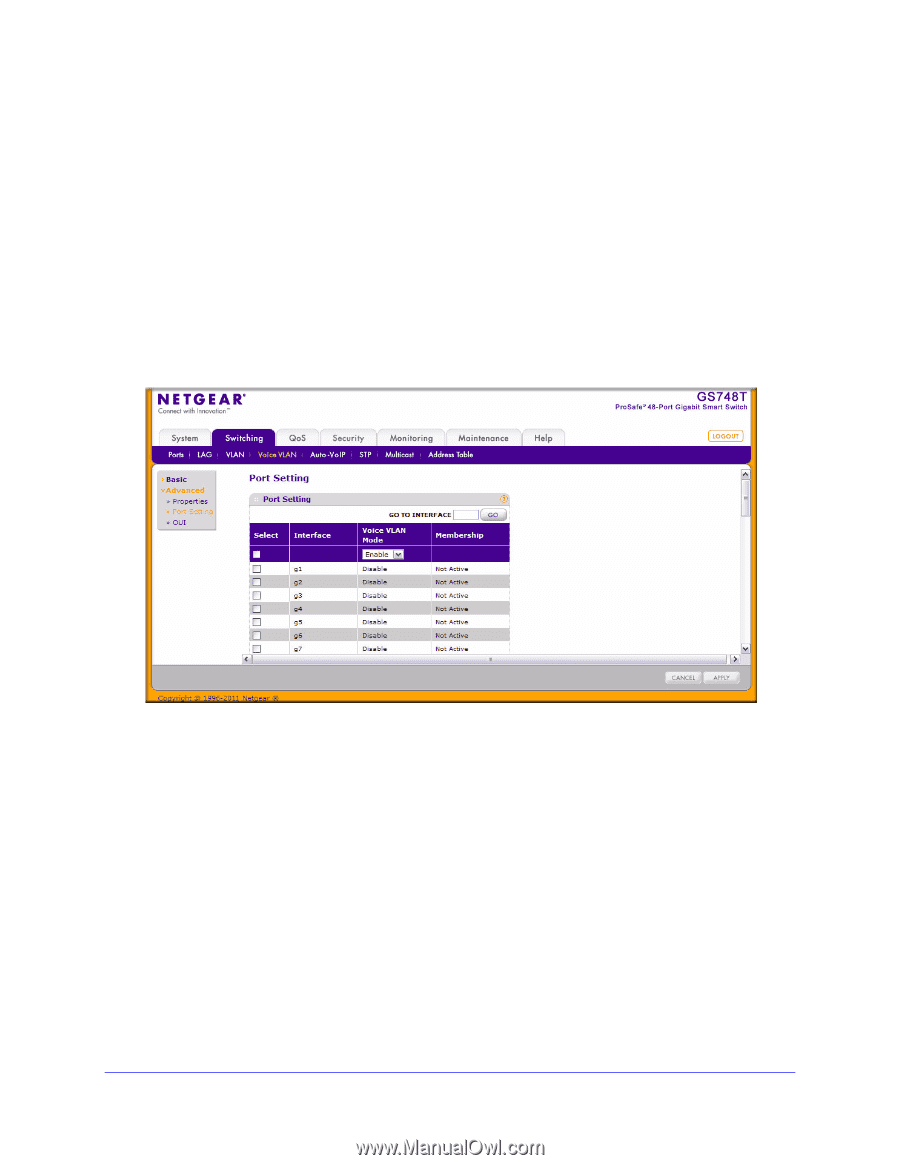
GS748T Smart Switch Software Administration Manual 5. From the Voice VLAN Aging Time field, specify the amount of time after the last IP phone's OUI is aged out for a specific port. The port will age out after the bridge and voice aging time. 6. Click Cancel to cancel the configuration on the screen and reset the data on the screen to the latest value of the switch. 7. If you make any changes to this page, click Apply to send the updated configuration to the switch. Voice VLAN Port Setting To display the Voice VLAN Port Setting page, click Switching > Voice VLAN > Advanced > Port Setting. To configure Voice VLAN port settings: 1. Select the check box next to the port to configure. You can select multiple check boxes to apply the same setting to all selected ports. 2. From the Voice VLAN Mode menu, specify whether to enable or disable Voice VLAN on the selected port. 3. From the Voice VLAN Security menu, specify whether to enable or disable Voice VLAN security on the selected port. 4. Click Cancel to cancel the configuration on the screen and reset the data on the screen to the latest value of the switch. 5. If you make any changes to this page, click Apply to send the updated configuration to the switch. 90 | Chapter 3: Configuring Switching Information
-
 1
1 -
2
-
3
-
4
-
5
-
6
-
7
-
8
-
9
-
10
-
11
-
12
-
13
-
14
-
15
-
16
-
17
-
18
-
19
-
20
-
21
-
22
-
23
-
24
-
25
-
26
-
27
-
28
-
29
-
30
-
31
-
32
-
33
-
34
-
35
-
36
-
37
-
38
-
39
-
40
-
41
-
42
-
43
-
44
-
45
-
46
-
47
-
48
-
49
-
50
-
51
-
52
-
53
-
54
-
55
-
56
-
57
-
58
-
59
-
60
-
61
-
62
-
63
-
64
-
65
-
66
-
67
-
68
-
69
-
70
-
71
-
72
-
73
-
74
-
75
-
76
-
77
-
78
-
79
-
80
-
81
-
82
-
83
-
84
-
 85
85 -
 86
86 -
 87
87 -
 88
88 -
 89
89 -
 90
90 -
 91
91 -
 92
92 -
 93
93 -
 94
94 -
 95
95 -
96
-
97
-
98
-
99
-
100
-
101
-
102
-
103
-
104
-
105
-
106
-
107
-
108
-
109
-
110
-
111
-
112
-
113
-
114
-
115
-
116
-
117
-
118
-
119
-
120
-
121
-
122
-
123
-
124
-
125
-
126
-
127
-
128
-
129
-
130
-
131
-
132
-
133
-
134
-
135
-
136
-
137
-
138
-
139
-
140
-
141
-
142
-
143
-
144
-
145
-
146
-
147
-
148
-
149
-
150
-
151
-
152
-
153
-
154
-
155
-
156
-
157
-
158
-
159
-
160
-
161
-
162
-
163
-
164
-
165
-
166
-
167
-
168
-
169
-
170
-
171
-
172
-
173
-
174
-
175
-
176
-
177
-
178
-
179
-
180
-
181
-
182
-
183
-
184
-
185
-
186
-
187
-
188
-
189
-
190
-
191
-
192
-
193
-
194
-
195
-
196
-
197
-
198
-
199
-
200
-
201
-
202
-
203
-
204
-
205
-
206
-
207
-
208
-
209
-
210
-
211
-
212
-
213
-
214
-
215
-
216
-
217
-
218
-
219
-
220
-
221
-
222
-
223
-
224
-
225
-
226
-
227
-
228
-
229
-
230
-
231
-
232
-
233
-
234
-
235
-
236
-
237
-
238
-
239
-
240
-
241
-
242
-
243
-
244
-
245
-
246
-
247
-
248
-
249
-
250
-
251
-
252
-
253
-
254
-
255
-
256
-
257
-
258
-
259
-
260
-
261
-
262
-
263
-
264
-
265
-
266
-
267
-
268
-
269
-
270
-
271
-
272
-
273
 |
 |