Netgear GS748Tv4 GS748Tv4 Software Administration Manual - Page 50
Delete, Apply, Cancel, Refresh, Clear, Configuring System Information
 |
View all Netgear GS748Tv4 manuals
Add to My Manuals
Save this manual to your list of manuals |
Page 50 highlights
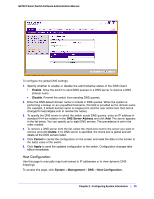
GS748T Smart Switch Software Administration Manual To add a static entry to the local DNS table: 1. Specify the static host name to add. Enter up to 158 characters. 2. Specify the IP address in standard IPv4 dot notation to associate with the hostname. 3. Click Add. The entry appears in the list below. 4. To remove an entry from the static DNS table, select the check box next to the entry and click Delete. 5. To change the hostname or IP address in an entry, select the check box next to the entry and enter the new information in the appropriate field, and then click Apply. 6. Click Cancel to cancel the configuration on the screen and reset the data on the screen to the latest value of the switch. The Dynamic Host Configuration table shows host name-to-IP address entries that the switch has learned. The following table describes the dynamic host fields: Field Host Description Lists the host name you assign to the specified IP address. Total Elapsed Amount of time since the dynamic entry was first added to the table. Amount of time since the dynamic entry was last updated. Type Addresses The type of the dynamic entry. Lists the IP address associated with the host name. Click Refresh to refresh the table with the most current data from the switch. Click Clear to delete Dynamic Host Entries. The table will be repopulated with entries as they are learned. 50 | Chapter 2: Configuring System Information
-
 1
1 -
2
-
3
-
4
-
5
-
6
-
7
-
8
-
9
-
10
-
11
-
12
-
13
-
14
-
15
-
16
-
17
-
18
-
19
-
20
-
21
-
22
-
23
-
24
-
25
-
26
-
27
-
28
-
29
-
30
-
31
-
32
-
33
-
34
-
35
-
36
-
37
-
38
-
39
-
40
-
41
-
42
-
43
-
44
-
 45
45 -
 46
46 -
 47
47 -
 48
48 -
 49
49 -
 50
50 -
 51
51 -
 52
52 -
 53
53 -
 54
54 -
 55
55 -
56
-
57
-
58
-
59
-
60
-
61
-
62
-
63
-
64
-
65
-
66
-
67
-
68
-
69
-
70
-
71
-
72
-
73
-
74
-
75
-
76
-
77
-
78
-
79
-
80
-
81
-
82
-
83
-
84
-
85
-
86
-
87
-
88
-
89
-
90
-
91
-
92
-
93
-
94
-
95
-
96
-
97
-
98
-
99
-
100
-
101
-
102
-
103
-
104
-
105
-
106
-
107
-
108
-
109
-
110
-
111
-
112
-
113
-
114
-
115
-
116
-
117
-
118
-
119
-
120
-
121
-
122
-
123
-
124
-
125
-
126
-
127
-
128
-
129
-
130
-
131
-
132
-
133
-
134
-
135
-
136
-
137
-
138
-
139
-
140
-
141
-
142
-
143
-
144
-
145
-
146
-
147
-
148
-
149
-
150
-
151
-
152
-
153
-
154
-
155
-
156
-
157
-
158
-
159
-
160
-
161
-
162
-
163
-
164
-
165
-
166
-
167
-
168
-
169
-
170
-
171
-
172
-
173
-
174
-
175
-
176
-
177
-
178
-
179
-
180
-
181
-
182
-
183
-
184
-
185
-
186
-
187
-
188
-
189
-
190
-
191
-
192
-
193
-
194
-
195
-
196
-
197
-
198
-
199
-
200
-
201
-
202
-
203
-
204
-
205
-
206
-
207
-
208
-
209
-
210
-
211
-
212
-
213
-
214
-
215
-
216
-
217
-
218
-
219
-
220
-
221
-
222
-
223
-
224
-
225
-
226
-
227
-
228
-
229
-
230
-
231
-
232
-
233
-
234
-
235
-
236
-
237
-
238
-
239
-
240
-
241
-
242
-
243
-
244
-
245
-
246
-
247
-
248
-
249
-
250
-
251
-
252
-
253
-
254
-
255
-
256
-
257
-
258
-
259
-
260
-
261
-
262
-
263
-
264
-
265
-
266
-
267
-
268
-
269
-
270
-
271
-
272
-
273
 |
 |
