Nokia n95 8gb User Guide - Page 66
Video recording, Video capture indicators, Record videos
 |
UPC - 758478012215
View all Nokia n95 8gb manuals
Add to My Manuals
Save this manual to your list of manuals |
Page 66 highlights
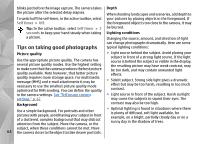
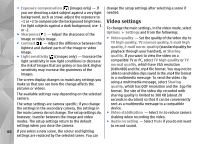
Video recording To activate the main camera, press and hold the capture key, or press , and select Applications > Camera > Options > Video mode . Video capture indicators The video viewfinder displays the following: 7 - Total available video recording time. When you are recording, the current video length indicator also shows the elapsed time and time remaining. 8 - The device memory ( ) and mass memory ( ) indicators that show where videos are saved 9 - The video stabilisation is turned on ( ). See "Video settings," p. 68. To display all viewfinder indicators, select Options > Show icons. Select Hide icons to display only the video status indicators, and during the recording, the available record time, zoom bar when zooming, and the selection keys. Record videos Before recording a video, note the following: ● To make lighting and colour adjustments, scroll 1 - Capture mode indicator through the active toolbar. See "Setup settings- 2 - Audio mute on indicator adjust colour and lighting," p. 67. See 3 - Active toolbar. The toolbar is not displayed during "Scenes," p. 63. recording. See "Active toolbar," p. 60. ● To free memory for new video clips, you can back up 4 - The battery charge level indicator 5 - Video quality indicator that indicates whether the quality of the video is TV high quality, TV normal quality, E-mail high quality, E-mail norm. quality, or Sharing quality files to a compatible PC using a compatible USB data cable, for example. The device informs you when the memory is full, and asks whether you want to change the memory in use. To record a video, do the following: 6 - The video clip file type 1. If the camera is in the image mode, select the video mode from the active toolbar. 65
-
 1
1 -
2
-
3
-
4
-
5
-
6
-
7
-
8
-
9
-
10
-
11
-
12
-
13
-
14
-
15
-
16
-
17
-
18
-
19
-
20
-
21
-
22
-
23
-
24
-
25
-
26
-
27
-
28
-
29
-
30
-
31
-
32
-
33
-
34
-
35
-
36
-
37
-
38
-
39
-
40
-
41
-
42
-
43
-
44
-
45
-
46
-
47
-
48
-
49
-
50
-
51
-
52
-
53
-
54
-
55
-
56
-
57
-
58
-
59
-
60
-
 61
61 -
 62
62 -
 63
63 -
 64
64 -
 65
65 -
 66
66 -
 67
67 -
 68
68 -
 69
69 -
 70
70 -
 71
71 -
72
-
73
-
74
-
75
-
76
-
77
-
78
-
79
-
80
-
81
-
82
-
83
-
84
-
85
-
86
-
87
-
88
-
89
-
90
-
91
-
92
-
93
-
94
-
95
-
96
-
97
-
98
-
99
-
100
-
101
-
102
-
103
-
104
-
105
-
106
-
107
-
108
-
109
-
110
-
111
-
112
-
113
-
114
-
115
-
116
-
117
-
118
-
119
-
120
-
121
-
122
-
123
-
124
-
125
-
126
-
127
-
128
-
129
-
130
-
131
-
132
-
133
-
134
-
135
-
136
-
137
-
138
-
139
-
140
-
141
-
142
-
143
-
144
-
145
-
146
-
147
-
148
-
149
-
150
-
151
-
152
-
153
-
154
-
155
-
156
-
157
-
158
-
159
-
160
-
161
-
162
-
163
 |
 |