Nokia n95 8gb User Guide - Page 69
Video settings, E-mail high
 |
UPC - 758478012215
View all Nokia n95 8gb manuals
Add to My Manuals
Save this manual to your list of manuals |
Page 69 highlights
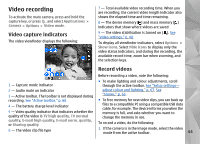
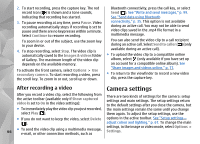
● Exposure compensation ( ) (images only) - If you are shooting a dark subject against a very light background, such as snow, adjust the exposure to +1 or +2 to compensate the background brightness. For light subjects against a dark background, use -1 or -2. ● Sharpness ( ) - Adjust the sharpness of the image or video image. ● Contrast ( ) - Adjust the difference between the lightest and darkest parts of the image or video image. ● Light sensitivity ( ) (images only) - Increase the light sensitivity in low light conditions to decrease the risk of images that are grainy or too dark. Higher sensitivity may increase the graininess of the images. The screen display changes to match any settings you make so that you see how the change affects the pictures or videos. The available settings vary depending on the selected camera. The setup settings are camera specific; if you change the settings in the secondary camera, the settings in the main camera do not change. The setup settings do, however, transfer between the image and video modes. The setup settings return to the default settings when you close the camera. change the setup settings after selecting a scene if needed. Video settings To change the main settings, in the video mode, select Options > Settings and from the following: ● Video quality - Set the quality of the video clip to TV high quality, TV normal quality, E-mail high quality, E-mail norm. quality (standard quality for playback through your handset), or Sharing quality. If you want to view the video on a compatible TV or PC, select TV high quality or TV normal quality, which have VGA resolution (640x480) and the .mp4 file format. You may not be able to send video clips saved in the .mp4 file format in a multimedia message. To send the video clip using a multimedia message, select Sharing quality, which has QCIF resolution and the .3gp file format. The size of the video clip recorded with sharing quality is limited to 300 KB (about 20 seconds in duration) so that it can be conveniently sent as a multimedia message to a compatible device. ● Video stabilisation - Select On to reduce camera shaking when recording the video. ● Audio recording - Select Mute if you do not want to record sound. 68 If you select a new scene, the colour and lighting settings are replaced by the selected scene. You can
-
 1
1 -
2
-
3
-
4
-
5
-
6
-
7
-
8
-
9
-
10
-
11
-
12
-
13
-
14
-
15
-
16
-
17
-
18
-
19
-
20
-
21
-
22
-
23
-
24
-
25
-
26
-
27
-
28
-
29
-
30
-
31
-
32
-
33
-
34
-
35
-
36
-
37
-
38
-
39
-
40
-
41
-
42
-
43
-
44
-
45
-
46
-
47
-
48
-
49
-
50
-
51
-
52
-
53
-
54
-
55
-
56
-
57
-
58
-
59
-
60
-
61
-
62
-
63
-
 64
64 -
 65
65 -
 66
66 -
 67
67 -
 68
68 -
 69
69 -
 70
70 -
 71
71 -
 72
72 -
 73
73 -
 74
74 -
75
-
76
-
77
-
78
-
79
-
80
-
81
-
82
-
83
-
84
-
85
-
86
-
87
-
88
-
89
-
90
-
91
-
92
-
93
-
94
-
95
-
96
-
97
-
98
-
99
-
100
-
101
-
102
-
103
-
104
-
105
-
106
-
107
-
108
-
109
-
110
-
111
-
112
-
113
-
114
-
115
-
116
-
117
-
118
-
119
-
120
-
121
-
122
-
123
-
124
-
125
-
126
-
127
-
128
-
129
-
130
-
131
-
132
-
133
-
134
-
135
-
136
-
137
-
138
-
139
-
140
-
141
-
142
-
143
-
144
-
145
-
146
-
147
-
148
-
149
-
150
-
151
-
152
-
153
-
154
-
155
-
156
-
157
-
158
-
159
-
160
-
161
-
162
-
163
 |
 |
