Panasonic WJ-HD716/1000 Installation Guide - Page 115
Step 5, Step 6, OnDepth, Step 8
 |
View all Panasonic WJ-HD716/1000 manuals
Add to My Manuals
Save this manual to your list of manuals |
Page 115 highlights
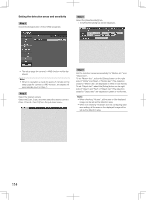
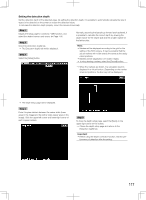
Step 5 Set the start point of the detection area. Move the cursor to the desired start point, and click the mouse button. Note: • To delete a set detection area, select the [Area delete] tab on the setup page for camera's i-VMD function, and click the [Delete] button of the area (White/Blue/Green/ Red) to be deleted. Step 6 Set the end point of the detection area. Move the cursor to the desired end point, and click the mouse button. To determine the detection area, select the [Back] button. Step 7 Set the size of an object to be detected ("Size"). It is possible to apply the setting to "Motion det." and "Object det." respectively. Off: Detects any moving objects regardless of the size. Small/Medium/Large: Determines the minimum size of an object to be detected by the SD5Link camera. On(Depth): Enables the depth correction function of the SD5 camera. Refer to page 117 for further information about how to set the detection depth. Note: • Detection areas will be set according to the grid for the detection areas of the SD5 camera. It may be possible that the actual detection areas will not be exactly the same as the designated start and end points. • Up to 2 areas for "Motion det." and "Object det." respectively by repeating Step 4 to 6. Step 8 Select the detection sensitivity of the detection areas set for "Motion det.". Low: Low sensitivity Mid: Standard sensitivity High: High sensitivity 115
-
 1
1 -
2
-
3
-
4
-
5
-
6
-
7
-
8
-
9
-
10
-
11
-
12
-
13
-
14
-
15
-
16
-
17
-
18
-
19
-
20
-
21
-
22
-
23
-
24
-
25
-
26
-
27
-
28
-
29
-
30
-
31
-
32
-
33
-
34
-
35
-
36
-
37
-
38
-
39
-
40
-
41
-
42
-
43
-
44
-
45
-
46
-
47
-
48
-
49
-
50
-
51
-
52
-
53
-
54
-
55
-
56
-
57
-
58
-
59
-
60
-
61
-
62
-
63
-
64
-
65
-
66
-
67
-
68
-
69
-
70
-
71
-
72
-
73
-
74
-
75
-
76
-
77
-
78
-
79
-
80
-
81
-
82
-
83
-
84
-
85
-
86
-
87
-
88
-
89
-
90
-
91
-
92
-
93
-
94
-
95
-
96
-
97
-
98
-
99
-
100
-
101
-
102
-
103
-
104
-
105
-
106
-
107
-
108
-
109
-
 110
110 -
 111
111 -
 112
112 -
 113
113 -
 114
114 -
 115
115 -
 116
116 -
 117
117 -
 118
118 -
 119
119 -
 120
120 -
121
-
122
-
123
-
124
-
125
-
126
-
127
-
128
-
129
-
130
-
131
-
132
-
133
-
134
-
135
-
136
-
137
-
138
-
139
-
140
-
141
-
142
-
143
-
144
-
145
-
146
-
147
-
148
-
149
-
150
-
151
-
152
-
153
-
154
-
155
-
156
 |
 |
