Panasonic WJ-HD716/1000 Installation Guide - Page 27
Operations flow
 |
View all Panasonic WJ-HD716/1000 manuals
Add to My Manuals
Save this manual to your list of manuals |
Page 27 highlights
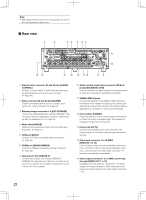
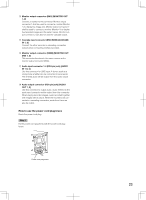
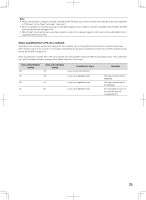
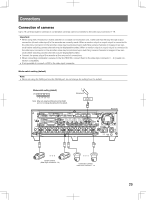
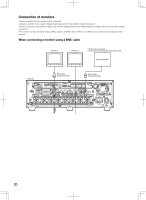
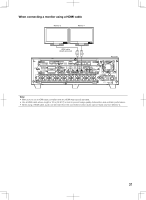
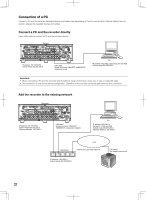
Operations flow The operation flow of the recorder is as follows. z Rack mounting (☞ Page 28) x Connections (☞ Page 29) c Installation of the hard disk drives (☞ Page 52) v Determination of the operational mode (☞ Page 54) b Startup (☞ Page 55) n Configuration of the settings for the quick setup. (☞ Page 63) z Install the recorder in the rack. Go to step x when not installing it in the rack. x Connect the recorder to each device. When using an optional extension unit, install hard disk drives in the optional extension unit (WJ-HDE400) and connect to the recorder. (☞ Page 33) c Install hard disk drives in the recorder. When using an optional RAID board (WJ-HDB601) or an optional DVD drive (WJ-HDB611), install it. v Reboot the recorder after determining the operational mode if necessary such when using the RAID function. When not installing an optional RAID board (WJ-HDB601), go to step 5. b Turn on the power of the recorder. When using optional extension units (WJ-HDE400), turn the power of all the extension units before turning on the power of the recorder. n Configure the settings such as the current time and date setting, schedule recording settings, etc. m Configuration of the recording area setting of the hard disk drives. (☞ Page 126) , Setup (☞ Page 57) m Change the recording area setting or format the recording area of the hard disk drive if necessary such when it is necessary to assign the event recording area to the hard disk drive. , Configure the settings required for operation. ➜➜➜ Start operation When necessary . Replacement/addition of hard disk drives (☞ Page 133) The hard disk drives can be formatted/replaced without turning off the power of the recorder even when one of them becomes faulty. 27
-
 1
1 -
2
-
3
-
4
-
5
-
6
-
7
-
8
-
9
-
10
-
11
-
12
-
13
-
14
-
15
-
16
-
17
-
18
-
19
-
20
-
21
-
 22
22 -
 23
23 -
 24
24 -
 25
25 -
 26
26 -
 27
27 -
 28
28 -
 29
29 -
 30
30 -
 31
31 -
 32
32 -
33
-
34
-
35
-
36
-
37
-
38
-
39
-
40
-
41
-
42
-
43
-
44
-
45
-
46
-
47
-
48
-
49
-
50
-
51
-
52
-
53
-
54
-
55
-
56
-
57
-
58
-
59
-
60
-
61
-
62
-
63
-
64
-
65
-
66
-
67
-
68
-
69
-
70
-
71
-
72
-
73
-
74
-
75
-
76
-
77
-
78
-
79
-
80
-
81
-
82
-
83
-
84
-
85
-
86
-
87
-
88
-
89
-
90
-
91
-
92
-
93
-
94
-
95
-
96
-
97
-
98
-
99
-
100
-
101
-
102
-
103
-
104
-
105
-
106
-
107
-
108
-
109
-
110
-
111
-
112
-
113
-
114
-
115
-
116
-
117
-
118
-
119
-
120
-
121
-
122
-
123
-
124
-
125
-
126
-
127
-
128
-
129
-
130
-
131
-
132
-
133
-
134
-
135
-
136
-
137
-
138
-
139
-
140
-
141
-
142
-
143
-
144
-
145
-
146
-
147
-
148
-
149
-
150
-
151
-
152
-
153
-
154
-
155
-
156
 |
 |