Panasonic WJ-HD716/1000 Installation Guide - Page 55
Startup
 |
View all Panasonic WJ-HD716/1000 manuals
Add to My Manuals
Save this manual to your list of manuals |
Page 55 highlights
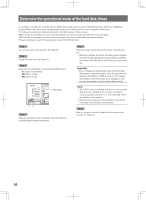
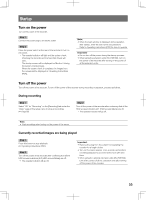
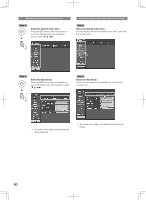
Startup Turn on the power Turn on the power of the recorder. Step 1 Connect the power plug to an electric outlet. Step 2 Press the power switch at the rear of the recorder to turn on the power. → The operate indicator will light and the system check (checking the recorder and the hard disk drives) will start. The startup screen will be displayed on Monitor 2 during the system check process. When the system check is complete, live images from the camera will be displayed (☞ Operating Instructions (PDF)). Note: • When the login window is displayed during operation after startup, enter the user name and password. Refer to Operating Instructions (PDF) for how to operate. Important: • Do not turn off the power during the startup process. • When using the extension units (WJ-HDE400), turn on the power of the recorder after turning on the power of all the extension units. Turn off the power Turn off the power of the recorder. To turn off the power of the recorder during recording or playback, proceed as follows. During recording Step 1 Select "Off" for "Recording" on the [Recording] tab under the "Basic" page of the setup menu to stop all recordings. (☞ Page 68) Step 2 Turn off the power of the recorder after confirming that all the HDD access indicators (A/F (HDD access/failure)) are off. → The operate indicator will go off. Note: • Start recordings after turning on the power of the server. Currently recorded images are being played Step 1 Press this button to stop playback. (☞ Operating Instructions (PDF)) Step 2 Turn off the power of the recorder after confirming that all the HDD access indicators (A/F (HDD access/failure)) are off. → The operate indicator will go off. Important: • Remove the plug from the outlet if not operating the recorder for a length of time. • Turn on the power (approx. once a week), and perform recording/playback to prevent interferences with functions. • When using the optional extension units (WJ-HDE400), turn off the power of all the extension units after turning off the power of the recorder. 55
-
 1
1 -
2
-
3
-
4
-
5
-
6
-
7
-
8
-
9
-
10
-
11
-
12
-
13
-
14
-
15
-
16
-
17
-
18
-
19
-
20
-
21
-
22
-
23
-
24
-
25
-
26
-
27
-
28
-
29
-
30
-
31
-
32
-
33
-
34
-
35
-
36
-
37
-
38
-
39
-
40
-
41
-
42
-
43
-
44
-
45
-
46
-
47
-
48
-
49
-
 50
50 -
 51
51 -
 52
52 -
 53
53 -
 54
54 -
 55
55 -
 56
56 -
 57
57 -
 58
58 -
 59
59 -
 60
60 -
61
-
62
-
63
-
64
-
65
-
66
-
67
-
68
-
69
-
70
-
71
-
72
-
73
-
74
-
75
-
76
-
77
-
78
-
79
-
80
-
81
-
82
-
83
-
84
-
85
-
86
-
87
-
88
-
89
-
90
-
91
-
92
-
93
-
94
-
95
-
96
-
97
-
98
-
99
-
100
-
101
-
102
-
103
-
104
-
105
-
106
-
107
-
108
-
109
-
110
-
111
-
112
-
113
-
114
-
115
-
116
-
117
-
118
-
119
-
120
-
121
-
122
-
123
-
124
-
125
-
126
-
127
-
128
-
129
-
130
-
131
-
132
-
133
-
134
-
135
-
136
-
137
-
138
-
139
-
140
-
141
-
142
-
143
-
144
-
145
-
146
-
147
-
148
-
149
-
150
-
151
-
152
-
153
-
154
-
155
-
156
 |
 |